Disable Twitter vibration on Android (8.0 and up)

Holy CRAP I can’t believe how difficult this was to figure out.

TL;DR: Settings –> Apps & Notifications –> Twitter –> Notifications

Settings –> Apps & Notifications –> Twitter –> Notifications

Now here’s the super crazy part. See all those checkboxes, to turn notifications on or off entirely for various events – Direct Messages, Emergency alerts, etc? Yeah, ignore the checkboxes, and tap the TEXT. Now tap “Behavior”, and set to “Show silently.” You will now continue to get notifications, but stop getting sounds and insanely-irritating vibrations, for each event type you change Behavior on.

Tap event category NAME (NOT checkbox!) –> Behavior –> Show silently

I’ve been suffering from over-vibrating apps, with Twitter being the absolute worst offender, for months. There still weren’t any vaguely decent how-tos today, but I finally pieced it together from vague clues on an androidcentral forum post.


VLANs with KVM guests on Ubuntu 18.04 / netplan

There is a frustrating lack of information on how to set up multiple VLAN interfaces on a KVM host out there. I made my way through it in production today with great applications of thud and blunder; here’s an example of a working 01-netcfg.yaml with multiple VLANs on a single (real) bridge interface, presenting as multiple bridges.

Everything feeds through properly so that you can bring KVM guests up on br0 for the default VLAN, br100 for VLAN 100, or br200 for VLAN 200. Adapt as necessary for whatever VLANs you happen to be using.

# This file describes the network interfaces available on your system
# For more information, see netplan(5).
network:
  version: 2
  renderer: networkd
  ethernets:
    eno1:
      dhcp4: no
      dhcp6: no
    eno2:
      dhcp4: no
      dhcp6: no
  vlans:
    br0.100:
      link: br0
      id: 100
    br0.200:
      link: br0
      id: 200
  bridges:
    br0:
      interfaces:
        - eno1
        - eno2
      dhcp4: no
      dhcp6: no
      addresses: [ 10.0.0.2/24 ]
      gateway4: 10.0.0.1
      nameservers:
        addresses: [ 8.8.8.8,1.1.1.1 ]
    br100:
      interfaces:
        - br0.100
      dhcp4: no
      dhcp6: no
      addresses: [ 10.0.100.1/24 ]
    br200:
      interfaces:
        - br0.200
      dhcp4: no
      dhcp6: no
      addresses: [ 10.0.200.1/24 ]

ZFS write allocation in 0.7.x

In an earlier post, I demonstrated why you shouldn’t mix rust and SSDs – reads on your pool bind at the speed of the slowest vdev; effectively making SSDs in a pool containing rust little more than extremely small, expensive rust disks themselves.  That post was a follow-up to an even earlier post demonstrating that – as of 0.6.x – ZFS did not allocate writes to the lowest latency vdev.

An update to the Storage Pool Allocator (SPA) has changed the original write behavior; as of 0.7.0 (and Ubuntu Bionic includes 0.7.5) writes really are allocated to the lowest-latency vdev in the pool. To test this, I created a throwaway pool on a system with both rust and SSD devices on board. This isn’t the cleanest test possible – the vdevs are actually sparse files created on, respectively, an SSD mdraid1 and another pool consisting of on rust mirror vdev. It’s good enough for government work, though, so let’s see how small-block random write operations are allocated when you’ve got one rust vdev and one SSD vdev:

root@demo0:/tmp# zpool create -oashift=12 test /tmp/rust.bin /tmp/ssd.bin
root@demo0:/tmp# zfs set compression=off test

root@demo0:/tmp# fio --name=write --ioengine=sync --rw=randwrite \
--bs=16K --size=1G --numjobs=1 --end_fsync=1

[...]

Run status group 0 (all jobs):
WRITE: bw=204MiB/s (214MB/s), 204MiB/s-204MiB/s (214MB/s-214MB/s),
io=1024MiB (1074MB), run=5012-5012msec

root@demo0:/tmp# du -h /tmp/ssd.bin ; du -h /tmp/rust.bin
1.8M /tmp/ssd.bin
237K /tmp/rust.bin

Couldn’t be much clearer – 204 MB/sec is higher throughput than a single rust mirror can manage for 16K random writes, and almost 90% of the write operations were committed to the SSD side. So the SPA updates in 0.7.0 work as intended – when pushed to the limit, ZFS will now allocate far more of its writes to the fastest vdevs available in the pool.

I italicized that for a reason, of course. When you don’t push ZFS hard with synchronous, small-block writes like we did with fio above, it still allocates according to free space available. To demonstrate this, we’ll destroy and recreate our hybrid test pool – and this time, we’ll write a GB or so of random data sequentially and asynchronously, using openssl to rapidly generate pseudo-random data, which we’ll pipe through pv into a file on our pool.

root@demo0:/tmp# zpool create -oashift=12 test /tmp/rust.bin /tmp/ssd.bin root@demo0:/tmp# zfs set compression=off test 

root@demo0:~# openssl enc -aes-256-ctr -pass \
              pass:"$(dd if=/dev/urandom bs=128 \
                    count=1 2>/dev/null | base64)" \
              -nosalt < /dev/zero | pv > /test/randomfile.bin

 1032MiB 0:00:04 [ 370MiB/s] [    <=>                 ] ^C

root@demo0:~# du -h /tmp/*bin
571M /tmp/rust.bin
627M /tmp/ssd.bin

Although we wrote our pseudorandom data very rapidly to the pool, in this case we did so sequentially and asynchronously, rather than in small random access blocks and synchronously. And in this case, our writes were committed near-equally to each vdev, despite one being immensely faster than the other.

Please note that this describes the SPA’s behavior when allocating writes at the pool level – it has nothing at all to do with the behavior of individual vdevs which have both rust and SSD member devices. My recent test of half-rust/half-SSD mirror vdevs was also run on Bionic with ZFS 0.7.5, and demonstrated conclusively that even read behavior inside a vdev doesn’t favor lower-latency devices, let alone write behavior.

The new SPA code is great, and it absolutely does improve write performance on IOPS-saturated pools. However, it is not intended to enable the undying dream of mixing rust and SSD storage willy-nilly, and if you try to do so anyway, you’re gonna have a bad time.

I still do not recommend mixing SSDs and rust in the same pool, or in the same vdev.

ZFS tuning cheat sheet

Quick and dirty cheat sheet for anyone getting ready to set up a new ZFS pool. Here are all the settings you’ll want to think about, and the values I think you’ll probably want to use.

I am not generally a fan of tuning things unless you need to, but unfortunately a lot of the ZFS defaults aren’t optimal for most workloads.

SLOG and L2ARC are special devices, not parameters… but I included them anyway. Lean into it.

parameter best* value why / what does it do?
ashift 12 Ashift tells ZFS what the underlying physical block size your disks use is. It’s in bits, so ashift=9 means 512B sectors (used by all ancient drives), ashift=12 means 4K sectors (used by most modern hard drives), and ashift=13 means 8K sectors (used by some modern SSDs).

If you get this wrong, you want to get it wrong high. Too low an ashift value will cripple your performance. Too high an ashift value won’t have much impact on almost any normal workload.

Ashift is per vdev, and immutable once set. This means you should manually set it at pool creation, and any time you add a vdev to an existing pool, and should never get it wrong because if you do, it will screw up your entire pool and cannot be fixed.

 xattr  sa  Sets Linux eXtended ATTRibutes directly in the inodes, rather than as tiny little files in special hidden folders.

This can have a significant performance impact on datasets with lots of files in them, particularly if SELinux is in play. Unlikely to make any difference on datasets with very few, extremely large files (eg VM images).

 compression  lz4  Compression defaults to off, and that’s a losing default value. Even if your data is incompressible, your slack space is (highly) compressible.

LZ4 compression is faster than storage. Yes, really. Even if you have a $50 tinkertoy CPU and a blazing-fast SSD. Yes, really. I’ve tested it. It’s a win.

You might consider gzip compression for datasets with highly compressible files. It will have better compression rate but likely lower throughput. YMMV, caveat imperator.

 atime  off  If atime is on – which it is by default – your system has to update the “Accessed” attribute of every file every time you look at it. This can easily double the IOPS load on a system all by itself.

Do you care when the last time somebody opened a given file was, or the last time they ls’d a directory? Probably not. Turn this off.

 recordsize  64K  If you have files that will be read from or written to in random batches regularly, you want to match the recordsize to the size of the reads or writes you’re going to be digging out of / cramming into those large files.

For most database binaries or VM images, 64K is going to be either an exact match to the VM’s back end storage cluster size (eg the default cluster_size=64K on QEMU’s QCOW2 storage) or at least a better one than the default recordsize, 128K.

If you’ve got a workload that wants even smaller blocks—for example, 16KiB to match MySQL InnoDB or 8KiB to match PostgreSQL back-ends—you should tune both ZFS recordsize and the VM back end storage (where applicable) to match.

This can improve the IOPS capability of an array used for db binaries or VM images fourfold or more.

 recordsize  1M  Wait, didn’t we just do recordsize…? Well, yes, but different workloads call for different settings if you’re tuning.

If you’re only reading and writing in fairly large chunks – for example, a collection of 5-8MB JPEG images from a camera, or 100GB movie files, either of which will not be read or written random access – you’ll want to set recordsize=1M, to reduce the IOPS load on the system by requiring fewer individual records for the same amount of data. This can also increase compression ratio, for compressible data, since each record uses its own individual compression dictionary.

If you’re using bittorrent, recordsize=16K results in higher possible bittorrent write performance… but recordsize=1M results in lower overall fragmentation, and much better performance when reading the files you’ve acquired by torrent later.

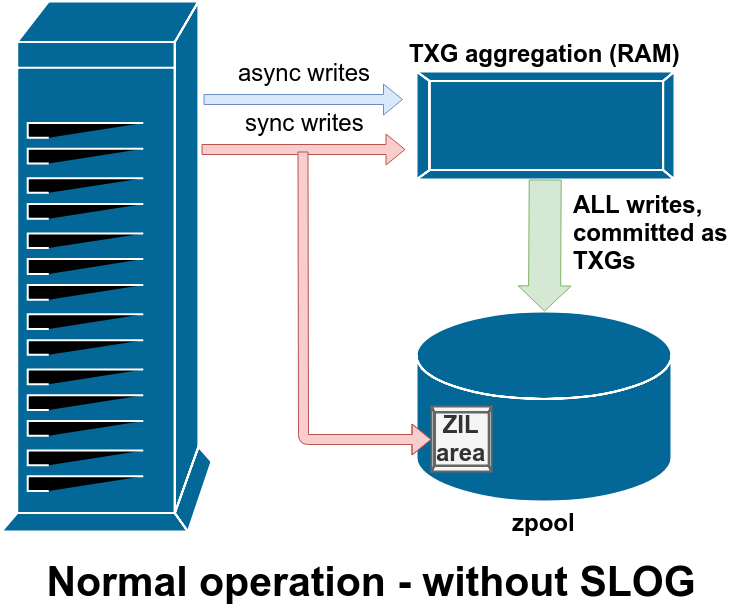
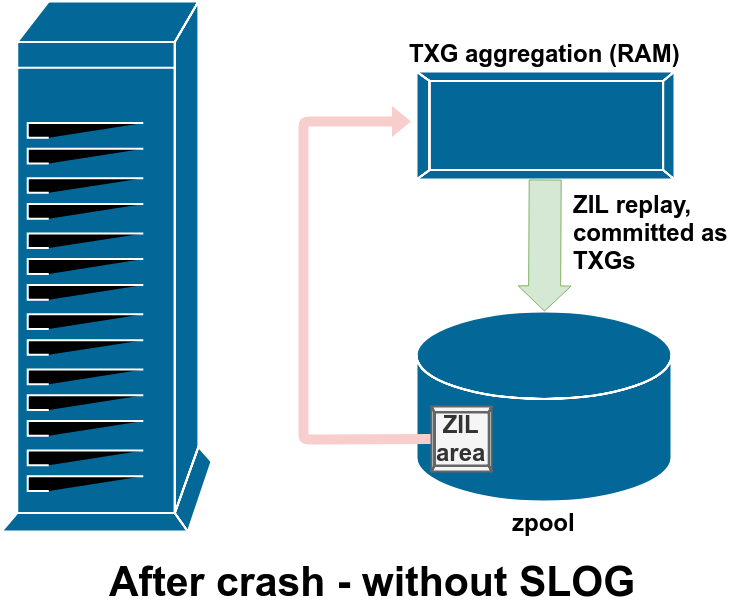
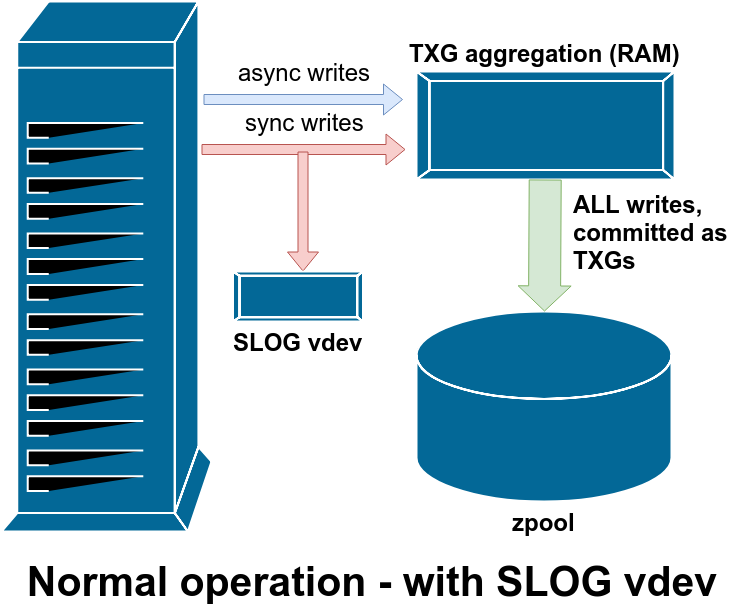
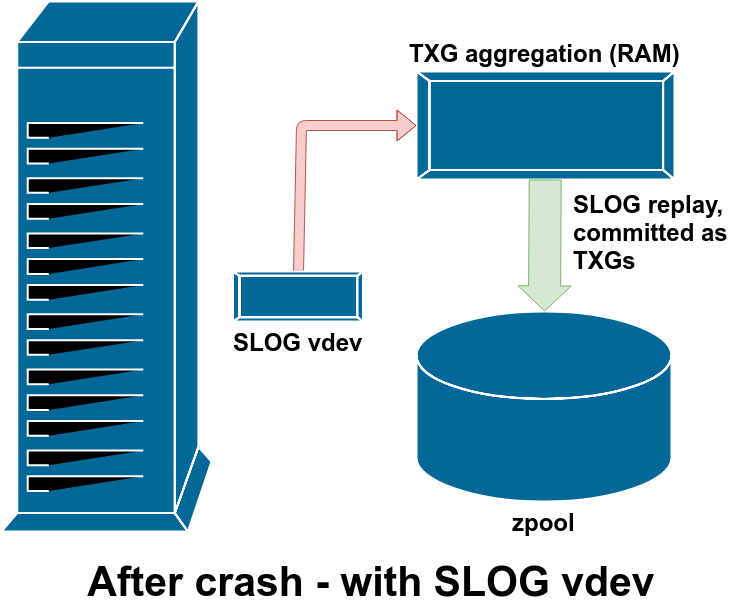
 SLOG  maybe  SLOG isn’t a setting, it’s a special vdev type that acts as a write aggregation layer for the entire pool. It only affects synchronous writes – asynchronous writes are already aggregated in the ZIL in RAM.

SLOG doesn’t need to be a large device; it only has to accumulate a few seconds’ worth of writes… but if you’re using NAND flash, it probably should be a large device, since write endurance is proportional to device size. On systems that need a LOG vdev in the first place, that LOG vdev will generally get an awful lot of writes.

Having a LOG vdev means that synchronous writes perform like asynchronous writes; it doesn’t really act like a “write cache” in the way new ZFS users tend to hope it will.

Great for databases, NFS exports, or anything else that calls sync() a lot. Not too useful for more casual workloads.

 L2ARC  nope!  L2ARC is a layer of ARC that resides on fast storage rather than in RAM. It sounds amazing – super huge super fast read cache!

Yeah, it’s not really like that. For one thing, L2ARC is ephemeral – data in L2ARC  doesn’t survive reboots. For another thing, it costs a significant amount of RAM to index the L2ARC, which means now you have a smaller ARC due to the need for indexing your L2ARC.

Even the very fastest SSD is a couple orders of magnitude slower than RAM. When you have to go to L2ARC to fetch data that would have fit in the ARC if it hadn’t been for needing to index the L2ARC, it’s a massive lose.

Most people won’t see any real difference at all after adding L2ARC. A significant number of people will see performance decrease after adding L2ARC. There is such a thing as a workload that benefits from L2ARC… but you don’t have it. (Think hundreds of users, each with extremely large, extremely hot datasets.)

* “best” is always debatable. Read reasoning before applying. No warranties offered, explicit or implied.

Routing between wg interfaces with WireGuard

Aha! This was the last piece I was really looking for with WireGuard. It gets a bit tricky when you want packets to route between WireGuard clients. But once you grok how it works, well, it works.

This also works for passing traffic between WireGuard clients on the same interface – the trick is in making certain that AllowedIPs in the client configs includes the entire IP subnet services by the server, not just the single IP address of the server itself (with a /32 subnet)… and that you not only set up the tunnel on each client, but initialize it with a bit of data as well.

Set up your server with two WireGuard interfaces:

root@server:~# touch /etc/wireguard/keys/server.wg0.key
root@server:~# chmod 600 /etc/wireguard/keys/server.wg0.key 
root@server:~# wg genkey > /etc/wireguard/keys/server.wg0.key root@server:~# wg pubkey < /etc/wireguard/keys/server.wg0.key > /etc/wireguard/keys/server.wg0.pub

root@server:~# touch /etc/wireguard/keys/server.wg1.key
root@server:~# chmod 600 /etc/wireguard/keys/server.wg1.key 
root@server:~# wg genkey > /etc/wireguard/keys/server.wg1.key root@server:~# wg pubkey < /etc/wireguard/keys/server.wg1.key > /etc/wireguard/keys/server.wg1.pub

Don’t forget to make sure ipv4 forwarding is enabled on your server:

root@server:~# sed -i 's/^#net\.ipv4\.ip_forward=1/net.ipv4.ip_forward=1/' /etc/sysctl.conf
root@server:~# sysctl -p

Now set up your wg0.conf:

# server.wg0.conf

[Interface] 
   Address = 10.0.0.1/24 
   ListenPort = 51820
   PrivateKey = WG0_SERVER_PRIVATE_KEY
   SaveConfig = false

[Peer] 
   # client1 
   PublicKey = PUBKEY_FROM_CLIENT_ONE
   AllowedIPs = 10.0.0.2/32

And your wg1.conf:

# server.wg1.conf

[Interface] 
 Address = 10.0.1.1/24 
 ListenPort = 51821
 PrivateKey = WG1_SERVER_PRIVATE_KEY
 SaveConfig = false

[Peer] 
 # client2 
 PublicKey = PUBKEY_FROM_CLIENT_TWO
 AllowedIPs = 10.0.1.2/32

Gravy. Now enable both interfaces, and bring them online.

root@server:~# systemctl enable wg-quick@wg0 ; systemctl enable wg-quick@wg1
root@server:~# systemctl start wg-quick@wg0 ; systemctl start wg-quick@wg1

Server’s done. Now, set up your clients.

Client install, multi-wg server:

Client one will connect to the server’s wg0, and client two will connect to the server’s wg1. After creating your keys, set them up as follows:

# /etc/wireguard/wg0.conf on Client1
#    connecting to server/wg0
 
[Interface]
   Address = 10.0.0.2/24
   PrivateKey = PRIVATE_KEY_FROM_CLIENT1
   # set up routing from server/wg0 to server/wg1
   PostUp = route add -net 10.0.1.0/24 gw 10.0.0.1 ; ping -c1 10.0.0.1
   PostDown = route delete -net 10.0.1.0/24 gw 10.0.0.1
   SaveConfig = false

[Peer]
   PublicKey = PUBKEY_FROM_SERVER
   AllowedIPs = 10.0.0.1/24, 10.0.1.1/24
   Endpoint = wireguard.yourdomain.tld:51820

Now set up wg0 on Client2:

# /etc/wireguard/wg0.conf on Client2
#   connecting to server/wg1 

[Interface]
   Address = 10.0.1.2/24
   PrivateKey = PRIVATE_KEY_FROM_CLIENT2
   # set up routing from server/wg1 to server/wg0
   PostUp = route add -net 10.0.0.0/24 gw 10.0.1.1 ; ping -c1 10.0.1.1
   PostDown = route delete -net 10.0.0.0/24 gw 10.0.1.1
   SaveConfig = false

[Peer]
   PublicKey = PUBKEY_FROM_SERVER
   AllowedIPs = 10.0.0.1/24, 10.0.1.1/24
   Endpoint = wireguard.yourdomain.tld:51821

Now start up the client interfaces. First, Client1:

root@client1:~# systemctl start wg-quick@wg0
root@client1:~# wg
interface: wg0
 public key: MY_PUBLIC_KEY
 private key: (hidden)
 listening port: some-random-port

peer: SERVER_PUBLIC_KEY
 endpoint: server-ip-address:51820
 allowed ips: 10.0.0.0/24, 10.0.1.0/24
 latest handshake: 3 seconds ago
 transfer: 2.62 KiB received, 3.05 KiB sent

Now Client2:

root@client2:~# systemctl start wg-quick@wg0
root@client2:~# wg
interface: wg0
 public key: MY_PUBLIC_KEY
 private key: (hidden)
 listening port: some-random-port

peer: SERVER_PUBLIC_KEY
 endpoint: server-ip-address:51821
 allowed ips: 10.0.0.0/24, 10.0.1.0/24
 latest handshake: 4 seconds ago
 transfer: 2.62 KiB received, 3.05 KiB sent

Now that both clients are connected, we can successfully send traffic back and forth between client1 and client2.

root@client1:~# ping -c3 10.0.1.2
PING 10.0.1.2 (10.0.1.2) 56(84) bytes of data.
64 bytes from 10.0.1.2: icmp_seq=1 ttl=63 time=80.4 ms
64 bytes from 10.0.1.2: icmp_seq=2 ttl=63 time=83.5 ms
64 bytes from 10.0.1.2: icmp_seq=3 ttl=63 time=83.2 ms

--- 10.0.1.2 ping statistics ---
3 packets transmitted, 3 received, 0% packet loss, time 2003ms
rtt min/avg/max/mdev = 80.492/82.410/83.501/1.380 ms

Sweet.

The step some of you undoubtedly missed:

There’s a little trick that will frustrate you to no end if you glossed over the client config files without paying attention.

PostUp = route add -net 10.0.0.0/24 gw 10.0.1.1 ; ping -c1 10.0.1.1

If you left out that ping command in one or both of the clients, then you won’t be able to ping client1 from client2, or vice versa, until each client has sent some data down the tunnel. This frustrated the crap out of me initially – ping client2 from client1 would be broken, but then ping client1 from client2 would work and then ping client2 from client1 would work. The solution, as shown, is just to make sure we immediately chuck a packet down the tunnel whenever each client connects; then everything works as intended.

What if I don’t want multiple interfaces?

If all you want to do is pass traffic from one client to the next, you don’t need two interfaces on the server, and you don’t need PostUp and PostDown route commands, either. The trick is that you do need to make sure that AllowedIPs on each client is set to a range that includes the other client, and you do need the PostUp ping -c1 server-ip-addresscommand on each client as well. Without that PostUp ping, you’re going to get frustrated by connectivity that “sometimes works and sometimes doesn’t”.

If you want to give access to some clients but not all clients, you can do that by setting multiple AllowedIPs arguments on the clients, like so:

[Peer]
   PublicKey = PUBKEY_FROM_SERVER
   # this stanza allows access from the server (.1), client one (.2),
   # and client two (.3) - but not from any clients at .4-.254.
   AllowedIPs = 10.0.0.1/32, 10.0.0.2/32, 10.0.0.3/32
   Endpoint = wireguard.yourdomain.tld:51820

That is a sample [Peer] stanza of a client wg config, not a[Peer] stanza of the server wg config! The[Peer] stanzas of the server config should only allow connection to a single IP (using a /32 subnet) for each individual[Peer] definition.

If you try to set AllowedIPs 10.0.0.0/24 on both client1 and client2’s[Peer] stanzas in the server’s wg config, you’ll break one or the other client – they can’t BOTH be allowed the entire subnet.

This bit’s a little confusing, I know, but that’s how it works.

As always, caveat imperator.

Just like the last couple of posts, everything here is tested and working. Also just like the last couple of posts, this is day zero of my personal experience with Wireguard. While everything here works, I still have not delved into any of the actual crypto components’ configurability or personally evaluated/researched how sane the defaults are.

These configs absolutely will encrypt the data sent down the tunnel – I’ve verified that much! – but I cannot offer a well-established and researched opinion on how well they encrypt that data, or what weaknesses there might be. I have no particular reason to believe they’re not secure, but I haven’t done any donkey-work to thoroughly establish that they are secure either.

Caveat imperator.

I may come back to edit out these dire warnings in a few weeks or months as I hammer at this stuff more. Or I might forget to! Feel free to tweet @jrssnet if you want to ask how or if things have changed; I am definitely going to continue my evaluation and testing.

Working VPN-gateway configs for WireGuard

Want to set up a simple security VPN, that routes all your internet traffic out of a potentially hostile network through a trusted VM somewhere? Here you go. Note that while all this is tested and working, this is still literal day zero of my personal experience with Wireguard; in particular while Wireguard claims to use only the most secure crypto (the best, everybody says that!) I not only have not really investigated that, I don’t know how to configure that part of it, so this is just using whatever the WG defaults are. Caveat imperator.

Installing Wireguard, generating keys:

This first set of steps is the same for all machines. Substitute the actual machine name as appropriate; you want to make sure you know which of these keys is which later on down the line, so actually name them and don’t be sloppy about it.

root@machine:~# apt-add-repository ppa:wireguard/wireguard ; apt update ; apt install wireguard-dkms wireguard-tools

root@machinename:~# mkdir /etc/wireguard/keys
root@machinename:~# chmod 700 /etc/wireguard/keys

root@machinename:~# touch /etc/wireguard/keys/machinename.wg0.key
root@machinename:~# chmod 600 /etc/wireguard/keys/machinename.wg0.key

root@machinename:~# wg genkey > /etc/wireguard/keys/machinename.wg0.key
root@machinename:~# wg pubkey < /etc/wireguard/keys/machinename.wg0.key > /etc/wireguard/keys/machinename.wg0.pub

OK, you’ve installed wireguard on your server VM and one or two clients, and you’ve generated some keys.

Setting up your server VM:

Create your config file on the server, at /etc/wireguard/wg0.conf:

[Interface] 
   Address = 10.0.0.1/24 
   ListenPort = 51820 
   PrivateKey = YOUR_SERVER_PRIVATE_KEY
   SaveConfig = false
 
   # Internet Gateway config: nat wg1 out to the internet on eth0 
   PostUp = iptables -A FORWARD -i wg1 -j ACCEPT; iptables -t nat -A POSTROUTING -o eth0 -j MASQUERADE 
   PostDown = iptables -D FORWARD -i wg1 -j ACCEPT; iptables -t nat -D POSTROUTING -o eth0 -j MASQUERADE

[Peer] 
   # Client1
   PublicKey = PUBLIC_KEY_FROM_CLIENT1
   AllowedIPs = 10.0.0.2/32

[Peer] 
   # Client2 
   PublicKey = PUBLIC_KEY_FROM_CLIENT2
   AllowedIPs = 10.0.0.3/32

Now you’ll need to enable ipv4 forwarding in /etc/sysctl.conf.

root@server:~# sed -i 's/^#net\.ipv4\.ip_forward=1/net.ipv4.ip_forward=1/' /etc/sysctl.conf
root@server:~# sysctl -p

Enable your wg0 interface to start automatically at boot, and bring it up:

root@server:~# sysctl enable wg-quick@wg0
root@server:~# sysctl start wg-quick@wg0

Server should be good to go now.

Setting up your clients:

Client setup is a bit simpler; all you really need is the /etc/wireguard/wg0.conf file itself.

[Interface] 
   # CLIENT1 
   Address = 10.0.0.2/24 
   PrivateKey = CLIENT1_PRIVATE_KEY
   SaveConfig = false

   # the DNS line is broken on 18.04 due to lack of resolvconf 
   # DNS = 1.1.1.1

[Peer] 
   # SERVER 
   PublicKey = PUBLIC_KEY_FROM_SERVER
   Endpoint = wireguard.yourdomain.fqdn:51820

   # gateway rule - send all traffic out over the VPN
   AllowedIPs = 0.0.0.0/0

Note that I have the DNS = 1.1.1.1 line commented out above – its syntax is correct, and it works fine on Ubuntu 16.04, but on 18.04 it will cause the entire interface not to come up due to a lack of installed resolvconf.

You can use sysctl enable wg-quick@wg0 to have the wg0 interface automatically start at boot the way we did on the server, but you likely won’t want to. Without enabling it to start automatically at boot, you can use sysctl start wg-quick@wg0 by itself to manually start it, and sysctl stop wg-quick@wg0 to manually disconnect it. Or if you’re not in love with systemd, you can accomplish the same thing with the raw wg-quick commands: wg-quick up wg0 to start it, and wg-quick down wg0 to bring it down again. Your choice.

What about Windows? Android? Etc?

You can use TunSafe as a Windows client, and the WireGuard app on Android. Setup steps will basically be the same as shown above. On a Mac, you can reportedly brew install wireguard-tools and have everything work as above (though you’ll need to invoke wg-quick directly; systemd isn’t a thing there).

If you’ve rooted your Android phone, you can build a kernel that includes the Wireguard kernel module; if you haven’t, stock kernels work fine – the Android app just runs in userspace mode, which is somewhat less efficient. (You’re currently stuck in userspace mode on a Mac no matter what, AFAIK; not sure what the story is with TunSafe on Windows.)

If you’re using iOS, there’s a Git repository that purports to be a Wireguard client for iPhone/iPad; but good f’n luck actually doing anything with it unless you’re pretty deep into the iOS development world already.

Some testing notes on WireGuard

I got super, super interested in WireGuard when Linus Torvalds heaped fulsome praise on its design (if you’re not familiar with Linus’ commentary, then trust me – that’s extremely fulsome in context) in an initial code review this week. WireGuard aims to be more secure and faster than competing VPN solutions; as far as security goes, it’s certainly one hell of a lot more auditable, at 4,000 lines of code compared to several hundred thousand lines of code for OpenVPN/OpenSSL or IPSEC/StrongSwan.

I’ve got a decade-and-a-half of production experience with OpenVPN and various IPSEC implementations, and “prettiness of code” aside, frankly they all suck. They’re not so bad if you only work with a client or ten at a time which are manually connected and disconnected; but if you’re working at a scale of hundred+ clients expected to be automatically connected 24/7/365, they’re a maintenance nightmare. The idea of something that connects quicker and cleaner, and is less of a buggy nightmare both in terms of security and ongoing usage, is pretty strongly appealing!

WARNING:  These are my initial testing notes, on 2018-Aug-05. I am not a WireGuard expert. This is my literal day zero. Proceed at own risk!

Alright, so clearly I wanna play with this stuff.  I’m an Ubuntu person, so my initial step is apt-add-repository ppa:wireguard/wireguard ; apt update ; apt install wireguard-dkms wireguard-tools .

After we’ve done that, we’ll need to generate a keypair for our wireguard instance. The basic commands here are wg genkey and wg pubkey. You’ll need to pipe private key created with wg genkey into wg pubkey to get a working private key.  You don’t have to store your private key anywhere outside the wg0.conf itself, but if you’re a traditionalist and want them saved in nice organized files you can find (and which aren’t automagically monkeyed with – more on that later), you can do so like this:

root@box:/etc/wireguard# touch machinename.wg0.key ; chmod 600 machinename.wg0.key
root@box:/etc/wireguard# wg genkey > machinename.wg0.key
root@box:/etc/wireguard# wg pubkey < machinename.wg0.key > machinename.wg0.pub

You’ll need this keypair to connect to other wireguard machines; it’s generated the same way on servers or clients. The private key goes in the [Interface] section of the machine it belongs to; the public key isn’t used on that machine at all, but is given to machines it wants to connect to, where it’s specified in a [Peer] section.

From there, you need to generate a wg0.conf to define a wireguard network interface. I had some trouble finding definitive information on what would or wouldn’t work with various configs on the server side, so let’s dissect a (fairly) simple one:

# /etc/wireguard/wg0.conf - server configs

[Interface]
   Address = 10.0.0.1/24
   ListenPort = 51820
   PrivateKey = SERVER_PRIVATE_KEY
   
   # SaveConfig = true makes commenting, formattting impossible
   SaveConfig = false
   # This stuff sets up masquerading through the server's WAN,
   # if you want to route all internet traffic from your client
   # across the Wireguard link. 
   #
   # You'll also need to set net.ipv4.ip_forward=1 in /etc/sysctl.conf
   # if you're going this route; sysctl -p to reload sysctl.conf after
   # making your changes.
   #
   PostUp = iptables -A FORWARD -i wg0 -j ACCEPT; iptables -t nat -A POSTROUTING -o eth0 -j MASQUERADE; ip6tables -A FORWARD -i wg0 -j ACCEPT; ip6tables -t nat -A POSTROUTING -o eth0 -j MASQUERADE
   PostDown = iptables -D FORWARD -i wg0 -j ACCEPT; iptables -t nat -D POSTROUTING -o eth0 -j MASQUERADE; ip6tables -D FORWARD -i wg0 -j ACCEPT; ip6tables -t nat -D POSTROUTING -o eth0 -j MASQUERADE

OK, so far so good. Note that SERVER_PRIVATE_KEY above is not a reference to a filename – it’s the server’s private key itself, pasted directly into the config file!

With the above server config file (and a real private key on the private key line), wg0 will start, and will answer incoming connections. The problem is, it’ll answer incoming connections from anybody who has the server’s public key – no verification of the client necessary. (TESTED)

Here’s a sample client config:

# client config - client 1 - /etc/wireguard/wg0.conf

[Interface]
   Address = 10.0.0.2/20
   SaveConfig = true
   PrivateKey = MY_PRIVATE_KEY

   # Warning: setting DNS here won't work if you don't
   # have resolvconf installed... and if you're running
   # Ubuntu 18.04, you probably don't have resolvconf
   # installed. If you set this without resolvconf available,
   # the whole interface will fail to come up.
   #
   # DNS = 1.1.1.1

[Peer]
   PublicKey = SERVER_PUBLIC_KEY
   Endpoint = wireguard.mydomain.wtflol:51820

   # this restricts tunnel traffic to the VPN server itself
   AllowedIPs = 172.29.128.1/32

   # if you wanted to route ALL traffic across the VPN, do this instead:
   # AllowedIPs = 0.0.0.0/0

Notice that we set SaveConfig=true in wg0.conf here on our client. This may be more of a bug than a feature. See those nice helpful comments we put in there? And notice how we specified an FQDN instead of a raw IP address for our server endpoint? Well, with SaveConfig=true on, those are going to get wiped out every time the service is restarted (such as on boot). The comments will just get wiped, stuff like the random dynamic port the client service uses will get hard-coded into the file, and the FQDN will be replaced with whatever IP address it resolved to the last time the service was started.

So, yes, you can use an FQDN in your configs – but if you use SaveConfig=true you might as well not bother, since it’ll get immediately replaced with a raw IP address anyway. Caveat imperator.

If we want our server to refuse random anonymous clients and only accept clients who have a private key matching a pubkey in our possession, we need to add [Peer] section(s):

[Peer]
PublicKey = PUBLIC_KEY_OF_CLIENT_ONE
AllowedIPs = 10.0.0.2/32

This works… and with it in place, we will no longer accept connections from anonymous clients. If we haven’t specifically authorized the pubkey for a connecting client, it won’t be allowed to send or receive any traffic. (TESTED.)

We can have multiple peers defined, and they’ll all work simultaneously, on the same port on the same server: (TESTED)

# appended to wg0.conf on SERVER

[Peer]
PublicKey = PUBKEY_OF_CLIENT_ONE
AllowedIPs = 10.0.0.2/32

[Peer]
PublicKey = PUBKEY_OF_CLIENT_TWO
AllowedIPs = 10.0.0.3/32

Wireguard won’t dynamically reload wg0.conf looking for new keys, though; so if we’re adding our new peers manually to the config file like this we’ll have to bring the wg0 interface down and back up again to load the changes, with wg-quick down wg0 && wg-quick up wg0. This is definitely not a good way to do things in production at scale, because it means approximately 15 seconds of downtime for existing clients before they automatically reconnect themselves: (TESTED)

64 bytes from 172.29.128.1: icmp_seq=10 ttl=64 time=35.0 ms
64 bytes from 172.29.128.1: icmp_seq=11 ttl=64 time=39.3 ms
64 bytes from 172.29.128.1: icmp_seq=12 ttl=64 time=37.6 ms

[[[       client disconnected due to server restart      ]]]
[[[  16 pings dropped ==> approx 15-16 seconds downtime  ]]]
[[[ client automatically reconnects itself after timeout ]]]

64 bytes from 172.29.128.1: icmp_seq=28 ttl=64 time=51.4 ms
64 bytes from 172.29.128.1: icmp_seq=29 ttl=64 time=37.6 ms

A better way to do things in production is to add our clients manually with the wg command itself. This allows us to dynamically add clients without bringing the server down, and that doing so will also add those clients into wg0.conf for persistence across reboots and what-have-you.

If we wanted to use this method, the CLI commands we’ll need to run on the server look like this: (TESTED)

root@server:/etc/wireguard# wg set wg0 peer CLIENT3_PUBKEY allowed-ips 10.0.0.4/24

The client CLIENT3 will immediately be able to connect to the server after running this command; but its config information won’t be added to wg0.conf, so this isn’t a persistent addition. To make it persistent, we’ll either need to append a [Peer] block for CLIENT3 to wg0.conf manually, or we could use wg-quick save wg0 to do it automatically. (TESTED)

root@server:/etc/wireguard# wg-quick save wg0

The problem with using wg-quick save (which does not require, but shares the limitations of, SaveConfig = true in the wg0.conf itself) is that it strips all comments and formatting, permanently resolves FQDNs to raw IP addresses, and makes some things permanent that you might wish to keep ephemeral (such as ListenPort on client machines). So in production at scale, while you will likely want to use the wg set command to directly add peers to the server, you probably won’t want to use wg-quick save to make the addition permanent; you’re better off scripting something to append a well-formatted [Peer] block to your existing wg0.conf instead.

Once you’ve gotten everything working to your liking, you’ll want to make your wg0 interface come up automatically on boot. On Ubuntu Xenial or later, this is (of course, and however you may feel about it) a systemd thing:

root@box:/etc/wireguard# systemctl enable wg-quick@wg0

This is sufficient to automatically bring up wg0 at boot; but note that since we’ve already brought it up manually with wg-quick up in this session, an attempt to systemctl status wg-quick@wg0 will show an error. This is harmless, but if it bugs you, you’ll need to manually bring wg0 down, then start it up again using systemctl:

root@box:/etc/wireguard# wg-quick down wg0
root@box:/etc/wireguard# systemctl start wg-quick@wg0

At this point, you’ve got a working wireguard interface on server and client(s), that’s persistent across reboots (and other disconnections) if you want it to be.

What we haven’t covered

Note that we haven’t covered getting packets from CLIENT1 to CLIENT2 here – if you try to communicate directly between two clients with this setup and no additional work, you’ll see the following error: (TESTED)

root@client1:/etc/wireguard# ping -c1 CLIENT2
From 10.0.0.2 icmp_seq=1 Destination Host Unreachable
ping: sendmsg: Required key not available
--- 10.0.0.3 ping statistics ---
1 packets transmitted, 0 received, +1 errors, 100% packet loss, time 0ms

We also haven’t looked around at any kind of crypto configuration yet; at this point we’re blindly accepting whatever defaults for algorithms, key sizes, and so forth and hoping for the best. Make sure you understand these (and I don’t, yet!) before deploying in production.

At this point, though, we’ve at least got something working we can play with. Happy hacking, and good luck!

ZFS does NOT favor lower latency devices. Don’t mix rust disks and SSDs!

In an earlier post, I addressed the never-ending urban legend that ZFS writes data to the lowest-latency vdev. Now the urban legend that never dies has reared its head again; this time with someone claiming that ZFS will issue read operations to the lowest-latency disk in a given mirror vdev.

TL;DR – this, too, is a myth. If you need or want an empirical demonstration, read on.

I’ve got an Ubuntu Bionic machine handy with both rust and SSD available; /tmp is an ext4 filesystem on an mdraid1 SSD mirror and /rust is an ext4 filesystem on a single WD 4TB black disk. Let’s play.

root@box:~# truncate -s 4G /tmp/ssd.bin
root@box:~# truncate -s 4G /rust/rust.bin
root@box:~# mkdir /tmp/disks
root@box:~# ln -s /tmp/ssd.bin /tmp/disks/ssd.bin ; ln -s /rust/rust.bin /tmp/disks/rust.bin
root@box:~# zpool create -oashift=12 test /tmp/disks/rust.bin
root@box:~# zfs set compression=off test

Now we’ve got a pool that is rust only… but we’ve got an ssd vdev off to the side, ready to attach. Let’s run an fio test on our rust-only pool first. Note: since this is read testing, we’re going to throw away our first result set; they’ll largely be served from ARC and that’s not what we’re trying to do here.

root@box:~# cd /test
root@box:/test# fio --name=read --ioengine=sync  --rw=randread --bs=16K --size=1G --numjobs=1 --end_fsync=1

OK, cool. Now that fio has generated its dataset, we’ll clear all caches by exporting the pool, then clearing the kernel page cache, then importing the pool again.

root@box:/test# cd ~
root@box:~# zpool export test
root@box:~# echo 3 > /proc/sys/vm/drop_caches
root@box:~# zpool import -d /tmp/disks test
root@box:~# cd /test

Now we can get our first real, uncached read from our rust-only pool. It’s not terribly pretty; this is going to take 5 minutes or so.

root@box:/test# fio --name=read --ioengine=sync  --rw=randread --bs=16K --size=1G --numjobs=1 --end_fsync=1
[ ... ]
Run status group 0 (all jobs):
  READ: bw=17.6MiB/s (18.5MB/s), 17.6MiB/s-17.6MiB/s (18.5MB/s-18.5MB/s), io=1024MiB (1074MB), run=58029-58029msec

Alright. Now let’s attach our ssd and make this a mirror vdev, with one rust and one SSD disk.

root@box:/test# zpool attach test /tmp/disks/rust.bin /tmp/disks/ssd.bin
root@box:/test# zpool status test
  pool: test
 state: ONLINE
  scan: resilvered 1.00G in 0h0m with 0 errors on Sat Jul 14 14:34:07 2018
config:

    NAME                     STATE     READ WRITE CKSUM
    test                     ONLINE       0     0     0
      mirror-0               ONLINE       0     0     0
        /tmp/disks/rust.bin  ONLINE       0     0     0
        /tmp/disks/ssd.bin   ONLINE       0     0     0

errors: No known data errors

Cool. Now that we have one rust and one SSD device in a mirror vdev, let’s export the pool, drop all the kernel page cache, and reimport the pool again.

root@box:/test# cd ~
root@box:~# zpool export test
root@box:~# echo 3 > /proc/sys/vm/drop_caches
root@box:~# zpool import -d /tmp/disks test
root@box:~# cd /test

Gravy. Now, do we see massively improved throughput when we run the same fio test? If ZFS favors the SSD, we should see enormously improved results. If ZFS does not favor the SSD, we’ll not-quite-doubled results.

root@box:/test# fio --name=read --ioengine=sync  --rw=randread --bs=16K --size=1G --numjobs=1 --end_fsync=1
[...]
Run status group 0 (all jobs):
   READ: bw=31.1MiB/s (32.6MB/s), 31.1MiB/s-31.1MiB/s (32.6MB/s-32.6MB/s), io=1024MiB (1074MB), run=32977-32977msec

Welp. There you have it. Not-quite-doubled throughput, matching half – but only half – of the read ops coming from the SSD. To confirm, we’ll do this one more time; but this time we’ll detach the rust disk and run fio with nothing in the pool but the SSD.

root@box:/test# cd ~
root@box:~# zpool detach test /tmp/disks/rust.bin
root@box:~# zpool export test
root@box:~# zpool import -d /tmp/disks test
root@box:~# cd /test

Moment of truth… this time, fio runs on pure solid state:

root@box:/test# fio --name=read --ioengine=sync  --rw=randread --bs=16K --size=1G --numjobs=1 --end_fsync=1
[...]
Run status group 0 (all jobs):
  READ: bw=153MiB/s (160MB/s), 153MiB/s-153MiB/s (160MB/s-160MB/s), io=1024MiB (1074MB), run=6710-6710msec

Welp, there you have it.

Rust only: reads 18.5 MB/sec
SSD only: reads 160 MB/sec
Rust + SSD: reads 32.6 MB/sec

No, ZFS does not read from the lowest-latency disk in a mirror vdev.

Please don’t perpetuate the myth that ZFS favors lower latency devices.

sample netplan config for ubuntu 18.04

Here’s a sample /etc/netplan config for Ubuntu 18.04. HUGE LIFE PRO TIP: against all expectations of decency, netplan refuses to function if you don’t indent everything exactly the way it likes it and returns incomprehensible wharrgarbl errors like “mapping values are not allowed in this context, line 17, column 15” if you, for example, have a single extra space somewhere in the config.

I wish I was kidding.

Anyway, here’s a sample /etc/netplan/01-config.yaml with a couple interfaces, one wired and static, one wireless and dynamic. Enjoy. And for the love of god, get the spacing exactly right; I really wasn’t kidding about it barfing if you have one too many spaces for a whitespace indent somewhere. Ask me how I know. >=\

If for any reason you have trouble reading this exact spacing, the rule is two spaces for each level of indent. So the v in “version” should line up under the t in “network”, the d in “dhcp4” should line up under the o in “eno1”, and so forth.

# This file describes the network interfaces available on your system
# For more information, see netplan(5).
network:
  version: 2
  renderer: networkd
  ethernets:
    eno1:
      dhcp4: no
      dhcp6: no
      addresses: [192.168.0.1/24]
      gateway4: 192.168.0.1
      nameservers:
        addresses: [8.8.8.8, 1.1.1.1]
  wifis:
    wlp58s0:
      dhcp4: yes
      dhcp6: no
      access-points:
        "your-wifi-SSID-name":
          password: "your-wifi-password"

Wait for network to be configured (no limit)

In Ubuntu 16.04 or up (ie, post systemd) if you’re ever stuck staring for two straight minutes at “Waiting for network to be configured (no limit)” and despairing, there’s a simple fix:

systemctl mask systemd-networkd-wait-online.service

This links the service that sits there with its thumb up its butt if you don’t have a network connection to /dev/null, causing it to just return instantly whenever it’s called. Which is probably a good idea. There may indeed be a situation in which I want a machine to refuse to boot until it gets an IP address, but whatever that situation MIGHT be, I’ve never encountered it in 20+ years of professional system administration, so…