Recently, I acquired a new client with a massive load of technical debt (in other words: a new client). The facility internet connection appeared to go down for an hour or two every day, typically in the mid-afternoon.
Complicating things tremendously, this new client had no insight into its own infrastructure: the former IT person had left them with no credentials or documentation for anything. So I was limited to completely unprivileged tools while troubleshooting.
The first major thing I discovered was a somewhat deranged Adtran Netvanta router, as installed by the ISP. When I got a Linux laptop onto the network and issued a dhclient -v, I could see both that the Netvanta was acting as DHCP server, and that it was struggling badly.
My laptop DHCPDISCOVERed about twelve times before getting a DHCPOFFER from the Netvanta, to which it eagerly replied with a DHCPREQ for the offered address… which the Netvanta failed to respond to. My laptop DHCPREQ’d twice more, before giving up and moving back to DHCPDISCOVER. Eventually, the Netvanta DHCPOFFERed again, my laptop DHCPREQ’d, and this time on the third try, the punch-drunk Netvanta DHCPACK’d it, and it was on the network… after a solid two minutes of trying to get an IP address.
Alright, now I knew both that DHCP was coming from the ISP router, and that it was deranged. Why? And could I do anything about it?
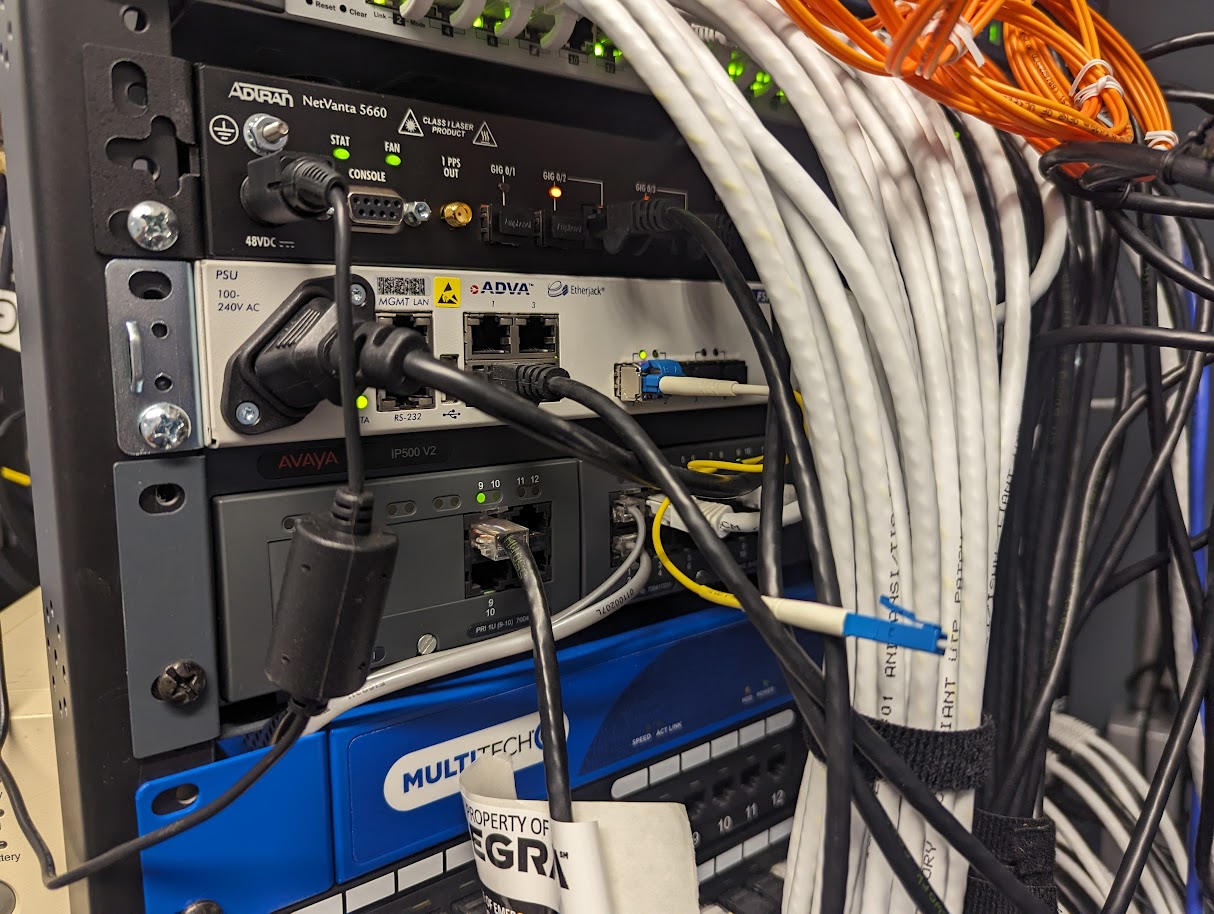
The Netvanta was bolted into a wall-mounted half-cab directly touching its sibling Adva, so tightly together you couldn’t slide a playing card between the two. Both devices had functional active cooling, so this wasn’t necessarily a problem… but when I ran a bare finger along the rear face of the chassis, it was a lot warmer than I liked. So, I unbolted one side of it, and re-bolted it caddycorner with one side higher than the other, which gave some external airflow across the chassis.
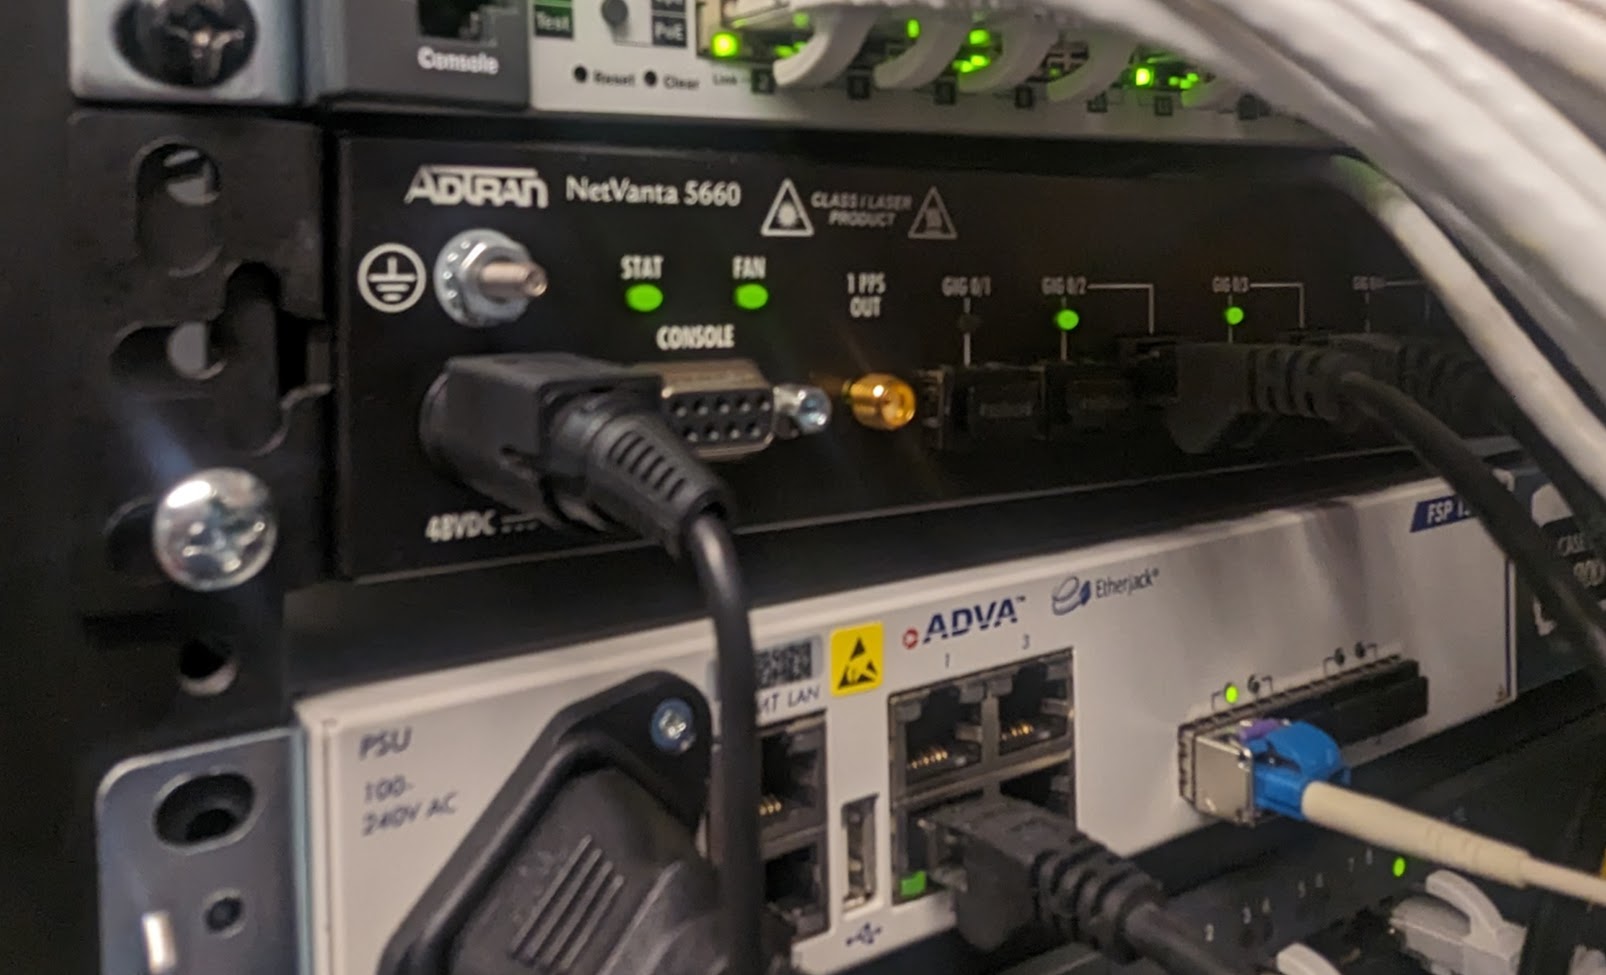
Although now it looks like I’m an idiot who can’t line up boltholes, the triangles of airspace on the bottom left and top right of the Netvanta give it some convection space to shed heat from its metal chassis.
And to my great delight, when I got back to my commandeered office (the former IT guy’s personal dungeon), dhclient -v now completed in under 10ms, every time: DHCPDISCOVER–>DHCPOFFER–>DHCPREQ–>DHCPACK with no stumbles at all. As an added bonus, my exploratory internet speedtests went from 65Mbps to 400Mbps!
This made an enormous improvement in the facility’s network health, but there were still problems: the next day, my direct report got frustrated enough with the facility network to turn on a cell phone hotspot. Luckily, I’d already spotted another problem in the same rack:
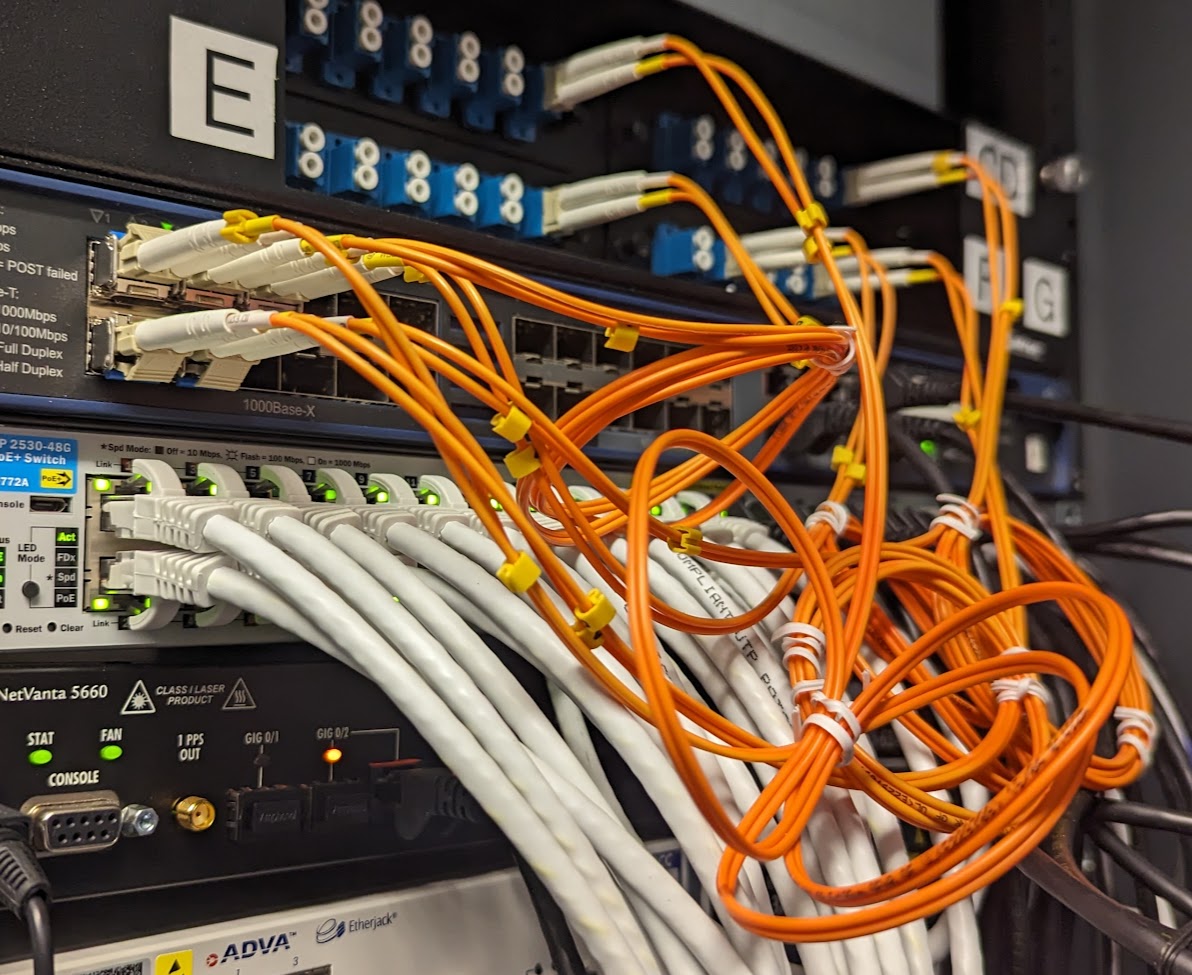
Whoever installed all this gear apparently didn’t realize there’s a minimum bend radius for fiberoptics: and for multi-mode fiber like you see above, that minimum bend radius is 30x the diameter of the jacketed pair. I didn’t try to break out a ruler, but that looked a lot more like 10x the jacket diameter than 30x to me, so off I went to grab a five-pack of LC to LC multi-mode patch cables.

Keeping to our theme of me looking like a drunken redneck while actually improving things technically, I used some mounting points on the face of an abandoned Cisco switch mounted several units higher in the cabinet as a centerpoint anchor for my new patch cables. Does it look stupid? Yes. Does it keep things out of the way without fracturing the glass on the inside of my optic cables? Also yes.
The performance difference here was harder to spot–especially since I needed to perform it on a weekend with the facility empty except for myself–but if you know what you’re looking for, it’s there. Prior to replacing the patch cables, an iperf3 run to one of my internet-based servers had a TCP congestion window of 3.00MiB:
me@swift:~$ iperf3 -c [redacted]
Connecting to host [redacted], port 5201
[ 5] local [redacted] port 39874 connected to [redacted] port 5201
[ ID] Interval Transfer Bitrate Retr Cwnd
[ 5] 0.00-1.00 sec 30.3 MBytes 254 Mbits/sec 0 3.00 MBytes
[ 5] 1.00-2.00 sec 48.8 MBytes 409 Mbits/sec 0 3.00 MBytes
[ 5] 2.00-3.00 sec 52.5 MBytes 440 Mbits/sec 0 3.00 MBytes
[ 5] 3.00-4.00 sec 52.5 MBytes 440 Mbits/sec 0 3.00 MBytes
[ 5] 4.00-5.00 sec 36.2 MBytes 304 Mbits/sec 0 3.00 MBytes
[ 5] 5.00-6.00 sec 38.8 MBytes 325 Mbits/sec 0 3.00 MBytes
[ 5] 6.00-7.00 sec 40.0 MBytes 335 Mbits/sec 0 3.00 MBytes
[ 5] 7.00-8.00 sec 47.5 MBytes 399 Mbits/sec 0 3.00 MBytes
[ 5] 8.00-9.00 sec 52.5 MBytes 440 Mbits/sec 0 3.00 MBytes
[ 5] 9.00-10.00 sec 53.8 MBytes 451 Mbits/sec 0 3.00 MBytes
– – – – – – – – – – – – – – – – – – – – – – – – –
[ ID] Interval Transfer Bitrate Retr
[ 5] 0.00-10.00 sec 453 MBytes 380 Mbits/sec 0 sender
[ 5] 0.00-10.05 sec 452 MBytes 377 Mbits/sec receiver
iperf Done.
After replacing the too-tightly-bent fiber patch cables, the raw speed didn’t increase much–but the TCP congestion window doubled to 6.00MiB. This is an excellent sign which–if you understand TCP congestion windowing algorithms–strongly implies a significant decrease in experienced latency.
jim@swift:~$ iperf3 -c [redacted]
Connecting to host [redacted], port 5201
[ 5] local [redacted] port 39882 connected to [redacted] port 5201
[ ID] Interval Transfer Bitrate Retr Cwnd
[ 5] 0.00-1.00 sec 29.1 MBytes 244 Mbits/sec 0 6.00 MBytes
[ 5] 1.00-2.00 sec 52.5 MBytes 440 Mbits/sec 0 6.00 MBytes
[ 5] 2.00-3.00 sec 52.5 MBytes 441 Mbits/sec 0 6.00 MBytes
[ 5] 3.00-4.00 sec 47.5 MBytes 398 Mbits/sec 0 6.00 MBytes
[ 5] 4.00-5.00 sec 52.5 MBytes 440 Mbits/sec 0 6.00 MBytes
[ 5] 5.00-6.00 sec 52.5 MBytes 441 Mbits/sec 0 6.00 MBytes
[ 5] 6.00-7.00 sec 52.5 MBytes 440 Mbits/sec 0 6.00 MBytes
[ 5] 7.00-8.00 sec 52.5 MBytes 440 Mbits/sec 0 6.00 MBytes
[ 5] 8.00-9.00 sec 53.8 MBytes 451 Mbits/sec 0 6.00 MBytes
[ 5] 9.00-10.00 sec 52.5 MBytes 440 Mbits/sec 0 6.00 MBytes
– – – – – – – – – – – – – – – – – – – – – – – – –
[ ID] Interval Transfer Bitrate Retr
[ 5] 0.00-10.00 sec 498 MBytes 418 Mbits/sec 0 sender
[ 5] 0.00-10.05 sec 498 MBytes 415 Mbits/sec receiver
iperf Done.
This apparent improvement in latency is confirmed with simpler web-based speedtests to fast.com, which showed an unloaded latency of 3ms and a loaded latency of 48-85ms prior to replacing the cables. After replacing them, fast.com consistently showed unloaded latency of 2ms… and loaded latency of <10ms.
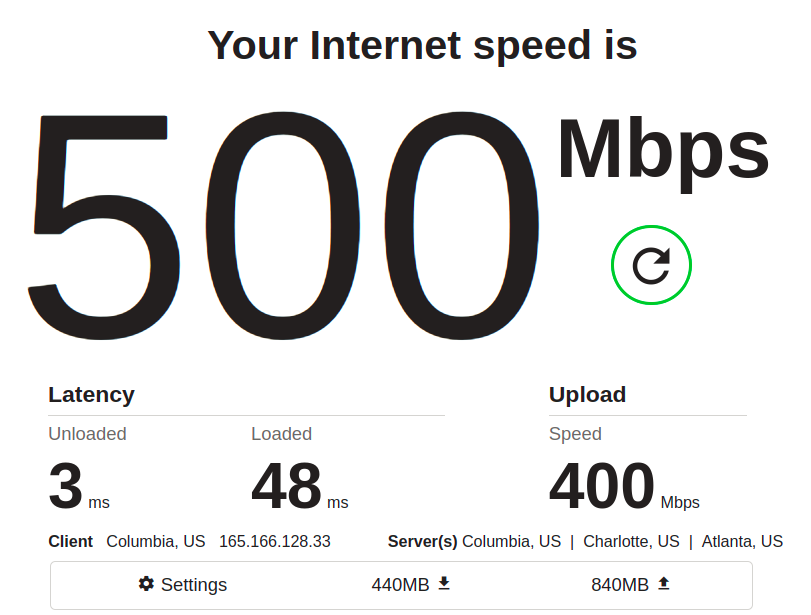
Again, pay attention to the latency. In the “before” shot above, we see a maxed-out download throughput of 500Mbps, which is nice… and in fact, at first glance, you might mistakenly think this is a better result than the “after” we see below:
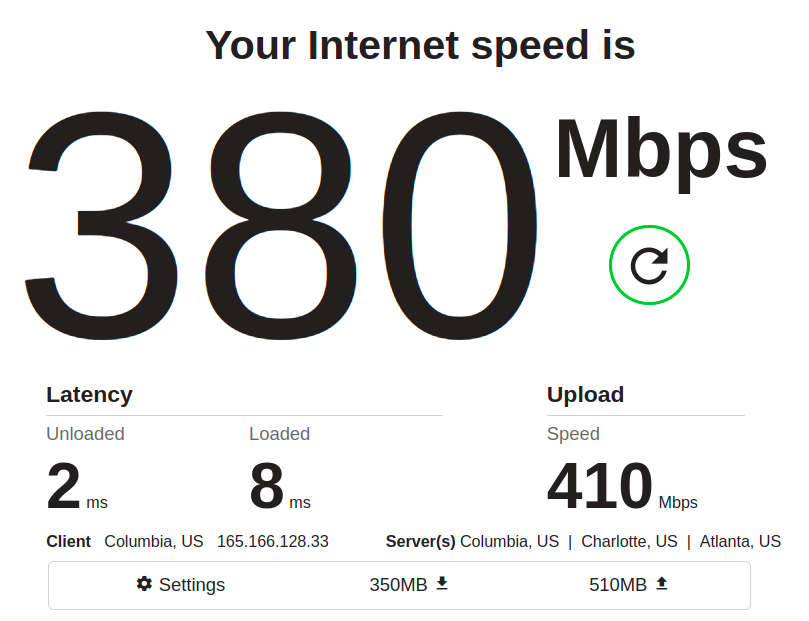
Oh no, you might think–download speed decreased from 500Mbps to 380Mbps! What did we do wrong? That’s the tricky part; we didn’t do anything wrong–something else on the network just siphoned off some of the available throughput while the test was running.
The important things to notice are, as mentioned, latency: it’s easy to dismiss the unloaded latency (meaning, how quickly pings return when the main bulk of the test isn’t running) decreasing from 3ms to 2ms. It’s only 1ms, after all… but it’s also a 33% improvement, and it held precisely consistent across many runs.
More conclusively, the loaded latency (time to return a ping when there’s lots of data moving) decreased by several hundred percent, and that result was also consistent across several runs.
There are almost certainly more gremlins to find and eliminate in this long-untended network, but we’re already in a much better position than we started from.