Adventures in network repair

Recently, I acquired a new client with a massive load of technical debt (in other words: a new client). The facility internet connection appeared to go down for an hour or two every day, typically in the mid-afternoon.

Complicating things tremendously, this new client had no insight into its own infrastructure: the former IT person had left them with no credentials or documentation for anything. So I was limited to completely unprivileged tools while troubleshooting.

The first major thing I discovered was a somewhat deranged Adtran Netvanta router, as installed by the ISP. When I got a Linux laptop onto the network and issued a dhclient -v, I could see both that the Netvanta was acting as DHCP server, and that it was struggling badly.

My laptop DHCPDISCOVERed about twelve times before getting a DHCPOFFER from the Netvanta, to which it eagerly replied with a DHCPREQ for the offered address… which the Netvanta failed to respond to. My laptop DHCPREQ’d twice more, before giving up and moving back to DHCPDISCOVER. Eventually, the Netvanta DHCPOFFERed again, my laptop DHCPREQ’d, and this time on the third try, the punch-drunk Netvanta DHCPACK’d it, and it was on the network… after a solid two minutes of trying to get an IP address.

Alright, now I knew both that DHCP was coming from the ISP router, and that it was deranged. Why? And could I do anything about it?
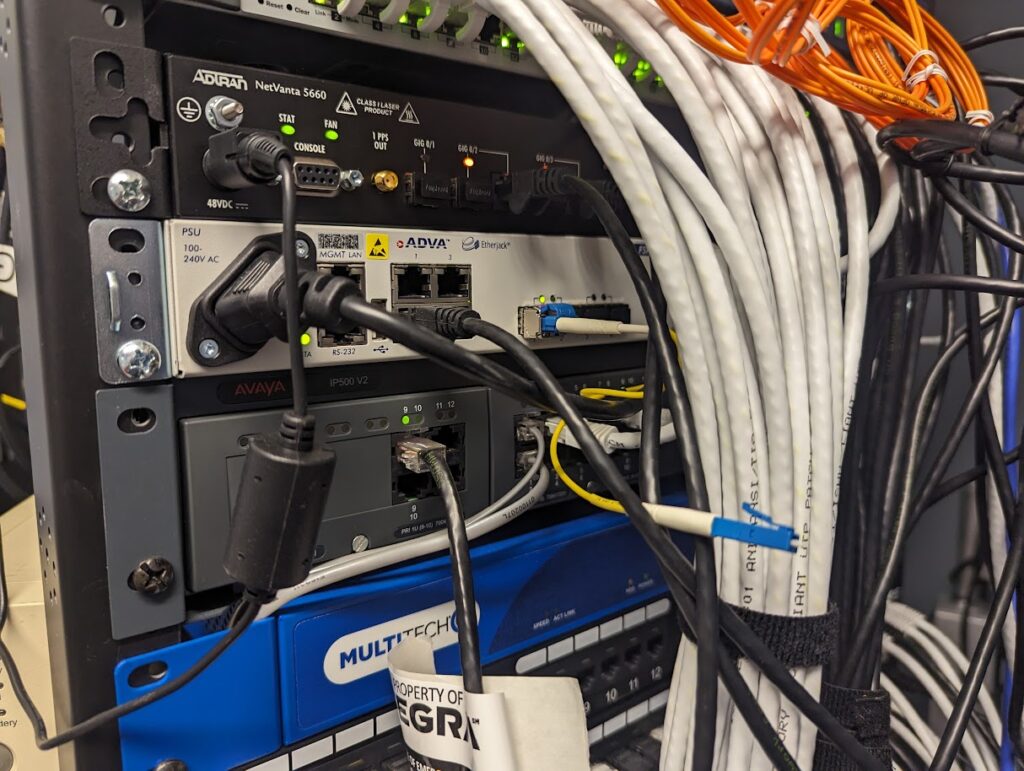
The Netvanta was bolted into a wall-mounted half-cab directly touching its sibling Adva, so tightly together you couldn’t slide a playing card between the two. Both devices had functional active cooling, so this wasn’t necessarily a problem… but when I ran a bare finger along the rear face of the chassis, it was a lot warmer than I liked. So, I unbolted one side of it, and re-bolted it caddycorner with one side higher than the other, which gave some external airflow across the chassis.
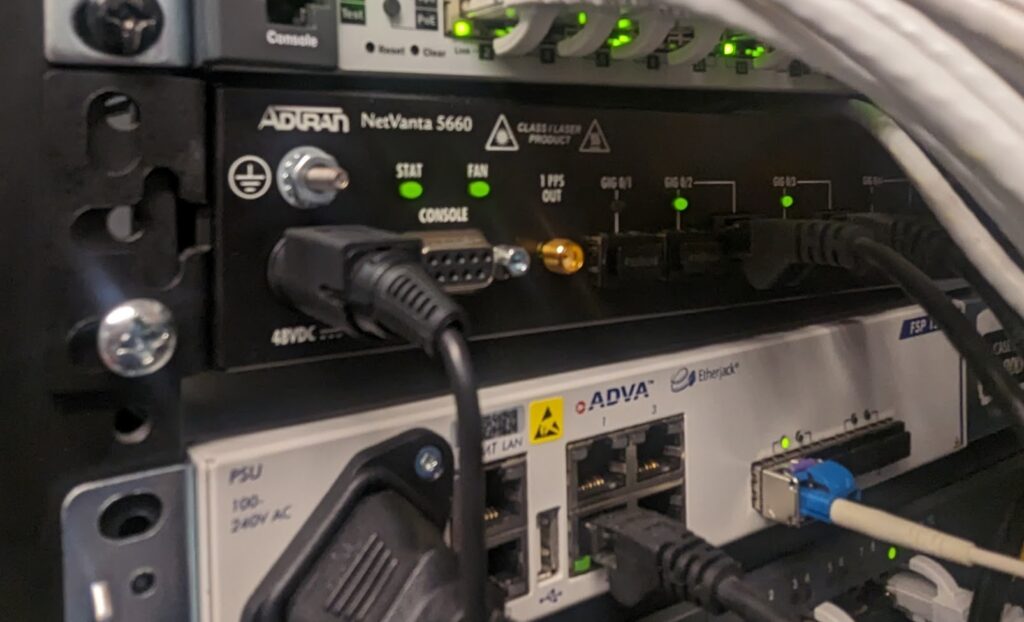
Although now it looks like I’m an idiot who can’t line up boltholes, the triangles of airspace on the bottom left and top right of the Netvanta give it some convection space to shed heat from its metal chassis.

And to my great delight, when I got back to my commandeered office (the former IT guy’s personal dungeon), dhclient -v now completed in under 10ms, every time: DHCPDISCOVER–>DHCPOFFER–>DHCPREQ–>DHCPACK with no stumbles at all. As an added bonus, my exploratory internet speedtests went from 65Mbps to 400Mbps!

This made an enormous improvement in the facility’s network health, but there were still problems: the next day, my direct report got frustrated enough with the facility network to turn on a cell phone hotspot. Luckily, I’d already spotted another problem in the same rack:
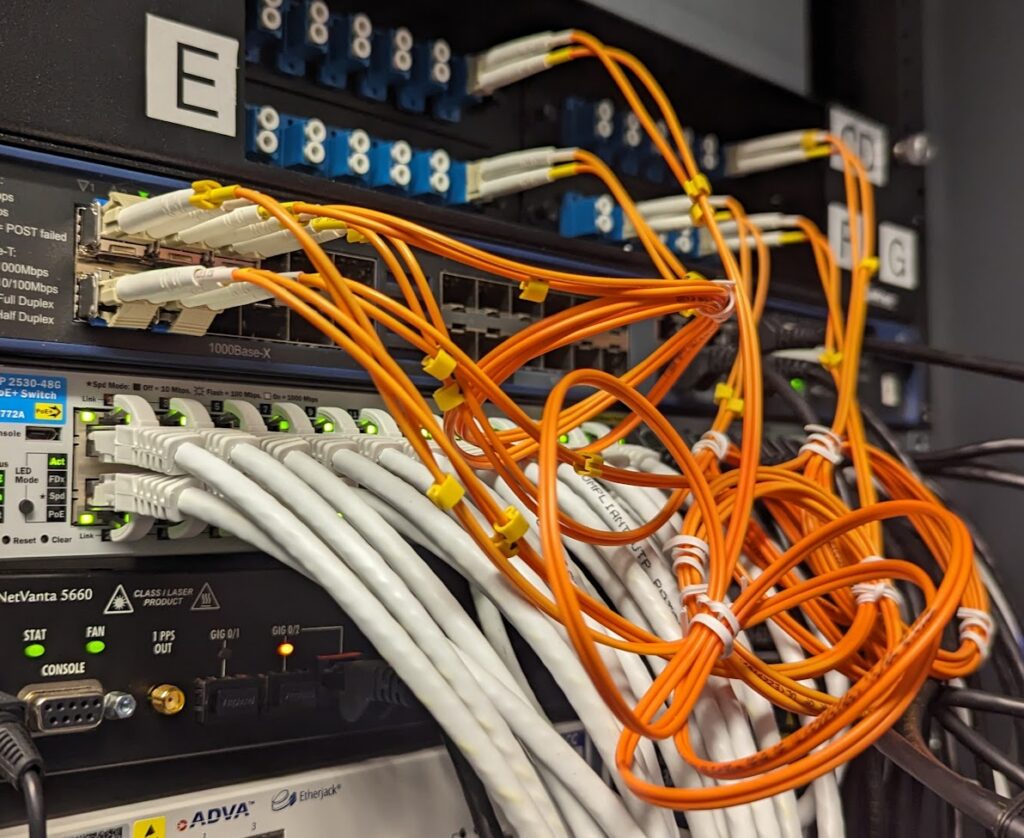
Whoever installed all this gear apparently didn’t realize there’s a minimum bend radius for fiberoptics: and for multi-mode fiber like you see above, that minimum bend radius is 30x the diameter of the jacketed pair. I didn’t try to break out a ruler, but that looked a lot more like 10x the jacket diameter than 30x to me, so off I went to grab a five-pack of LC to LC multi-mode patch cables.
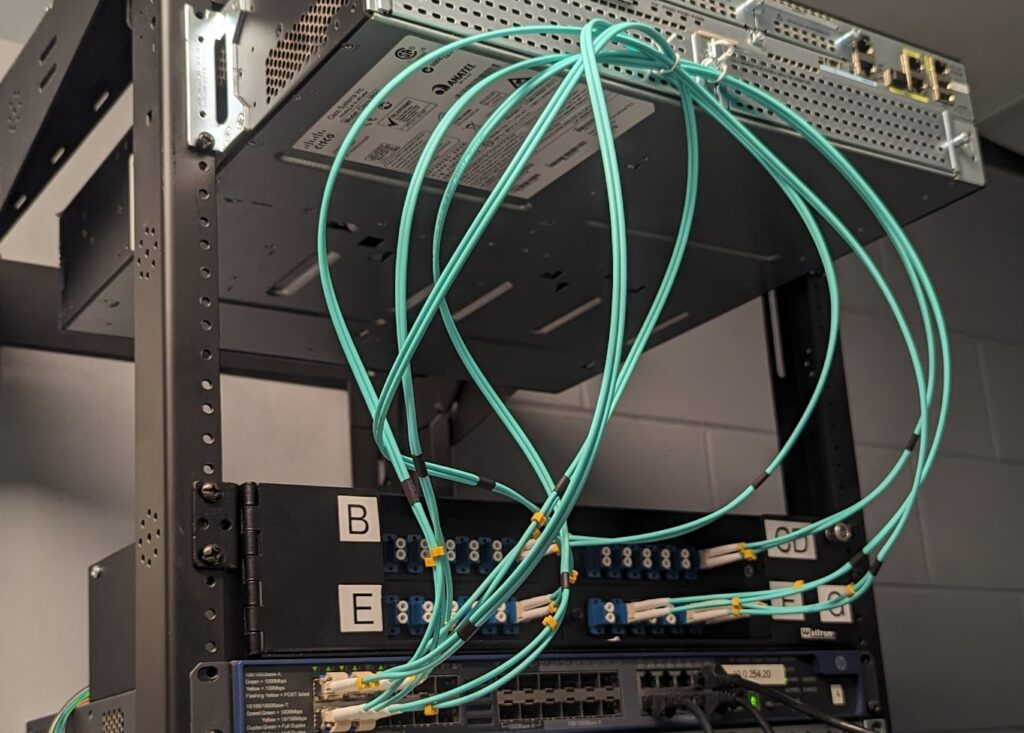
Keeping to our theme of me looking like a drunken redneck while actually improving things technically, I used some mounting points on the face of an abandoned Cisco switch mounted several units higher in the cabinet as a centerpoint anchor for my new patch cables. Does it look stupid? Yes. Does it keep things out of the way without fracturing the glass on the inside of my optic cables? Also yes.

The performance difference here was harder to spot–especially since I needed to perform it on a weekend with the facility empty except for myself–but if you know what you’re looking for, it’s there. Prior to replacing the patch cables, an iperf3 run to one of my internet-based servers had a TCP congestion window of 3.00MiB:

me@swift:~$ iperf3 -c [redacted]
Connecting to host [redacted], port 5201
[ 5] local [redacted] port 39874 connected to [redacted] port 5201
[ ID] Interval Transfer Bitrate Retr Cwnd
[ 5] 0.00-1.00 sec 30.3 MBytes 254 Mbits/sec 0 3.00 MBytes
[ 5] 1.00-2.00 sec 48.8 MBytes 409 Mbits/sec 0 3.00 MBytes
[ 5] 2.00-3.00 sec 52.5 MBytes 440 Mbits/sec 0 3.00 MBytes
[ 5] 3.00-4.00 sec 52.5 MBytes 440 Mbits/sec 0 3.00 MBytes
[ 5] 4.00-5.00 sec 36.2 MBytes 304 Mbits/sec 0 3.00 MBytes
[ 5] 5.00-6.00 sec 38.8 MBytes 325 Mbits/sec 0 3.00 MBytes
[ 5] 6.00-7.00 sec 40.0 MBytes 335 Mbits/sec 0 3.00 MBytes
[ 5] 7.00-8.00 sec 47.5 MBytes 399 Mbits/sec 0 3.00 MBytes
[ 5] 8.00-9.00 sec 52.5 MBytes 440 Mbits/sec 0 3.00 MBytes
[ 5] 9.00-10.00 sec 53.8 MBytes 451 Mbits/sec 0 3.00 MBytes
– – – – – – – – – – – – – – – – – – – – – – – – –
[ ID] Interval Transfer Bitrate Retr
[ 5] 0.00-10.00 sec 453 MBytes 380 Mbits/sec 0 sender
[ 5] 0.00-10.05 sec 452 MBytes 377 Mbits/sec receiver

iperf Done.

After replacing the too-tightly-bent fiber patch cables, the raw speed didn’t increase much–but the TCP congestion window doubled to 6.00MiB. This is an excellent sign which–if you understand TCP congestion windowing algorithms–strongly implies a significant decrease in experienced latency.

jim@swift:~$ iperf3 -c [redacted]
Connecting to host [redacted], port 5201
[ 5] local [redacted] port 39882 connected to [redacted] port 5201
[ ID] Interval Transfer Bitrate Retr Cwnd
[ 5] 0.00-1.00 sec 29.1 MBytes 244 Mbits/sec 0 6.00 MBytes
[ 5] 1.00-2.00 sec 52.5 MBytes 440 Mbits/sec 0 6.00 MBytes
[ 5] 2.00-3.00 sec 52.5 MBytes 441 Mbits/sec 0 6.00 MBytes
[ 5] 3.00-4.00 sec 47.5 MBytes 398 Mbits/sec 0 6.00 MBytes
[ 5] 4.00-5.00 sec 52.5 MBytes 440 Mbits/sec 0 6.00 MBytes
[ 5] 5.00-6.00 sec 52.5 MBytes 441 Mbits/sec 0 6.00 MBytes
[ 5] 6.00-7.00 sec 52.5 MBytes 440 Mbits/sec 0 6.00 MBytes
[ 5] 7.00-8.00 sec 52.5 MBytes 440 Mbits/sec 0 6.00 MBytes
[ 5] 8.00-9.00 sec 53.8 MBytes 451 Mbits/sec 0 6.00 MBytes
[ 5] 9.00-10.00 sec 52.5 MBytes 440 Mbits/sec 0 6.00 MBytes
– – – – – – – – – – – – – – – – – – – – – – – – –
[ ID] Interval Transfer Bitrate Retr
[ 5] 0.00-10.00 sec 498 MBytes 418 Mbits/sec 0 sender
[ 5] 0.00-10.05 sec 498 MBytes 415 Mbits/sec receiver

iperf Done.

This apparent improvement in latency is confirmed with simpler web-based speedtests to fast.com, which showed an unloaded latency of 3ms and a loaded latency of 48-85ms prior to replacing the cables. After replacing them, fast.com consistently showed unloaded latency of 2ms… and loaded latency of <10ms.
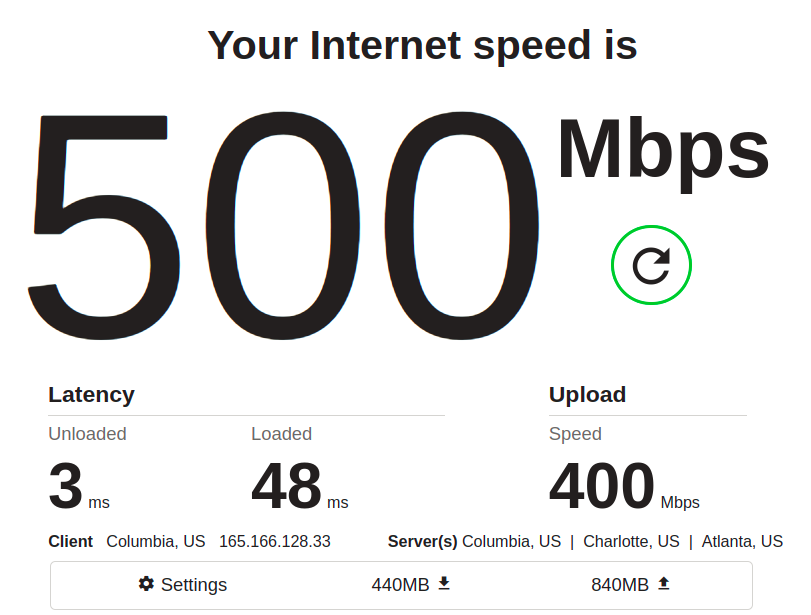
Again, pay attention to the latency. In the “before” shot above, we see a maxed-out download throughput of 500Mbps, which is nice… and in fact, at first glance, you might mistakenly think this is a better result than the “after” we see below:
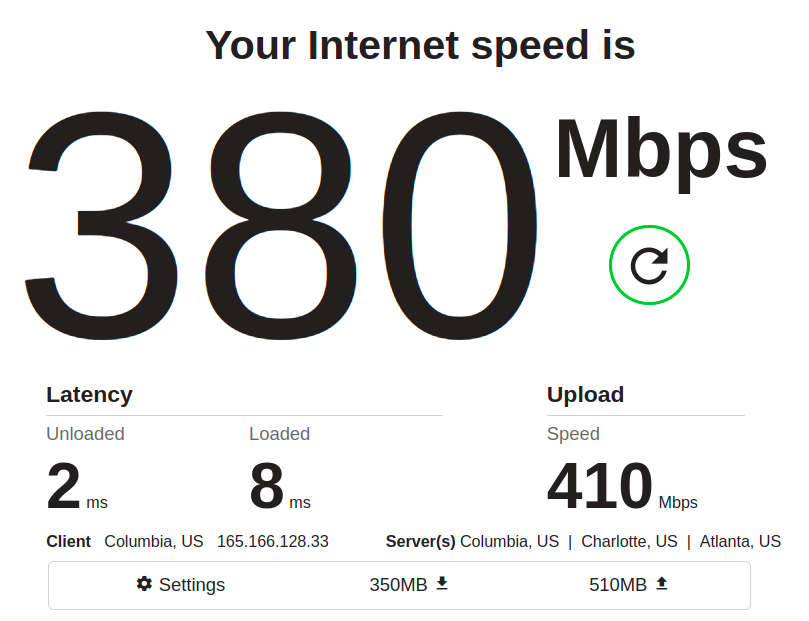
Oh no, you might think–download speed decreased from 500Mbps to 380Mbps! What did we do wrong? That’s the tricky part; we didn’t do anything wrong–something else on the network just siphoned off some of the available throughput while the test was running.

The important things to notice are, as mentioned, latency: it’s easy to dismiss the unloaded latency (meaning, how quickly pings return when the main bulk of the test isn’t running) decreasing from 3ms to 2ms. It’s only 1ms, after all… but it’s also a 33% improvement, and it held precisely consistent across many runs.

More conclusively, the loaded latency (time to return a ping when there’s lots of data moving) decreased by several hundred percent, and that result was also consistent across several runs.

There are almost certainly more gremlins to find and eliminate in this long-untended network, but we’re already in a much better position than we started from.
PSA: Cannot open Credentials Manager

I blew several INCREDIBLY frustrating hours trying to troubleshoot issues installing Google Workspace Sync and Microsoft Office 365 on multiple Windows 10 workstations today.

Searching for “failed to create profile” errors when setting up a Google Workspace Sync user for Outlook frequently nets you advice to fire up Windows’ Credential Manager and delete rogue credentials. The same advice often pops up for the dreaded “Trusted Platform Module Has Malfunctioned” error when attempting to register a freshly-downloaded Office 365 application to a user.

Unfortunately, trying to open Credential Manager also fails on affected PCs, with the error “An error occurred while performing this action: 0x80090345.” This was what finally led me to the workaround to the single issue affecting both Office365 setup and Google Workspace Sync setup.

First, open regedit on the affected PC. Then navigate to HKEY_LOCAL_MACHINE\Software\Microsoft\Cryptography\Protect\Providers\df9d8cd0-1501-11d1-8c7a-00c04fc297eb, and create a new registry DWORD value ProtectionPolicy, and set it to 1.

After creating the new DWORD and setting it to 1, restart your PC, and opening Credential Manager should then work fine. Once Credential Manager is open, delete anything you find in there, then register your Office365 apps and/or set up your Google Workspace Sync user.

That was four hours of my life I’m never getting back. Hope you found your answer sooner than I did!

Office 2016 for Mac on the Microsoft VLSC (Volume License Service Center) by way of TechSoup

If you bought Office 2016 for the Mac by way of volume licensing – for example, if you’re a non-profit and got it through TechSoup – you may have a hell of a time figuring out how to actually GET it. Above and beyond the usual fandango of getting an open license agreement and creating a Windows Live account for the same email address the OLSA is attached to and creating a VLSC account on that Windows Live account and taking ownership of the OLSA… things get deeply weird when you try to download it.

I had to google to even figure out what "Office Online Server" was.  Hint: you can't actually install it on a Mac...
I had to google to even figure out what “Office Online Server” was. Hint: you can’t actually install it on a Mac…

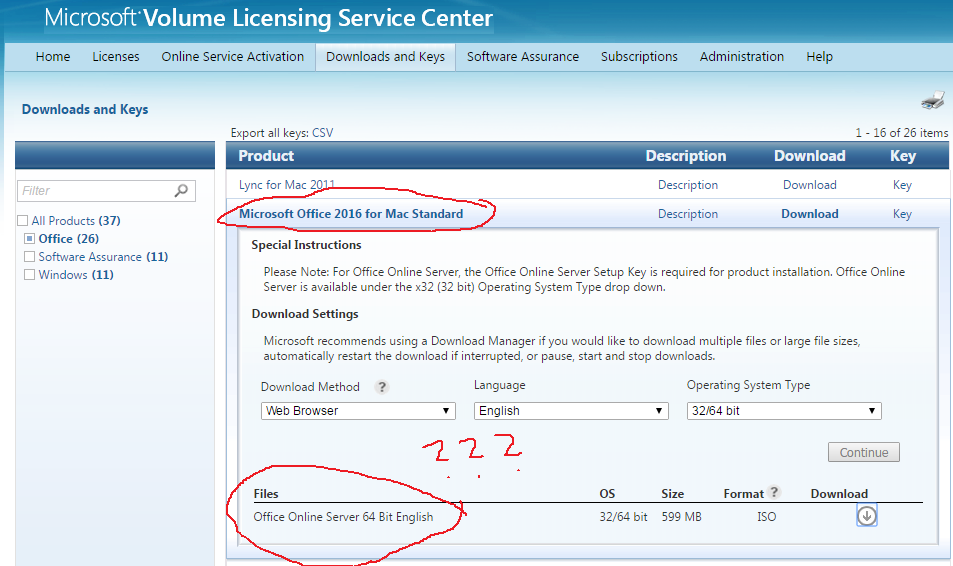
There’s your Microsoft Office for Mac 2016 Standard in the Downloads section, and it has the usual glowing text about how awesome it will be to have Office 2016 for your Mac in the Description tab… but when you click Download, all of a sudden you’re faces with a download for “Office Online Server”, which has absolutely nothing to do with Office 2016 for Mac.

I went around and around trying to figure out what was going on with this, to no avail. I eventually figured out – due to scads of people posting about OTHER problems with the Mac installer, which I fervently hope I won’t encounter once I actually get the chance to install this thing – that the ISO I should be seeing was about 1.6GB in size. The ISO for “Office Online Server 64 Bit English” is a “svelte” 599MB, so that’s not it.

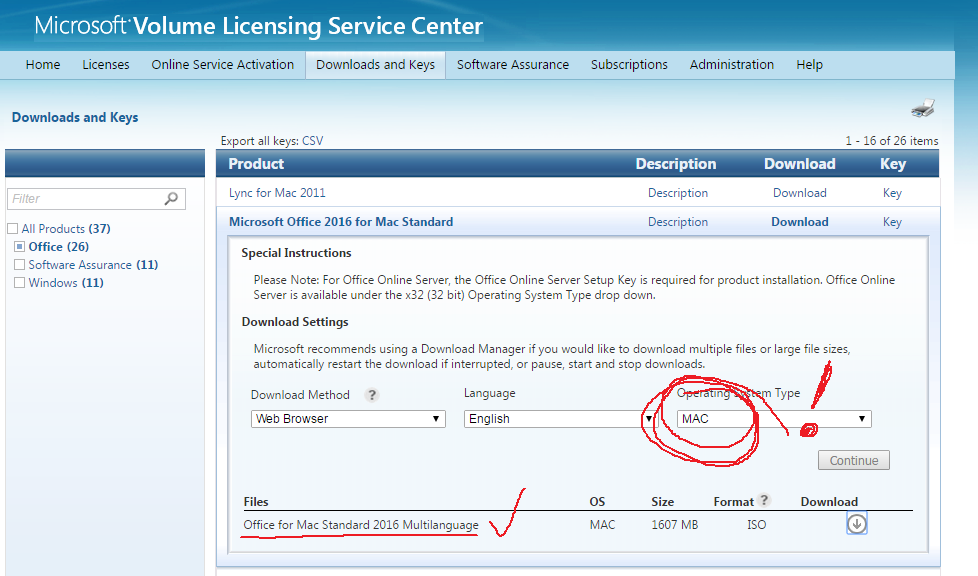
Eventually, just before giving up and trying to file a bug report with Microsoft about mislabeled downloads on the VLSC, I looked hard at the “32/64 bit” Operating System Type. I mean, I’d looked at it ten times already and moved on, because, sure, OS X should be taking a multi-arch installer, why not? But when I actually clicked the drop down…

somebody at Microsoft is in need of a paddlin'. Why the hell isn't "MAC" the *default* operating system type for "Office 2016 Standard FOR MAC?!"
somebody at Microsoft is in need of a paddlin’. Why the hell isn’t “MAC” the *default* operating system type for “Office 2016 Standard FOR MAC?!”

Yyyyyyeah. Hope this helps somebody else, that was a frustrating half hour or so.

Depressing Storage Calculator

When a Terabyte is not a Terabyte

It seems like a stupid question, if you’re not an IT professional – and maybe even if you are – how much storage does it take to store 1TB of data? Unfortunately, it’s not a stupid question in the vein of “what weighs more, a pound of feathers or a pound of bricks”, and the answer isn’t “one terabyte” either. I’m going to try to break down all the various things that make the answer harder – and unhappier – in easy steps. Not everybody will need all of these things, so I’ll try to lay it out in a reasonably likely order from “affects everybody” to “only affects mission-critical business data with real RTO and RPO defined”.

Counting the Costs

Simple Local Storage

Computer TB vs Manufacturer TB

To your computer, and to all computers since the dawn of computing, a KB is actually a “kibibyte”, a megabyte a “mebibyte”, and so forth – they’re powers of two, not of ten. So 1 KiB = 2^10 = 1024. That’s an extra 24 bytes from a proper Kilobyte, which is 10^3 = 1000. No big deal, right? Well, the difference squares itself with each hop up from KB to MB to GB to TB, and gets that much more significant. Storage manufacturers prefer – and also have, since the dawn of time – to measure in those proper power-of-ten units, since that means they get to put bigger numbers on a device of a given actual size and thus try to trick you into thinking it’s somehow better.

At the Terabyte/Tebibyte level, you’re talking about the difference between 2^40 and 10^12. So 1 TiB, as your computer measures data, is 1.0995 TB as the rat bastards who sell hard drives measure storage. Let’s just go ahead and round that up to a nice easy 1.1.

TL;DR: multiply times 1.1 to account for vendor units.

Working Free Space

Remember those sliding number puzzles you had as a kid, where the digits 1-8 were embedded in a 9-square grid, and you were supposed to slide them around one at a time until you got them in order? Without the “9” missing, you wouldn’t be able to slide them. That’s a pretty decent rough analogy of how storage generally works, for all sorts of general reasons. If you don’t have any free space, you can’t move the tiles around and actually get anything done. For our sliding number puzzles when we were kids, that was 8/9 of the available storage occupied. A better rule of thumb for us is 8/10, or 80%. Once your disk(s) are 80% full, you should consider them full, and you should immediately be either deleting things or upgrading. If they hit 90% full, you should consider your own personal pants to be on actual fire, and react with an appropriate amount of immediacy to remedy that.

TL;DR: multiply times 1.25 to account for working free space.

Growth

You’re probably not really planning on just storing one chunk of data you have right now and never changing it. You’re almost certainly talking about curating an ever-growing collection of data that changes and accumulates as time goes on. Most people and businesses should plan on their data storage needs to double about every five years – that’s pretty conservative; it can easily get worse than that. Still, five years is also a pretty decent – and very conservative, not aggressive – hardware refresh cycle. So let’s say we want to plan for our storage needs to be fulfilled by what we buy now, until we need new everything anyway. That means doubling everything so you don’t have to upgrade for another few years.

TL;DR: multiply times 2.0 to account for data growth over the next few years.

Disaster Recovery

What, you weren’t planning on not backing your stuff up, were you? At a bare minimum, you’re going to need as much storage for backup as you did for production – most likely, you’ll need considerably more. We’ll be super super generous here and assume all you need is enough space for one single full backup – which usually only applies if you also have redundancy and very heavy-duty “oops recovery” and maybe hotspares as well. But if you don’t have all those things… this really isn’t enough. Really.

TL;DR: multiply times 2.0 to account for one full backup, as disaster recovery.

Redundancy, Hotspares, and Snapshots

Snapshots / “Oops Recovery” Schemes

You want to have a way to fix it pretty much immediately if you accidentally break a document. What this scheme looks like may differ depending on the sophistication of the system you’re working on. At best, you’re talking something like ZFS snapshots. In the middle of the road, Windows’ Volume Shadow Copy service (what powers the “Previous Versions” tab in Windows Explorer). At worst, the Recycle Bin. (And that’s really not good enough and you should figure out a way to do better.) What these things all have in common is that they offer a limiting factor to how badly you can screw yourself with the stroke of a key – you can “undo” whatever it is you broke to a relatively recent version that wasn’t broken in just a few clicks.

Different “oops recovery” schemes have different levels of efficiency, and different amounts of point-in-time granularity. My own ZFS-based systems maintain 30 hourly snapshots, 30 daily snapshots, and 3 monthly snapshots. I generally plan for snapshot space to take up about 33% as much space as my production storage, and that’s not a bad rule of thumb across the board, even if you can’t cram as many of your own schemes level of “oops points” in the same amount of space.

TL;DR: multiply times 1.3 to account for snapshots, VSS, or other “oops recovery”.

Redundancy

Redundancy – in the form of mirrored drives, striped RAID arrays, and so forth – is not a backup! However, it is a very, very useful thing to help you avoid the downtime monster, and in the case of more advanced storage schema like ZFS, to avoid corruption and bitrot. If you’re using 1:1 redundancy – RAID1, RAID10, ZFS mirrors, or btrfs-RAID1 distributed redundancy – this means you need two of every drive. If you’re using two blocks of parity in each eight block stripe (think RAID6 or ZFS RAIDZ2 with eight drives in each vdev), you’re going to be looking at 75% theoretical efficiency that comes out to more like 70% actual efficiency after stripe overhead. I’m just going to go ahead and say “let’s calculate using the more pessimistic number”. So, double everything to account for redundancy.

TL;DR: multiply times 2.0 to account for redundant storage scheme.

Hotspare

This is probably going to be the least common item on the list, but the vast majority of my clients have opted for it at this point. A hotspare server is ready to take over for the production server at a moment’s notice, without an actual “restore the backup” type procedure. With Sanoid, this most frequently means hourly replication from production to hotspare, with the ability to spin up the replicated VMs – both storage and hypervisor – directly on the hotspare server. The hotspare is thus promoted to being production, and what was the production server can be repaired with reduced time pressure and restored into service as a hotspare itself.

If you have a hotspare – and if, say, ten or more people’s payroll and productivity is dependent on your systems being up and running, you probably should – that’s another full redundancy to add to the bill.

TL;DR: bump your “backup” allowance up from x2.0 to x3.0 if you also use hotspare hardware.

The Butcher’s Bill

If you have, and account for, everything we went through above, to store 1 “terabyte” of data you’ll need:

1 “terabyte” (really a tebibyte) of data
x 1.1 TiB per TB
x 1.25 for working free space
x 2.0 for planned growth over the next few years

x 3.0 for disaster recovery + hotspare systems
x 1.3 for snapshot or other “oops recovery”
x 2.0 for redundancy
==========================================
21.45 TB of actual storage hardware.

That can’t be right! You’re insane!

Alright, let’s break that down somewhat differently, then. Keep in mind that we’re talking about three separate computer systems in the above example, each with its own storage (production, hotspare, and disaster recovery). Now let’s instead assume that we’re talking about using drives of a given size, and see what that breaks down to in terms of actual usable storage on them.

Let’s forget about the hotspare and the disaster recovery boxes, so we’re looking at the purely local level now. Then let’s toss out the redundancy, since we’re only talking about one individual drive. That leaves us with 1TB / 1.1 TiB per TB / 1.25 working TiB per stored TiB / 1.3 TiB of prod+snapshots for every TiB of prod = 0.559 TiB of usable capacity per 1TB drive. Factor in planned growth by cutting that in half, and that means you shouldn’t be planning to start out storing more than 0.28 TiB of data on 1TB of storage.

TL;DR: If you have 280GiB of existing data, you need 1TB of local capacity.

That probably sounds more reasonable in terms of your “gut feel”, right? You have 280GiB of data, so you buy a 1TB disk, and that’ll give you some breathing room for a few years? Maybe you think it feels a bit aggressive (it isn’t), but it should at least be within the ballpark of how you’re used to thinking and feeling.

Now multiply by 2 for storage redundancy (mirrored disks), and by 3 for site/server redundancy (production, hotspare, and DR) and you’re at six 1TB disks total, to store 280GiB of data. 6/.28 = 21.43, and we’re right back where we started from, less a couple of rounding errors: we need to provision 21.45 TB for every 1TiB of data we’ve got right now.

8:1 rule of thumb

Based on the same calculations and with a healthy dose of rounding, we come up with another really handy, useful, memorable rule of thumb: when buying, you need eight times as much raw storage in production as the amount of data you have now.

So if you’ve got 1TiB of data, buy servers with 8TB of disks – whether it’s two 4TB disks in a single mirror, or four 2TB disks in two mirrors, or whatever, your rule of thumb is 8:1. Per system, so if you maintain hotspare and DR systems, you’ll need to do that twice more – but it’s still 8:1 in raw storage per machine.

Reshuffling pool storage on the fly

If you’re new here:

Sanoid is an open-source storage management project, built on top of the OpenZFS filesystem and Linux KVM hypervisor, with the aim of providing affordable, open source, enterprise-class hyperconverged infrastructure. Most of what we’re talking about today boils down to “managing ZFS storage” – although Sanoid’s replication management tool Syncoid does make the operation a lot less complicated.

Recently, I deployed two Sanoid appliances to a new customer in Raleigh, NC.

When the customer specced out their appliances, their plan was to deploy one production server and one offsite DR server – and they wanted to save a little money, so the servers were built out differently. Production had two SSDs and six conventional disks, but offsite DR just had eight conventional disks – not like DR needs a lot of IOPS performance, right?

Well, not so right. When I got onsite, I discovered that the “disaster recovery” site was actually a working space, with a mission critical server in it, backed up only by a USB external disk. So we changed the plan: instead of a production server and an offsite DR server, we now had two production servers, each of which replicated to the other for its offsite DR. This was a big perk for the customer, because the lower-specced “DR” appliance still handily outperformed their original server, as well as providing ZFS and Sanoid’s benefits of rolling snapshots, offsite replication, high data integrity, and so forth.

But it still bothered me that we didn’t have solid state in the second suite.

The main suite had two pools – one solid state, for boot disks and database instances, and one rust, for bulk storage (now including backups of this suite). Yes, our second suite was performing better now than it had been on their original, non-Sanoid server… but they had a MySQL instance that tended to be noticeably slow on inserts, and the desire to put that MySQL instance on solid state was just making me itch. Problem is, the client was 250 miles away, and their Sanoid Standard appliance was full – eight hot-swap bays, each of which already had a disk in it. No more room at the inn!

We needed minimal downtime, and we also needed minimal on-site time for me.

You can’t remove a vdev from an existing pool, so we couldn’t just drop the existing four-mirror pool to a three-mirror pool. So what do you do? We could have stuffed the new pair of SSDs somewhere inside the case, but I really didn’t want to give up the convenience of externally accessible hot swap bays.

So what do you do?

In this case, what you do – after discussing all the pros and cons with the client decision makers, of course – is you break some vdevs. Our existing pool had four mirrors, like this:

	NAME                              STATE     READ WRITE CKSUM
	data                              ONLINE       0     0     0
	  mirror-0                        ONLINE       0     0     0
	    wwn-0x50014ee20b8b7ba0-part3  ONLINE       0     0     0
	    wwn-0x50014ee20be7deb4-part3  ONLINE       0     0     0
	  mirror-1                        ONLINE       0     0     0
	    wwn-0x50014ee261102579-part3  ONLINE       0     0     0
	    wwn-0x50014ee2613cc470-part3  ONLINE       0     0     0
	  mirror-2                        ONLINE       0     0     0
	    wwn-0x50014ee2613cfdf8-part3  ONLINE       0     0     0
	    wwn-0x50014ee2b66693b9-part3  ONLINE       0     0     0
          mirror-3                        ONLINE       0     0     0
            wwn-0x50014ee20b9b4e0d-part3  ONLINE       0     0     0
            wwn-0x50014ee2610ffa17-part3  ONLINE       0     0     0

Each of those mirrors can be broken, freeing up one disk – at the expense of removing redundancy on that mirror, of course. At first, I thought I’d break all the mirrors, create a two-mirror pool, migrate the data, then destroy the old pool and add one more mirror to the new pool. And that would have worked – but it would have left the data unbalanced, so that the majority of reads would only hit two of my three mirrors. I decided to go for the cleanest result possible – a three mirror pool with all of its data distributed equally across all three mirrors – and that meant I’d need to do my migration in two stages, with two periods of user downtime.

First, I broke mirror-0 and mirror-1.

I detached a single disk from each of my first two mirrors, then cleared its ZFS label afterward.

    root@client-prod1:/# zpool detach wwn-0x50014ee20be7deb4-part3 ; zpool labelclear wwn-0x50014ee20be7deb4-part3
    root@client-prod1:/# zpool detach wwn-0x50014ee2613cc470-part3 ; zpool labelclear wwn-0x50014ee2613cc470-part3

Now mirror-0 and mirror-1 are in DEGRADED condition, as is the pool – but it’s still up and running, and the users (who are busily working on storage and MySQL virtual machines hosted on the Sanoid Standard appliance we’re shelled into) are none the wiser.

Now we can create a temporary pool with the two freed disks.

We’ll also be sure to set compression on by default for all datasets created on or replicated onto our new pool – something I truly wish was the default setting for OpenZFS, since for almost all possible cases, LZ4 compression is a big win.

    root@client-prod1:/# zpool create -o ashift=12 tmppool mirror wwn-0x50014ee20be7deb4-part3 wwn-0x50014ee2613cc470-part3
    root@client-prod1:/# zfs set compression=lz4 tmppool

We haven’t really done much yet, but it felt like a milestone – we can actually start moving data now!

Next, we use Syncoid to replicate our VMs onto the new pool.

At this point, these are still running VMs – so our users won’t see any downtime yet. After doing an initial replication with them up and running, we’ll shut them down and do a “touch-up” – but this way, we get the bulk of the work done with all systems up and running, keeping our users happy.

    root@client-prod1:/# syncoid -r data/images tmppool/images ; syncoid -r data/backup tmppool/backup

This took a while, but I was very happy with the performance – never dipped below 140MB/sec for the entire replication run. Which also strongly implies that my users weren’t seeing a noticeable amount of slowdown! This initial replication completed in a bit over an hour.

Now, I was ready for my first little “blip” of actual downtime.

First, I shut down all the VMs running on the machine:

    root@client-prod1:/# virsh shutdown suite100 ; virsh shutdown suite100-mysql ; virsh shutdown suite100-openvpn
    root@client-prod1:/# watch -n 1 virsh list

As soon as virsh list showed me that the last of my three VMs were down, I ctrl-C’ed out of my watch command and replicated again, to make absolutely certain that no user data would be lost.

    root@client-prod1:/# syncoid -r data/images tmppool/images ; syncoid -r data/backup tmppool/backup

This time, my replication was done in less than ten seconds.

Doing replication in two steps like this is a huge win for uptime, and a huge win for the users – while our initial replication needed a little more than an hour, the “touch-up” only had to copy as much data as the users could store in a few moments, so it was done in a flash.

Next, it’s time to rename the pools.

Our system expects to find the storage for its VMs in /data/images/VMname, so for minimum downtime and reconfiguration, we’ll just export and re-import our pools so that it finds what it’s looking for.

    root@client-prod1:/# zpool export data ; zpool import data olddata 
    root@client-prod1:/# zfs set mountpoint=/olddata/images/qemu olddata/images/qemu ; zpool export olddata

Wait, what was that extra step with the mountpoint?

Sanoid keeps the virtual machines’ hardware definitions on the zpool rather than on the root filesystem – so we want to make sure our old pool’s ‘qemu’ dataset doesn’t try to automount itself back to its original mountpoint, /etc/libvirt/qemu.

    root@client-prod1:/# zpool export tmppool ; zpool import tmppool data
    root@client-prod1:/# zfs set mountpoint=/etc/libvirt/qemu data/images/qemu

OK, at this point our original, degraded zpool still exists, intact, as an exported pool named olddata; and our temporary two disk pool exists as an active pool named data, ready to go.

After less than one minute of downtime, it’s time to fire up the VMs again.

    root@client-prod1:/# virsh start suite100 ; virsh start suite100-mysql ; virsh start suite100-openvpn

If anybody took a potty break or got up for a fresh cup of coffee, they probably missed our first downtime window entirely. Not bad!

Time to destroy the old pool, and re-use its remaining disks.

After a couple of checks to make absolutely sure everything was working – not that it shouldn’t have been, but I’m definitely of the “measure twice, cut once” school, especially when the equipment is a few hundred miles away – we’re ready for the first completely irreversible step in our eight-disk fandango: destroying our original pool, so that we can create our final one.

    root@client-prod1:/# zpool destroy olddata
    root@client-prod1:/# zpool create -o ashift=12 newdata mirror wwn-0x50014ee20b8b7ba0-part3 wwn-0x50014ee261102579-part3
    root@client-prod1:/# zpool add -o ashift=12 newdata mirror wwn-0x50014ee2613cfdf8-part3 wwn-0x50014ee2b66693b9-part3
    root@client-prod1:/# zpool add -o ashift=12 newdata mirror wwn-0x50014ee20b9b4e0d-part3 wwn-0x50014ee2610ffa17-part3
    root@client-prod1:/# zfs set compression=lz4 newdata

Perfect! Our new, final pool with three mirrors is up, LZ4 compression is enabled, and it’s ready to go.

Now we do an initial Syncoid replication to the final, six-disk pool:

    root@client-prod1:/# syncoid -r data/images newdata/images ; syncoid -r data/backup newdata/backup

About an hour later, it’s time to shut the VMs down for Brief Downtime Window #2.

    root@client-prod1:/# virsh shutdown suite100 ; virsh shutdown suite100-mysql ; virsh shutdown suite100-openvpn
    root@client-prod1:/# watch -n 1 virsh list

Once our three VMs are down, we ctrl-C out of ‘watch’ again, and…

Time for our final “touch-up” re-replication:

    root@client-prod1:/# syncoid -r data/images newdata/images ; syncoid -r data/backup newdata/backup

At this point, all the actual data is where it should be, in the right datasets, on the right pool.

We fix our mountpoints, shuffle the pool names, and fire up our VMs again:

    root@client-prod1:/# zpool export data ; zpool import data tmppool 
    root@client-prod1:/# zfs set mountpoint=/tmppool/images/qemu olddata/images/qemu ; zpool export tmppool
    root@client-prod1:/# zpool export newdata ; zpool import newdata data
    root@client-prod1:/# zfs set mountpoint=/etc/libvirt/qemu data/images/qemu
    root@client-prod1:/# virsh start suite100 ; virsh start suite100-mysql ; virsh start suite100-openvpn

Boom! Another downtime window over with in less than a minute.

Our TOTAL elapsed downtime was less than two minutes.

At this point, our users are up and running on the final three-mirror pool, and we won’t be inconveniencing them again today. Again we do some testing to make absolutely certain everything’s fine, and of course it is.

The very last step: destroying tmppool.

    root@client-prod1:/# zpool destroy tmppool

That’s it; we’re done for the day.

We’re now up and running on only six total disks, not eight, which gives us the room we need to physically remove two disks. With those two disks gone, we’ve got room to slap in a pair of SSDs for a second pool with a solid-state mirror vdev when we’re (well, I’m) there in person, in a week or so. That will also take a minute or less of actual downtime – and in that case, the preliminary replication will go ridiculously fast too, since we’ll only be moving the MySQL VM (less than 20G of data), and we’ll be writing at solid state device speeds (upwards of 400MB/sec, for the Samsung Pro 850 series I’ll be using).

None of this was exactly rocket science. So why am I sharing it?

Well, it’s pretty scary going in to deliberately degrade a production system, so I wanted to lay out a roadmap for anybody else considering it. And I definitely wanted to share the actual time taken for the various steps – I knew my downtime windows would be very short, but honestly I’d been a little unsure how the initial replication would go, given that I was deliberately breaking mirrors and degrading arrays. But it went great! 140MB/sec sustained throughput makes even pretty substantial tasks go by pretty quickly – and aside from the two intervals with a combined downtime of less than two minutes, my users never even noticed anything happening.

Closing with a plug: yes, you can afford it.

If this kind of converged infrastructure (storage and virtualization) management sounds great to you – high performance, rapid onsite and offsite replication, nearly zero user downtime, and a whole lot more – let me add another bullet point: low cost. Getting started isn’t prohibitively expensive.

Sanoid appliances like the ones we’re describing here – including all the operating systems, hardware, and software needed to run your VMs and manage their storage and automatically replicate them both on and offsite – start at less than $5,000. For more information, send us an email, or call us at (803) 250-1577.

PSA: don’t buy or trust Lenovo

There’s a big flurry in the IT world today about Lenovo shipping malware – oops, pardon me, a PUP or “Potentially Unwanted Program” – in some of its consumer laptops.

I’m going to try to keep my own technical coverage of this fairly brief; you can refer to ZDNet’s article for a somewhat glossier overview.

Superfish – the maladware in question – does the following:

  • installs a certificate in the Trusted CA store on the infected machine
  • installs an SSL-enabled proxy on the machine to intercept all HTTP and HTTPS traffic
  • automatically generates a new certificate from the Superfish CA onboard to match any SSL connection that’s being made

So Superfish is sniffing literally ALL of the traffic on your machine – everything from browsing Reddit to transferring funds online with your bank. But wait, it gets worse:

  • Superfish’s proxy does not pass on validation errors it encounters
  • uninstalling Superfish does not remove the bogus CA cert from your machine
  • all machines use the same private key for all Superfish-generated certs

This means that if you have Superfish, anyone can insert themselves in your traffic – go to a coffee shop, and anyone who wants to can intercept your wireless connection, use a completely bogus certificate to claim to be your bank, and Superfish will obligingly stamp its own bogus certificate on top of the connection – which your browser trusts, which means you get the green lock icon and no warning even though both Superfish and the other attacker are actively compromising your connection – they can steal credentials, change the content of the pages you see, perform actions as you while you’re logged in, sky’s the limit.

This also means that even after you remove Superfish, if you haven’t manually found and deleted the bogus CA certificate, anybody who is aware of Superfish can generate bogus certificates that pass the Superfish CA – so you’re still vulnerable to being MITM’ed by literally anybody anywhere, even though you’ve removed Superfish itself.

So, this is bad. Really bad. Far worse than the usual bloatware / shovelware crap found on consumer machines. In fact, this is unusually bad even by the already-terrible standards of “PUPs” which mangle and modify your web traffic. But that’s not the worst part. The worst part is Lenovo’s official statement (mirrored on the Wayback Machine in case they alter it):

We have thoroughly investigated this technology and do not find any evidence to substantiate security concerns. […] The relationship with Superfish is not financially significant; our goal was to enhance the experience for users.

this-is-fine

The company is looking you dead in the eye and telling you that they didn’t care about the money they got for installing software that injects ads into your web browsing experience, they did it because they thought it would be awesome for you.

You can take that one of two ways: either they’re far too malicious to trust with your IT purchases, or they’re far too ignorant to trust with your IT purchases. I cannot for the life of me think of a third option.

Fascinating insight into IT and non-profits

If you’ve ever wondered what the typical non-profit looks like in terms of IT budget – everything from salaries, to head count, to non-salary budget per staff, to non-salary budget per category (project management, outsourced services, hardware, software, more…) looks like, NTEN has got you covered.

http://www.nten.org/research/download_it_staffing_2012

This is a free download, though they do ask for your name and email address before you can click through to the PDF.  Fascinating, very deep dive, and totally worth it whether you’re a decision maker in a non profit yourself, a service provider with non-profit customers, or even just somebody curious about how organizations function.