Rebalancing data on ZFS mirrors

One of the questions that comes up time and time again about ZFS is “how can I migrate my data to a pool on a few of my disks, then add the rest of the disks afterward?”

If you just want to get the data moved and don’t care about balance, you can just copy the data over, then add the new disks and be done with it. But, it won’t be distributed evenly over the vdevs in your pool.

Don’t fret, though, it’s actually pretty easy to rebalance mirrors. In the following example, we’ll assume you’ve got four disks in a RAID array on an old machine, and two disks available to copy the data to in the short term.

Step one: create the new pool, copy data to it

First up, we create a simple temporary zpool with the two available disks.

zpool create temp -oashift=12 mirror /dev/disk/by-id/wwn-disk0 /dev/disk/by-id/disk1

Simple. Now you’ve got a ZFS mirror named temp, and you can start copying your data to it.

Step two: scrub the pool

Do not skip this step!

zpool scrub temp

Once this is done, do a zpool status temp to make sure you don’t have any errors. Assuming you don’t, you’re ready to proceed.

Step three: break the mirror, create a new pool

zpool detach temp /dev/disk/by-id/disk1

Now, your temp pool is down to one single disk vdev, and you’ve freed up one of its original disks. You’ve also got a known good copy of all your data on disk0, and you’ve verified it’s all good by using a zpool scrub command in step two. So, destroy the old machine’s storage, freeing up its four disks for use. 

zpool create tank /dev/disk/by-id/disk1 mirror /dev/disk/by-id/disk2 /dev/disk/by-id/disk3 mirror /dev/disk/by-id/disk4 /dev/disk/by-id/disk5

Now you’ve got your original temporary pool named temp, and a new permanent pool named tank. Pool “temp” is down to one single-disk vdev, and pool “tank” has one single-disk vdev, and two mirror vdevs.

Step four: copy your data from temp to tank

Copy all your data one more time, from the single-disk pool “temp” to the new pool “tank.” You can use zfs replication for this, or just plain old cp or rsync. Your choice.

Step five: scrub tank, destroy temp

Do not skip this step.

zpool scrub tank

Once this is done, do a zpool status tank to make sure you don’t have any errors. Assuming you don’t, now it’s time to destroy your temporary pool to free up its disk.

zpool destroy temp

Almost done!

Step six: attach the final disk from temp to the single-disk vdev in tank

zpool attach tank /dev/disk/by-id/disk0 /dev/disk/by-id/disk1

That’s it—you now have all of your data imported to a six-disk pool of mirrors, and all of the data is evenly distributed (according to disk size, at least) across all vdevs, not all clumped up on the first one to be added.

You can obviously adjust this formula for larger (or smaller!) pools, and it doesn’t necessarily require importing from an older machine—you can use this basic technique to redistribute data across an existing pool of mirrors, too, if you add a new mirror vdev. 

The important concept here is the idea of breaking mirror vdevs using zpool detach, and creating mirror vdevs from single-disk vdevs using zpool attach.


Estimating space occupied by multiple ZFS snapshots

You want to reclaim space on a ZFS pool by deleting some old snapshots. Problem is, you take snapshots frequently, so they all have deceptively low REFER values—REFER only shows you the space unique to a snapshot, so it’s entirely possible that deleting two snapshots that each show REFER of 1MiB will actually remove 100GiB of data.

How, you ask? Well, if that 100GiB of data is common to both snapshots, it won’t show up on the REFER of either—but if it was present in only those two snapshots, deleting them both unlinks that 100GiB and marks it free again.

Luckily, zfs destroy has a dry-run option, and can be used to delete sequences of snapshots. So you can see before-hand how much space will be reclaimed by deleting a sequence of snapshots, like this:

root@box:~# zfs destroy -nv pool/dataset@snap4%snap8
would destroy pool/dataset@snap4
would destroy pool/dataset@snap5
would destroy pool/dataset@snap6
would destroy pool/dataset@snap7
would destroy pool/dataset@snap8
would reclaim 25.2G

Why can’t I get to the internet on my new OpnSense install?!

You buy a nice new firewall appliance. You install OpnSense on it, set all the WAN and LAN stuff up to match your existing firewall, and you drop it into place. WTF, no internet…?

First of all, if you’re using a cable ISP, remember that most cable modems are MAC address locked, and will refuse to talk to a new MAC address if they’ve already seen a different one connected. So, remember to FULLY power-cycle your cable modem. Buttons won’t cut it, in many cases—you gotta unplug the power cable out of that sucker, give it a count of five to think about its sins, then plug it back in and let it re-sync.

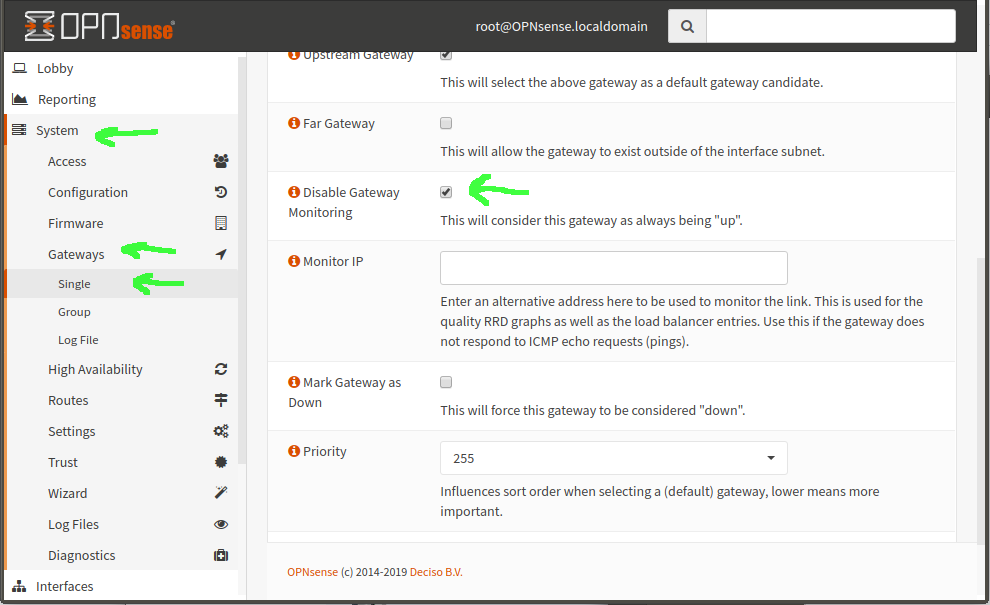
If you still don’t have any internets after power-cycling and your modem showing everything sync’ed and online, you may be falling afoul of a weirdness in OpnSense’s default gateway configs. By default, it will mark a gateway as “down” if it doesn’t return pings… but many ISP gateway addresses (not the WAN address your router gets, the one just upstream of it) don’t return pings. So, OpnSense reports it as down and refuses to even try slinging packets through it.

screenshot of opnsense gateway configs

To fix this, go to System–>Gateways–>Single and select your WANGW gateway for editing. Now scroll down, find “Disable Gateway monitoring” and give that sucker a checkmark. Once you click “Save”, you should now see your gateway green and online, and packets should start flowing.


Static routing through VPN servers in OpnSense

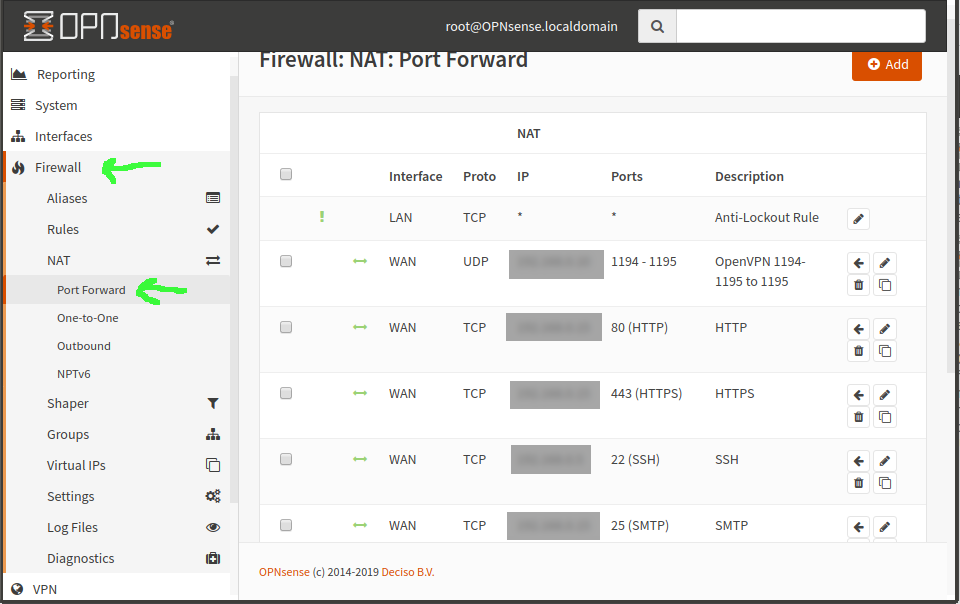
You’ve got a server on the LAN running OpenVPN, WireGuard, or some other VPN service. You port forwarded the VPN service port to that box, which was easy enough, under Firewall–>NAT–>Port Forward.

screenshot of opnsense portforwarding
But now you need to set a static route through that LAN-located gateway machine, so that all the machines on the LAN can find it to respond to requests from the tunnel—eg, 10.8.0.0/24.

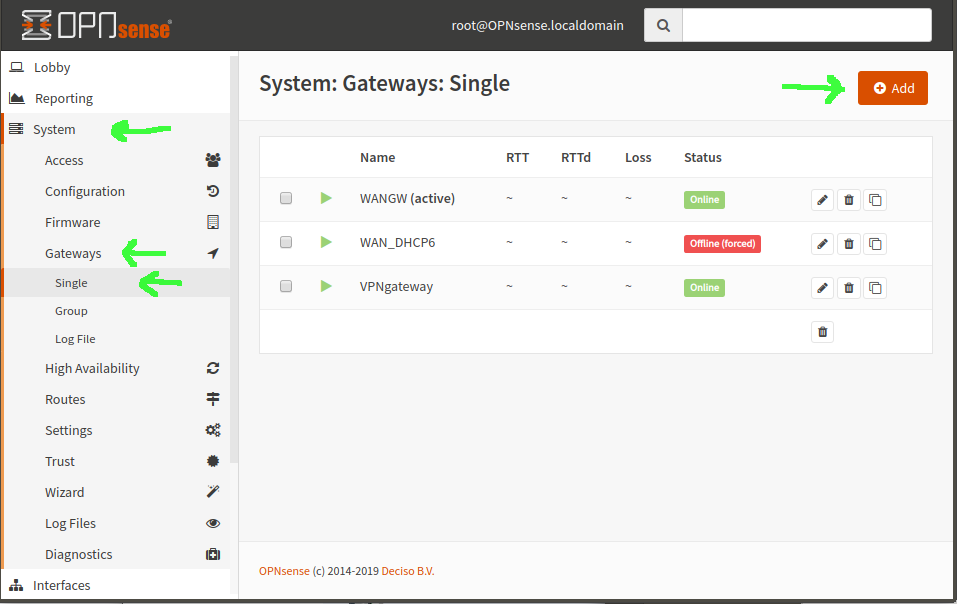
First step, in either OpnSense or pfSense, is to set up an additional gateway. In OpnSense, that’s System–>Gateways–>Single. Add a gateway with your VPN server’s LAN IP address, name it, done.

screenshot of opnsense gateways

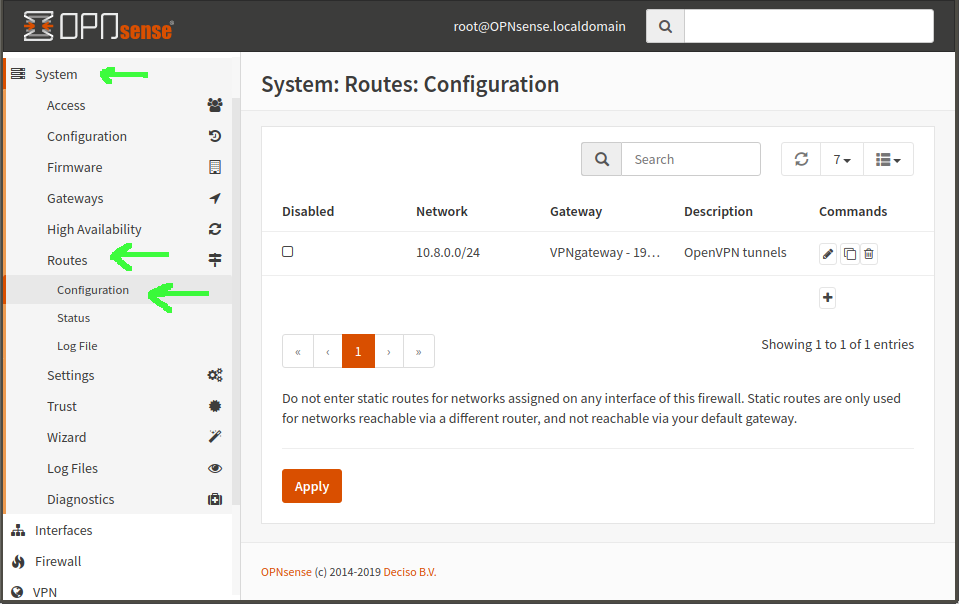
Now you create a static route, in System–>Routes–>Configuration. Network Address is the subnet of your tunnels—in our example, 10.8.0.0/24. Gateway is the new gateway you just created. Natch.

screenshot of opnsense static routes

At this point, if you connect into the network over your VPN, your remote client will be able to successfully ping machines on the LAN… but not access any services. If you try nmap from the remote client, it shows all ports filtered. WTF?

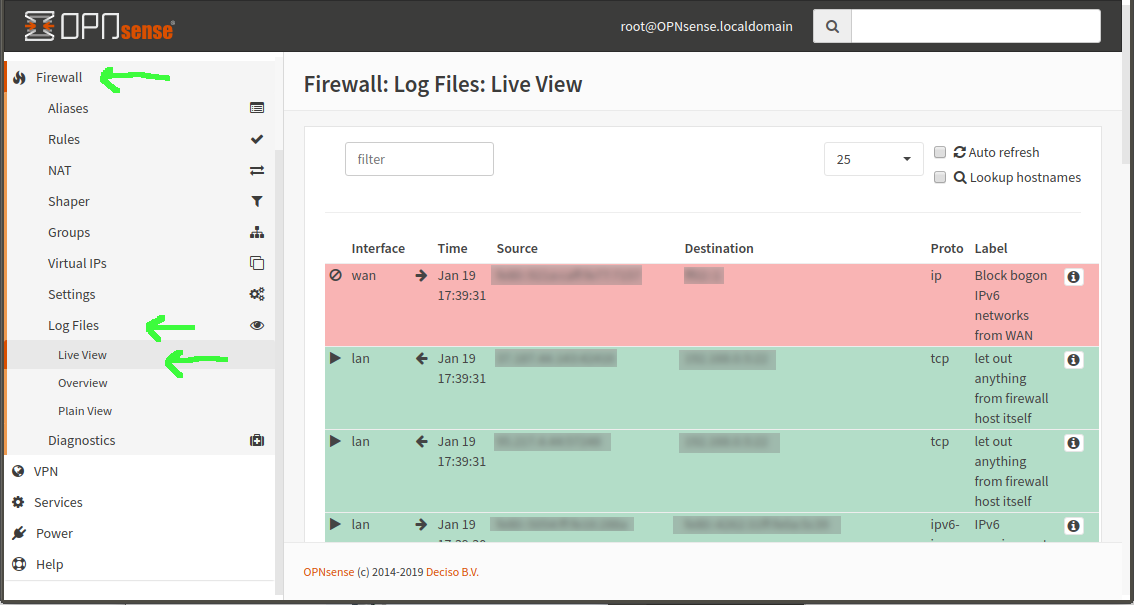
Diagnostically, you can go in the OpnSense GUI to Firewall–>Log Files–>Live View. If you try something nice and obnoxious like nmap that will constantly try to open connections, you’ll see tons of red as the connections from your remote machine are blocked, using Default Deny. But then you look at your LAN rules—and they’re default allow! WTF?

screenshot of opnsense firewall live view


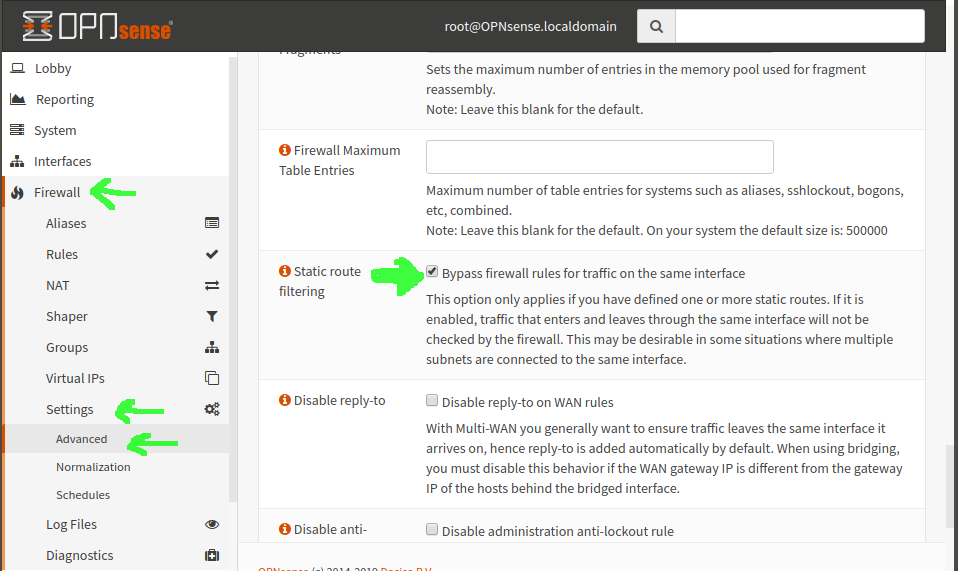
I can’t really answer W the F actually is, but I can, after much cursing, tell you how to fix it. Go in OpnSense to Firewall–>Settings–>Advanced and scroll most of the way down the page. Look for “Static route filtering” and check the box for “Bypass firewall rules for traffic on the same interface”—now click the Save button and, presto, when you go back to your live firewall view, you see tons of green on that nmap instead of tons of red—and, more importantly, your actual services can now connect from remote clients connected to the VPN.

screenshot of opnsense firewall advanced settings
This is the dastardly little bugger of a setting you’ve been struggling to find.

About ZFS recordsize

ZFS stores data in records, which are themselves composed of blocks. The block size is set by the ashift value at time of vdev creation, and is immutable. The recordsize, on the other hand, is individual to each dataset(although it can be inherited from parent datasets), and can be changed at any time you like. In 2019, recordsize defaults to 128K if not explicitly set.

big files? big recordsize.

The general rule of recordsize is that it should closely match the typical workload experienced within that dataset. For example, a dataset used to store high-quality JPGs, averaging 5MB or more, should have recordsize=1M. This matches the typical I/O seen in that dataset – either reading or writing a full 5+ MB JPG, with no random access within each file – quite well; setting that larger recordsize prevents the files from becoming unduly fragmented, ensuring the fewest IOPS are consumed during either read or write of the data within that dataset.

DB binaries? Smaller recordsize.

By contrast, a dataset which directly contains a MySQL InnoDB database should have recordsize=16K. That’s because InnoDB defaults to a 16KB page size, so most operations on an InnoDB database will be done in individual 16K chunks of data. Matching recordsize to MySQL’s page size here means we maximize the available IOPS, while minimizing latency on the highly sync()hronous reads and writes made by the database (since we don’t need to read or write extraneous data while handling our MySQL pages).

VMs? Match the recordsize to the VM storage format.

(That’s cluster_size, for QEMU/KVM .qcow2.)

On the other hand, if you’ve got a MySQL InnoDB database stored within a VM, your optimal recordsize won’t necessarily be either of the above – for example, KVM .qcow2 files default to a cluster_size of 64KB. If you’ve set up a VM on .qcow2 with default cluster_size, you don’t want to set recordsize any lower (or higher!) than the cluster_size of the .qcow2 file. So in this case, you’ll want recordsize=64K to match the .qcow2’s cluster_size=64K, even though the InnoDB database inside the VM is probably using smaller pages.

An advanced administrator might look at all of this, determine that a VM’s primary function in life is to run MySQL, that MySQL’s default page size is good, and therefore set both the .qcow2 cluster_size and the dataset’s recordsize to match, at 16K each.

A different administrator might look at all this, determine that the performance of MySQL in the VM with all the relevant settings left to their defaults was perfectly fine, and elect not to hand-tune all this crap at all. And that’s okay.

What if I set recordsize too high?

If recordsize is much higher than the size of the typical storage operation within the dataset, latency will be greatly increased and this is likely to be incredibly frustrating. IOPS will be very limited, databases will perform poorly, desktop UI will be glacial, etc.

What if I set recordsize too low?

If recordsize is a lot smaller than the size of the typical storage operation within the dataset, fragmentation will be greatly (and unnecessarily) increased, leading to unnecessary performance problems down the road. IOPS as measured by artificial tools will be super high, but performance profiles will be limited to those presented by random I/O at the record size you’ve set, which in turn can be significantly worse than the performance profile of larger block operations.

You’ll also screw up compression with an unnecessarily low recordsize; zfs inline compression dictionaries are per-record, and work by fitting more than one entire block into a single record’s space. If you set compression=lz4ashift=12, and recordsize=4K you’ll effectively have NO compression, because your blocksize is equal to your recordsize – pretty much nothing but all-zero blocks can be compressed. Meanwhile, the same dataset with the default 128K recordsize might easily have a 1.7:1 compression ratio.

Are the defaults good? Do I aim high, or do I aim low?

128K is a pretty reasonable “ah, what the heck, it works well enough” setting in general. It penalizes you significantly on IOPS and latency for small random I/O operations, and it presents more fragmentation than necessary for large contiguous files, but it’s not horrible at either task. There is a lot to be gained from tuning recordsize more appropriately for task, though.

What about bittorrent?

The “big records for big files” rule of thumb still applies for datasets used as bittorrent targets.

This is one of those cases where things work just the opposite of how you might think – torrents write data in relatively small chunks, and access them randomly for both read and write, so you might reasonably think this calls for a small recordsize. However, the actual data in the torrents is typically huge files, which are accessed in their entirety for everything but the initial bittorrent session.

Since the typical access pattern is “large-file”, most people will be better off using recordsize=1M in the torrent target storage. This keeps the downloaded data unfragmented despite the bittorrent client’s insanely random writing patterns. The data acquired during the bittorrent session in chunks is accumulated in the ZIL until a full record is available to write, since the torrent client itself is not synchronous – it writes all the time, but rarely if ever calls sync().

As a proof-of-concept, I used the Transmission client on an Ubuntu 16.04 LTS workstation to download the Ubuntu 18.04.2 Server LTS ISO, with a dataset using recordsize=1M as the target. This workstation has a pool consisting of two mirror vdevs on rust, so high levels of fragmentation would be very easy to spot.

root@locutus:/# zpool export data ; modprobe -r zfs ; modprobe zfs ; zpool import data

root@locutus:/# pv < /data/torrent/ubu*18*iso > /dev/null
 883MB 0:00:03 [ 233MB/s] [==================================>] 100%

Exporting the pool and unloading the ZFS kernel module entirely is a weapons-grade-certain method of emptying the ARC entirely; getting better than 200 MB/sec average read throughput directly from the rust vdevs afterward (the transfer actually peaked at nearly 400 MB/sec!) confirms that our torrented ISO is not fragmented.

Note that preallocation settings in your bittorrent client are meaningless when the client is saving to ZFS – you can’t actually preallocate in any meaningful way on ZFS, because it’s a copy-on-write filesystem.

Demonstrating ZFS zpool write distribution

One of my pet peeves is people talking about zfs “striping” writes across a pool. It doesn’t help any that zfs core developers use this terminology too – but it’s sloppy and not really correct.

ZFS distributes writes among all the vdevs in a pool.  If your vdevs all have the same amount of free space available, this will resemble a simple striping action closely enough.  But if you have different amounts of free space on different vdevs – either due to disks of different sizes, or vdevs which have been added to an existing pool – you’ll get more blocks written to the drives which have more free space available.

This came into contention on Reddit recently, when one senior sysadmin stated that a zpool queues the next write to the disk which responds with the least latency.  This statement did not match with my experience, which is that a zpool binds on the performance of the slowest vdev, period.  So, I tested, by creating a test pool with sparse images of mismatched sizes, stored side-by-side on the same backing SSD (which largely eliminates questions of latency).

root@banshee:/tmp# qemu-img create -f qcow2 512M.qcow2 512M root@banshee:/tmp# qemu-img create -f qcow2 2G.qcow2 2G
root@banshee:/tmp# qemu-nbd -c /dev/nbd0 /tmp/512M.qcow2
root@banshee:/tmp# qemu-nbd -c /dev/nbd1 /tmp/2G.qcow2
root@banshee:/tmp# zpool create -oashift=13 test nbd0 nbd1

OK, we’ve now got a 2.5 GB pool, with vdevs of 512M and 2G, and pretty much guaranteed equal latency between the two of them.  What happens when we write some data to it?

root@banshee:/tmp# dd if=/dev/zero bs=4M count=128 status=none | pv -s 512M > /test/512M.zero
 512MiB 0:00:12 [41.4MiB/s] [================================>] 100% 

root@banshee:/tmp# zpool export test
root@banshee:/tmp# ls -lh *qcow2
-rw-r--r-- 1 root root 406M Jul 27 15:25 2G.qcow2
-rw-r--r-- 1 root root 118M Jul 27 15:25 512M.qcow2

There you have it – writes distributed with a ratio of roughly 4:1, matching the mismatched vdev sizes. (I also tested with a 512M image and a 1G image, and got the expected roughly 2:1 ratio afterward.)

OK. What if we put one 512M image on SSD, and one 512M image on much slower rust?  Will the pool distribute more of the writes to the much faster SSD?

root@banshee:/tmp# qemu-img create -f qcow2 /tmp/512M.qcow2 512M
root@banshee:/tmp# qemu-img create -f qcow2 /data/512M.qcow2 512M

root@banshee:/tmp# qemu-nbd -c /dev/nbd0 /tmp/512M.qcow2
root@banshee:/tmp# qemu-nbd -c /dev/nbd1 /data/512M.qcow2

root@banshee:/tmp# zpool create test -oashift=13 nbd0 nbd1
root@banshee:/tmp# dd if=/dev/zero bs=4M count=128 | pv -s 512M > /test/512M.zero 
512MiB 0:00:48 [10.5MiB/s][================================>] 100%
root@banshee:/tmp# zpool export test
root@banshee:/tmp# ls -lh /tmp/512M.qcow2 ; ls -lh /data/512M.qcow2 
-rw-r--r-- 1 root root 266M Jul 27 15:07 /tmp/512M.qcow2 
-rw-r--r-- 1 root root 269M Jul 27 15:07 /data/512M.qcow2

Nope. Once again, zfs distributes the writes according to the amount of free space available – even when this causes performance to bind *severely* on the slowest vdev in the pool.

You should expect to see this happening if you have a vdev with failing hardware, as well – if any one disk is throwing massive latency instead of just returning errors, your entire pool will as well, until the deranged disk has been removed.  You can usually spot this sort of problem using iotop – all of the disks in your pool will have roughly the same throughput in MB/sec (assuming they’ve got equivalent amounts of free space left!), but your problem disk will show a much higher %UTIL than the rest.  Fault that slow disk, and your pool performance returns to normal.


A comprehensive guide to fixing slow SSH logins

The debug text that brought you here

Most of you are probably getting here just from frustratedly googling “slow ssh login”.  Those of you who got a little froggier and tried doing an ssh -vv to get lots of debug output saw things hanging at debug1: SSH2_MSG_SERVICE_ACCEPT received, likely for long enough that you assumed the entire process was hung and ctrl-C’d out.  If you’re patient enough, the process will generally eventually continue after the debug1: SSH2_MSG_SERVICE_ACCEPT received line, but it may take 30 seconds.  Or even five minutes.

You might also have enabled debug logging on the server, and discovered that your hang occurs immediately after debug1: KEX done [preauth]
and before debug1: userauth-request for user in /var/log/auth.log.

I feel your frustration, dear reader. I have solved this problem after hours of screeching head-desking probably ten times over the years.  There are a few fixes for this, with the most common – DNS – tending to drown out the rest.  Which is why I keep screeching in frustration every few years; I remember the dreaded debug1: SSH2_MSG_SERVICE_ACCEPT received hang is something I’ve solved before, but I can only remember some of the fixes I’ve needed.

Anyway, here are all the fixes I’ve needed to deploy over the years, collected in one convenient place where I can find them again.

It’s usually DNS.

The most common cause of slow SSH login authentications is DNS. To fix this one, go to the SSH server, edit /etc/ssh/sshd_config, and set UseDNS no.  You’ll need to restart the service after changing sshd_config: /etc/init.d/ssh restart, systemctl restart ssh, etc as appropriate.

If it’s not DNS, it’s Avahi.

The next most common cause – which is devilishly difficult to find reference to online, and I hope this helps – is the never-to-be-sufficiently damned avahi daemon.  To fix this one, go to the SSH client, edit /etc/nsswitch.conf, and change this line:

hosts:          files mdns4_minimal [NOTFOUND=return] dns

to:

hosts:          files dns

In theory maybe something might stop working without that mdns4_minimal option?  But I haven’t got the foggiest notion what that might be, because nothing ever seems broken for me after disabling it.  No services need restarting after making this change, which again, must be made on the client.

You might think this isn’t your problem. Maybe your slow logins only happen when SSHing to one particular server, even one particular server on your local network, even one particular server on your local network which has UseDNS no and which you don’t need any DNS resolution to connect to in the first place.  But yeah, it can still be this avahi crap. Yay.

When it’s not Avahi… it’s PAM.

This is another one that’s really, really difficult to find references to online.  Optional PAM modules can really screw you here.  In my experience, you can’t get away with simply disabling PAM login in /etc/ssh/sshd_config – if you do, you won’t be able to log in at all.

What you need to do is go to the SSH server, edit /etc/pam.d/common-session and comment out the optional module that’s causing you grief.  In the past, that was pam_ck_connector.so.  More recently, in Ubuntu 16.04, the culprit that bit me hard was pam_systemd.so. Get in there and comment that bugger out.  No restarts required.

#session optional pam_systemd.so

GSSAPI, and ChallengeResponse.

I’ve seen a few seconds added to a pokey login from GSSAPIAuthentication, whatever that is. I feel slightly embarrassed about not knowing, but seriously, I have no clue.  Ditto for ChallengeResponseAuthentication.  All I can tell you is that neither cover standard interactive passwords, or standard public/private keypair authentication (the keys you keep in ~/ssh/authorized_keys).

If you aren’t using them either, then disable them.  If you’re not using Active Directory authentication, might as well go ahead and nuke Kerberos while you’re at it.  Make these changes on the server in /etc/ssh/sshd_config, and restart the service.

ChallengeResponseAuthentication no
KerberosAuthentication no
GSSAPIAuthentication no

Host-based Authentication.

If you’re actually using this, don’t disable it. But let’s get real with each other: you’re not using it.  I mean, I’m sure somebody out there is.  But it’s almost certainly not you.  Get rid of it.  This is also on the server in /etc/ssh/sshd_config, and also will require a service restart.

# Don't read the user's ~/.rhosts and ~/.shosts files
IgnoreRhosts yes
# For this to work you will also need host keys in /etc/ssh_known_hosts
RhostsRSAAuthentication no
# similar for protocol version 2
HostbasedAuthentication no

Need frequent connections? Consider control sockets.

If you need to do repetitive ssh’ing into another host, you can speed up the repeated ssh commands enormously with the use of control sockets.  The first time you SSH into the host, you establish a socket.  After that, the socket obviates the need for re-authentication.

ssh -M -S /path/to/socket -o ControlPersist=5m remotehost exit

This creates a new SSH socket at /path/to/socket which will survive for the next 5 minutes, after which it’ll automatically expire.  The exit at the end just causes the ssh connection you establish to immediately terminate (otherwise you’d have a perfectly normal ssh session going to remotehost).

After creating the control socket, you utilize it with -S /path/to/socket in any normal ssh command to remotehost.

The improvement in execution time for commands using that socket is delicious.

me@banshee:/~$ ssh -M -S /tmp/demo -o ControlPersist=5m eohippus exit

me@banshee:/~$ time ssh eohippus exit
real 0m0.660s
user 0m0.052s
sys 0m0.016s

me@banshee:/~$ time ssh -S /tmp/demo eohippus exit
real 0m0.050s
user 0m0.005s
sys 0m0.010s

Yep… from 660ms to 50ms.  SSH control sockets are pretty awesome.

ZFS clones: Probably not what you really want

ZFS clones look great on paper: they’re instantaneously generated, they’re read/write, they’re initially “free” because they reference the same blocks their parent snapshots do. They’re also (initially) frequently extra-snappy performance-wise, because a lot of those parent blocks are very likely already in the ARC. If you create ten clones of the same VM image (for instance), all ten clones will share the same blocks in the ARC instead of them needing to be in the ARC ten different times. Huge win!

But, as great as a clone sounds at first blush, you probably don’t want to use them for anything that isn’t ephemeral (intended to be destroyed in fairly short order). This is because a clone’s parent snapshot is forever immutable; you can’t destroy the parent snapshot without destroying the clone along with it… even if and when the clone becomes 100% divergent, and no longer shares any block references with its parent. Let’s examine this on a small scale.

Practical testing

On my workstation banshee, I create a new dataset, make sure compression is turned off so as not to confuse us, and populate it with a 256MB chunk of random binary stuff:

root@banshee:~# zfs create banshee/demo ; zfs set compression=off banshee/demo
root@banshee:~# dd if=/dev/zero bs=16M count=16 | openssl enc -aes-256-ctr -pass pass:"$(dd if=/dev/urandom bs=128 count=1 2>/dev/null | base64)" -nosalt | pv > /banshee/demo/random.bin
16+0 records in
16+0 records out
268435456 bytes (268 MB, 256 MiB) copied, 0.483868 s, 555 MB/s
 256MiB 0:00:00 [ 533MiB/s] [<=>                                               ]

I know this looks a little weird, but AES-256 is roughly an order of magnitude faster than /dev/urandom: so what I did here was use /dev/urandom to seed AES-256, then encrypt a 256MB chunk of /dev/zero with it. At the end of this procedure, we have a dataset with 256MB of data in it:

root@banshee:~# ls -lh /banshee/demo
total 262M
-rw-r--r-- 1 root root 256M Mar 15 14:39 random.bin
root@banshee:~# zfs list banshee/demo
NAME                           USED  AVAIL  REFER  MOUNTPOINT
banshee/demo                   262M  83.3G   262M  /banshee/demo

OK. Next step, we take a snapshot of banshee/demo, then create a clone using that snapshot as its parent.

Creating a clone

You don’t actually create a ZFS clone of a dataset at all; you create a clone from a snapshot of a dataset. So before we can “clone banshee/demo”, we first have to take a snapshot of it, and then we clone that.

root@banshee:~# zfs snapshot banshee/demo@parent-snapshot
root@banshee:~# zfs clone banshee/demo@parent-snapshot banshee/demo-clone
root@banshee:~# zfs list -rt all banshee/demo
NAME                           USED  AVAIL  REFER  MOUNTPOINT
banshee/demo                   262M  83.3G   262M  /banshee/demo
banshee/demo@parent-snapshot      0      -   262M  -
root@banshee:~# zfs list -rt all banshee/demo-clone
NAME                 USED  AVAIL  REFER  MOUNTPOINT
banshee/demo-clone     1K  83.3G   262M  /banshee/demo-clone

So right now, we have the dataset banshee/demo, which shares all its blocks with banshee/demo@parent-snapshot, which in turn shares all its blocks with banshee/demo-clone. We see 262M in USED for banshee/demo, with nothing or next-to-nothing in USED for either banshee/demo@parent-snapshot or banshee/demo-clone.

Beginning divergence: removing data

Now, we remove all the data from banshee/demo:

root@banshee:~# rm /banshee/demo/random.bin
root@banshee:~# zfs list -rt all banshee/demo ; zfs list banshee/demo-clone
NAME                           USED  AVAIL  REFER  MOUNTPOINT
banshee/demo                   262M  83.3G    19K  /banshee/demo
banshee/demo@parent-snapshot   262M      -   262M  -
NAME                 USED  AVAIL  REFER  MOUNTPOINT
banshee/demo-clone     1K  83.3G   262M  /banshee/demo-clone

We still only have 262M of USED – but it’s all actually in banshee/demo@parent-snapshot now. You can tell because the REFER column has changed – banshee/demo@parent-snapshot and banshee/demo-clone still both REFER 262M, but banshee/demo only REFERs 19K now. (You still see 262M in USED for banshee/demo because banshee/demo@parent-snapshot is a child of banshee/demo, so its contents count towards banshee/demo‘s USED figure.)

Next up: we re-fill the parent dataset, banshee/demo, with 256MB of different random garbage.

Continuing divergence: replacing data in the parent

root@banshee:~# dd if=/dev/zero bs=16M count=16 | openssl enc -aes-256-ctr -pass pass:"$(dd if=/dev/urandom bs=128 count=1 2>/dev/null | base64)" -nosalt | pv > /banshee/demo/random.bin
16+0 records in
16+0 records out
268435456 bytes (268 MB, 256 MiB) copied, 0.498349 s, 539 MB/s
 256MiB 0:00:00 [ 516MiB/s] [<=>                                               ]
root@banshee:~# zfs list -rt all banshee/demo ; zfs list banshee/demo-clone
NAME                           USED  AVAIL  REFER  MOUNTPOINT
banshee/demo                   523M  83.2G   262M  /banshee/demo
banshee/demo@parent-snapshot   262M      -   262M  -
NAME                 USED  AVAIL  REFER  MOUNTPOINT
banshee/demo-clone     1K  83.2G   262M  /banshee/demo-clone

OK, at this point you see that the USED for banshee/demo shoots up to 523M: that’s the total of the 262M of original random garbage which is still preserved in banshee/demo@parent-snapshot, plus the new 262M of different random garbage in banshee/demo itself. The snapshot now diverges completely from the parent dataset, having no blocks in common at all.

So far, banshee/demo-clone is still 100% convergent with banshee/demo@parent-snapshot, so we’re still getting some conservation of space on disk and in ARC from that. But remember, the whole point of making the clone was so that we could write to it as well as read from it. So let’s do exactly that, and make the clone 100% divergent from its parent, too.

Diverging completely: replacing data in the clone

root@banshee:~# dd if=/dev/zero bs=16M count=16 | openssl enc -aes-256-ctr -pass pass:"$(dd if=/dev/urandom bs=128 count=1 2>/dev/null | base64)" -nosalt | pv > /banshee/demo-clone/random.bin
16+0 records in
16+0 records out
268435456 bytes (268 MB, 256 MiB) copied, 0.50151 s, 535 MB/s
 256MiB 0:00:00 [ 534MiB/s] [<=>                                               ]
root@banshee:~# zfs list -rt all banshee/demo ; zfs list banshee/demo-clone
NAME                           USED  AVAIL  REFER  MOUNTPOINT
banshee/demo                   523M  82.8G   262M  /banshee/demo
banshee/demo@parent-snapshot   262M      -   262M  -
NAME                 USED  AVAIL  REFER  MOUNTPOINT
banshee/demo-clone  262M  82.8G  262M  /banshee/demo-clone

There, done. We now have a parent dataset, banshee/demo, which diverges completely from its snapshot banshee/demo@parent-snapshot, and a clone, banshee/demo-clone, which also diverges completely from banshee/demo@parent-snapshot.

Examining the suck

Since neither the parent, its snapshot, nor the clone share any blocks with one another anymore, we’re using the full 786MB of on-disk space that the three of them add up to. And since they also don’t share any blocks in the ARC, we’re left with absolutely no benefit in either storage consumption or performance to our having used a clone.

Worse, despite having no blocks in common and no perceptible benefit to the clone structure, all three are still inextricably linked, and neither banshee/demo nor banshee/demo@parent-snapshot can be destroyed without also destroying banshee/demo-clone:

root@banshee:~# zfs destroy banshee/demo -r
cannot destroy 'banshee/demo': filesystem has dependent clones
use '-R' to destroy the following datasets:
banshee/demo-clone
root@banshee:~# zfs destroy banshee/demo@parent-snapshot
cannot destroy 'banshee/demo@parent-snapshot': snapshot has dependent clones
use '-R' to destroy the following datasets:
banshee/demo-clone

So now you’re left with a great unwieldy mass of tangled dependencies, wasted space, and no perceptible benefits at all.

Conclusion and practical example

Imagine that you’re storing VM images in ZFS, and you began with a “gold” image of a freshly installed operating system, and created ten different clones to run ten different VMs from. Initially, this seemed great: you could create the clones instantaneously, and they shared tons of blocks, so they consumed a fraction of the ARC they would as complete, separate copies.

A year later, however, your gold image – of, let’s say, Ubuntu 16.04.1 – has diverged to a staggering degree with the set of rolling updates necessary to bring it all the way to Ubuntu 16.04.2. Your VMs have also diverged tremendously, from their parent snapshot and from one another. And now you’re stuck with the year-old snapshot of the “gold” image, completely useless to you but forever engraved on your drive unless and until you’re willing to replicate or otherwise block-for-block copy your VMs painstakingly into self-sufficient datasets with no references. You also have no remaining performance benefits, and you have an extra SPOF (single point of failure) where some admin – maybe even you – might see that parent snapshot nobody cared about anymore taking up all that disk space, and…

root@banshee:~# zfs destroy -R banshee/demo@parent-snapshot
root@banshee:~# zfs list banshee/demo-clone
cannot open 'banshee/demo-clone': dataset does not exist

One “oops” later, that “useless” parent snapshot and every single one of those clones you were using in production are gone forever. (Or, hopefully, just gone until you can restore them from your off-pool backup. You are maintaining replicated backups on at least one other pool, preferably on another machine, aren’t you? Aren’t you?!)

Connecting pfSense to a standard OpenVPN Server config

First, you need to dump the client cert+key into System -> Cert Manager -> Certificates. Then dump the server’s CA cert into System-> Cert Manager-> CA.

Now go to the VPN -> OpenVPN -> Clients and add a client. You’ll likely want Peer-to-Peer (SSL/TLS), UDP, tun, and wan. Put in the remote host IP address or FQDN. You’ll probably want to check “infinitely resolve server”. Under Cryptographic settings, select the CA and certificate you entered into the System Cert Manager, and you’ll most likely want BF-CBC for the encryption algo and SHA-1 for the auth digest algo. Topology should be subnet unless you’re doing something funky; set compression if you’ve enabled it on the other end, but otherwise leave it alone.

This is enough to get you the VPN, but it won’t pass traffic originating there to you. To respond to traffic initiated from the other end, you’ll need to head to Firewall -> Rules -> OpenVPN. If you want all traffic to be allowed, when you create the new Pass rule, be certain to change the protocol from TCP to Any, and leave everything else the default. Save your rule and apply it, and you should at this point be connected and passing packets in both directions between your pfSense OpenVPN client and your standard (based on the template server.conf distributed with OpenVPN and using easy-rsa) OpenVPN server.

Verifying copies

Most of the time, we explicitly trust that our tools are doing what we ask them to do. For example, if we rsync -a /source /target, we trust that the contents of /target will exactly match the contents of /source. That’s the whole point, right? And rsync is a tool with a long and impeccable lineage. So we trust it. And, really, we should.

But once in a while, we might get paranoid. And when we do, and we decide to empirically and thoroughly check our copied data… things might get weird. Today, we’re going to explore the weirdness, and look at how to interpret it.

So you want to make a copy of /usr/bin…

Well, let’s be honest, you probably don’t. But it’s a convenient choice, because it has plenty of files in it (but not so many that copies will take forever), it has folders beneath it, and it has a couple of other things in there that can throw you off balance.

On the machine I’m sitting in front of now, /usr/bin is on an ext4 filesystem – the root filesystem, in fact. The machine also has a couple of ZFS filesystems. Let’s start out by using rsync to copy it off to a ZFS dataset.

We’ll use the -a argument to rsync, which stands for archive, and is a shorthand for -rlptgoD. This means recursive, copy symlinks as symlinks, maintain permissions, maintain timestamps, maintain group ownership, maintain ownership, and preserve devices and other special files as devices and special files where possible. Seems fairly straightforward, right?

root@banshee:/# zfs create banshee/tmp
root@banshee:/# rsync -a /usr/bin /banshee/tmp/
root@banshee:/# du -hs /usr/bin ; du -hs /banshee/tmp/bin
353M	/usr/bin
215M	/banshee/tmp/bin

Hey! We’re missing data! What the hell? No, we’re not actually missing data – we just didn’t think about the fact that the du command reports space used on disk, which is related but not at all the same thing as amount of data stored. In this case, obvious culprit is obvious:

root@banshee:/# zfs get compression banshee/tmp
NAME         PROPERTY     VALUE     SOURCE
banshee/tmp  compression  lz4       inherited from banshee
root@banshee:/# zfs get compressratio banshee/tmp
NAME         PROPERTY       VALUE  SOURCE
banshee/tmp  compressratio  1.55x  -

So, compression tricked us.

I had LZ4 compression enabled on my ZFS dataset, which means that the contents of /usr/bin – much of which are highly compressible – do not take up anywhere near as much space on disk when stored there as they do on the original ext4 filesystem. For the purposes of our exercise, let’s just wipe it out, create a new dataset that doesn’t use compression, and try again.

root@banshee:/# zfs destroy -r banshee/tmp
root@banshee:/# zfs create -o compression=off banshee/tmp
root@banshee:/# rsync -ha /usr/bin /banshee/tmp/
root@banshee:/# du -hs /usr/bin ; du -hs /banshee/tmp/bin
353M	/usr/bin
365M	/tmp/bin

Wait, what the hell?! Compression’s off now, so why am I still seeing discrepancies – and in this case, more space used on the ZFS target than the ext4 source? Well, again – du measures on-disk space, and these are different filesystems. The blocksizes may or may not be different, and in this case, ZFS stores redundant copies of the metadata associated with each file where ext4 does not, so this adds up to measurable discrepancies in the output of du.

Semi-hidden, arcane du arguments

You won’t find any mention at all of it in the man page, but info du mentions an argument called –apparent-size that sounds like the answer to our prayers.

`--apparent-size'
     Print apparent sizes, rather than disk usage.  The apparent size
     of a file is the number of bytes reported by `wc -c' on regular
     files, or more generally, `ls -l --block-size=1' or `stat
     --format=%s'.  For example, a file containing the word `zoo' with
     no newline would, of course, have an apparent size of 3.  Such a
     small file may require anywhere from 0 to 16 KiB or more of disk
     space, depending on the type and configuration of the file system
     on which the file resides.

Perfect! So all we have to do is use that, right?

root@banshee:/# du -hs --apparent-size /usr/bin ; du -hs --apparent-size /banshee/tmp/bin
349M	/usr/bin
353M	/banshee/tmp/bin

We’re still consuming 4MB more space on the target than the source, dammit. WHY?

Counting files and comparing notes

So we’ve tried everything we could think of, including some voodoo arguments to du that probably cost the lives of many Bothans, and we still have a discrepancy in the amount of data present in source and target. Next step, let’s count the files and folders present on both sides, by using the find command to enumerate them all, and piping its output to wc -l, which counts them once enumerated:

root@banshee:/# find /usr/bin | wc -l ; find /banshee/tmp/bin | wc -l
2107
2107

Huh. No discrepancies there. OK, fine – we know about the diff command, which compares the contents of files and tells us if there are discrepancies – and handily, diff -r is recursive! Problem solved!

root@banshee:/# diff -r /usr/bin /banshee/tmp/bin 2>&1 | head -n 5
diff: /banshee/tmp/bin/arista-gtk: No such file or directory
diff: /banshee/tmp/bin/arista-transcode: No such file or directory
diff: /banshee/tmp/bin/dh_pypy: No such file or directory
diff: /banshee/tmp/bin/dh_python3: No such file or directory
diff: /banshee/tmp/bin/firefox: No such file or directory

What’s wrong with diff -r?

Actually, problem emphatically not solved. I cheated a little, there – I knew perfectly well we were going to get a ton of errors thrown, so I piped descriptor 2 (standard error) to descriptor 1 (standard output) and then to head -n 5, which would just give me the first five lines of errors – otherwise we’d be staring at screens full of crap. Why are we getting “no such file or directory” on all these? Let’s look at one:

root@banshee:/# ls -l /banshee/tmp/bin/arista-gtk
lrwxrwxrwx 1 root root 26 Mar 20  2014 /banshee/tmp/bin/arista-gtk -> ../share/arista/arista-gtk

Oh. Well, crap – /usr/bin is chock full of relative symlinks, which rsync -a copied exactly as they are. So now our target, /banshee/tmp/bin, is full of relative symlinks that don’t go anywhere, and diff -r is trying to follow them to compare contents. /usr/share/arista/arista-gtk is a thing, but /banshee/share/arista/arista-gtk isn’t. So now what?

find, and xargs, and md5sum, oh my!

Luckily, we have a tool called md5sum that will generate a pretty strong checksum of any arbitrary content we give it. It’ll still try to follow symlinks if we let it, though. We could just ignore the symlinks, since they don’t have any data in them directly anyway, and just sorta assume that they’re targeted to the same relative target that they were on the source… yeah, sure, let’s try that.

What we’ll do is use the find command, with the -type f argument, to only find actual files in our source and our target, thereby skipping folders and symlinks entirely. We’ll then pipe that to xargs, which turns the list of output from find -type f into a list of arguments for md5sum, which we can then redirect to text files, and then we can diff the text files. Problem solved! We’ll find that extra 4MB of data in no time!

root@banshee:/# find /usr/bin -type f | xargs md5sum > /tmp/sourcesums.txt
root@banshee:/# find /banshee/tmp/bin -type f | xargs md5sum > /tmp/targetsums.txt

… okay, actually I’m going to cheat here, because you guessed it: we failed again. So we’re going to pipe the output through grep sudo to let us just look at the output of a couple of lines of detected differences.

root@banshee:/# diff /tmp/sourcesums.txt /tmp/targetsums.txt | grep sudo
< 866713ce6e9700c3a567788334be7e25  /usr/bin/sudo
< e43c40cfbec06f191191120f4332f60f  /usr/bin/sudoreplay
> e43c40cfbec06f191191120f4332f60f  /banshee/tmp/bin/sudoreplay
> 866713ce6e9700c3a567788334be7e25  /banshee/tmp/bin/sudo

Ah, crap – absolute paths. Every single file failed this check, since we’re seeing it referenced by absolute path, and /usr/bin/sudo doesn’t match /banshee/tmp/bin/sudo, even though the checksums match! OK, we’ll fix that by using relative paths when we generate our sums… and I’ll save you a little more time; that might fail too, because there’s not actually any guarantee that find will return the files in the same sort order both times. So we’ll also pipe find‘s output through sort to fix that problem, too.

root@banshee:/banshee/tmp# cd /usr ; find ./bin -type f | sort | xargs md5sum > /tmp/sourcesums.txt
root@banshee:/usr# cd /banshee/tmp ; find ./bin -type f | sort | xargs md5sum > /tmp/targetsums.txt
root@banshee:/banshee/tmp# diff /tmp/sourcesums.txt /tmp/targetsums.txt
root@banshee:/banshee/tmp# 

Yay, we finally got verification – all of our files exist on both sides, are named the same on both sides, are in the same folders on both sides, and checksum out the same on both sides! So our data’s good! Hey, wait a minute… if we have the same number of files, in the same places, with the same contents, how come we’ve still got different totals?!

Macabre, unspeakable use of ls

We didn’t really get what we needed out of find. We do at least know that we have the right total number of files and folders, and that things are in the right places, and that we got the same checksums out of the files that we could check. So where the hell are those missing 4MB of data coming from?! We’re using our arcane invocation of du -s –apparent-size to make sure we’re looking at bytes of data and not bytes of allocated disk space, so why are we still seeing differences?

This time, let’s try using ls. It’s rarely used, but ls does have a recursion argument, -R. We’ll use that along with -l for long form and -a to pick up dotfiles, and we’ll pipe it though grep -v ‘\.\.’ to get rid of the entry for the parent directory (which obviously won’t be the same for /usr/bin and for /banshee/tmp/bin, no matter how otherwise perfect matches they are), and then, once more, we’ll have something we can diff.

root@banshee:/banshee/tmp# ls -laR /usr/bin > /tmp/sourcels.txt
root@banshee:/banshee/tmp# ls -laR /banshee/tmp/bin > /tmp/targetls.txt
root@banshee:/banshee/tmp# diff /tmp/sourcels.txt /tmp/targetls.txt | grep which
< lrwxrwxrwx  1 root   root         10 Jan  6 14:16 which -> /bin/which
> lrwxrwxrwx 1 root   root         10 Jan  6 14:16 which -> /bin/which

Once again, I cheated, because there was still going to be a problem here. ls -l isn’t necessarily going to use the same number of formatting spaces when listing the source or the target – so our diff, again, frustratingly fails on every single line. I cheated here by only looking at the output for the which file so we wouldn’t get overwhelmed. The fix? We’ll pipe through awk, forcing the spacing to be constant. Grumble grumble grumble…

root@banshee:/banshee/tmp# ls -laR /usr/bin | awk '{print $1,$2,$3,$4,$5,$6,$7,$8,$9,$10,$11}' > /tmp/sourcels.txt
root@banshee:/banshee/tmp# ls -laR /banshee/tmp/bin | awk '{print $1,$2,$3,$4,$5,$6,$7,$8,$9,$10,$11}' > /tmp/targetls.txt
root@banshee:/banshee/tmp# diff /tmp/sourcels.txt /tmp/targetls.txt | head -n 25
1,4c1,4
< /usr/bin:          
< total 364620         
< drwxr-xr-x 2 root root 69632 Jun 21 07:39 .  
< drwxr-xr-x 11 root root 4096 Jan 6 15:59 ..  
---
> /banshee/tmp/bin:          
> total 373242         
> drwxr-xr-x 2 root root 2108 Jun 21 07:39 .  
> drwxr-xr-x 3 root root 3 Jun 29 18:00 ..  
166c166
< -rwxr-xr-x 2 root root 36607 Mar 1 12:35 c2ph  
---
> -rwxr-xr-x 1 root root 36607 Mar 1 12:35 c2ph  
828,831c828,831
< -rwxr-xr-x 4 root root 14592 Dec 3 2012 lockfile-check  
< -rwxr-xr-x 4 root root 14592 Dec 3 2012 lockfile-create  
< -rwxr-xr-x 4 root root 14592 Dec 3 2012 lockfile-remove  
< -rwxr-xr-x 4 root root 14592 Dec 3 2012 lockfile-touch  
---
> -rwxr-xr-x 1 root root 14592 Dec 3 2012 lockfile-check  
> -rwxr-xr-x 1 root root 14592 Dec 3 2012 lockfile-create  
> -rwxr-xr-x 1 root root 14592 Dec 3 2012 lockfile-remove  
> -rwxr-xr-x 1 root root 14592 Dec 3 2012 lockfile-touch  
885,887c885,887

FINALLY! Useful output! It makes perfect sense that the special files . and .., referring to the current and parent directories, would be different. But we’re still getting more hits, like for those four lockfile- commands. We already know they’re identical from source to target, both because we can see the filesizes are the same and because we’ve already md5sum‘ed them and they matched. So what’s up here?

And you thought you’d never need to use the ‘info’ command in anger

We’re going to have to use info instead of man again – this time, to learn about the ls command’s lesser-known evils.

Let’s take a quick look at those mismatched lines for the lockfile- commands again:

< -rwxr-xr-x 4 root root 14592 Dec 3 2012 lockfile-check  
< -rwxr-xr-x 4 root root 14592 Dec 3 2012 lockfile-create  
< -rwxr-xr-x 4 root root 14592 Dec 3 2012 lockfile-remove  
< -rwxr-xr-x 4 root root 14592 Dec 3 2012 lockfile-touch  
---
> -rwxr-xr-x 1 root root 14592 Dec 3 2012 lockfile-check  
> -rwxr-xr-x 1 root root 14592 Dec 3 2012 lockfile-create  
> -rwxr-xr-x 1 root root 14592 Dec 3 2012 lockfile-remove  
> -rwxr-xr-x 1 root root 14592 Dec 3 2012 lockfile-touch

OK, ho hum, we’ve seen this a million times before. File type, permission modes, owner, group, size, modification date, filename, and in the case of the one symlink shown, the symlink target. Hey, wait a minute… how come nobody ever thinks about the second column? And, yep, that second column is the only difference in these lines – it’s 4 in the source, and 1 in the target.

But what does that mean? You won’t learn the first thing about it from man ls, which doesn’t tell you any more than that -l gives you a “long listing format”. And there’s no option to print column headers, which would certainly be helpful… info ls won’t give you any secret magic arguments to print column headers either. But however grudgingly, it will at least name them:

`-l'
`--format=long'
`--format=verbose'
     In addition to the name of each file, print the file type, file
     mode bits, number of hard links, owner name, group name, size, and
     timestamp

So it looks like that mysterious second column refers to the number of hardlinks to the file being listed, normally one (the file itself) – but on our source, there are four hardlinks to each of our lockfile- files.

Checking out hardlinks

We can explore this a little further, using find‘s –samefile test:

root@banshee:/banshee/tmp# find /usr/bin -samefile /usr/bin/lockfile-check
/usr/bin/lockfile-create
/usr/bin/lockfile-check
/usr/bin/lockfile-remove
/usr/bin/lockfile-touch
root@banshee:/banshee/tmp# find /banshee/tmp/bin -samefile /usr/bin/lockfile-check
root@banshee:/banshee/tmp# 

Well, that explains it – on our source, lockfile-create, lockfile-check, lockfile-remove, and lockfile-touch are all actually just hardlinks to the same inode – meaning that while they look like four different files, they’re actually just four separate pointers to the same data on disk. Those and several other sets of hardlinks add up to the reason why our target, /banshee/tmp/bin, is larger than our source, /usr/bin, even though they appear to contain the same data exactly.

Could we have used rsync to duplicate /usr/bin exactly, including the hardlink structures? Absolutely! That’s what the -H argument is there for. Why isn’t that rolled into the -a shortcut argument, you might ask? Well, probably because hardlinks aren’t supported on all filesystems – in particular, they won’t work on FAT32 thumbdrives, or on NFS links set up by sufficiently paranoid sysadmins – so rather than have rsync jobs fail, it’s left up to you to specify if you want to recreate them.

Simpler verification with tar

This was cumbersome as hell – could we have done it more simply? Well, of course! Actually… maybe.

We could have used the venerable tar command to generate a single md5sum for the entire collection of data in one swell foop. We do have to be careful, though – tar will encode the entire path you feed it into the file structure, so you can’t compare tars created directly from /usr/bin and /banshee/tmp/bin – instead, you need to cd into the parent directories, create tars of ./bin in each case, then compare those.

Let’s start out by comparing our current copies, which differ in how hardlinks are handled:

root@banshee:/tmp# cd /usr ; tar -c ./bin | md5sum ; cd /banshee/tmp ; tar -c ./bin | md5sum
4bb9ffbb20c11b83ca616af716e2d792  -
2cf60905cb7870513164e90ac82ffc3d  -

Yep, they differ – which we should be expecting ; after all, the source has hardlinks and the target does not. How about if we fix up the target so that it also uses hardlinks?

root@banshee:/tmp# rm -r /banshee/tmp/bin ; rsync -haH /usr/bin /banshee/tmp/
root@banshee:/tmp# cd /usr ; tar -c ./bin | md5sum ; cd /banshee/tmp ; tar -c ./bin | md5sum
4bb9ffbb20c11b83ca616af716e2d792  -
f654cf7a1c4df8482d61b59993bb92f7  -

Well, crap. That should’ve resulted in identical md5sums, shouldn’t it? It would have, if we’d gone from one ext4 filesystem to another:

root@banshee:/banshee/tmp# rsync -haH /usr/bin /tmp/
root@banshee:/banshee/tmp# cd /usr ; tar -c ./bin | md5sum ; cd /tmp ; tar -c ./bin | md5sum
4bb9ffbb20c11b83ca616af716e2d792  -

So why, exactly, didn’t we get the same md5sum values for a tar on ZFS, when we did on ext4? The metadata gets included in those tarballs, and it’s just plain different between different filesystems. Different metadata means different contents of the tar means different checksums. Ugly but true. Interestingly, though, if we dump /banshee/tmp/bin back through tar and out to another location, the checksums match again:

root@banshee:/tmp/fromtar# tar -c /banshee/tmp/bin | tar -x
tar: Removing leading `/' from member names
tar: Removing leading `/' from hard link targets
root@banshee:/tmp/fromtar# cd /tmp/fromtar/banshee/tmp ; tar -c ./bin | md5sum ; cd /usr ; tar -c ./bin | md5sum
4bb9ffbb20c11b83ca616af716e2d792  -

What this tells us is that ZFS is storing additional metadata that ext4 can’t, and that, in turn, is what was making our tarballs checksum differently… but when you move that data back onto a nice dumb ext4 filesystem again, the extra metadata is stripped again, and things match again.

Picking and choosing what matters

Properly verifying data and metadata on a block-for-block basis is hard, and you need to really, carefully think about what, exactly, you do – and don’t! – want to verify. If you want to verify absolutely everything, including folder metadata, tar might be your best bet – but it probably won’t match up across filesystems. If you just want to verify the contents of the files, some combination of find, xargs, md5sum, and diff will do the trick. If you’re concerned about things like hardlink structure, you have to check for those independently. If you aren’t just handwaving things away, this stuff is hard. Extra hard if you’re changing filesystems from source to target.

Shortcut for ZFS users: replication!

For those of you using ZFS, and using strictly ZFS, though, there is a shortcut: replication. If you use syncoid to orchestrate ZFS replication at the dataset level, you can be sure that absolutely everything, yes everything, is preserved:

root@banshee:/usr# syncoid banshee/tmp banshee/tmp2
INFO: Sending oldest full snapshot banshee/tmp@autosnap_2016-06-29_19:33:01_hourly (~ 370.8 MB) to new target filesystem:
 380MB 0:00:01 [ 229MB/s] [===============================================================================================================================] 102%            
INFO: Updating new target filesystem with incremental banshee/tmp@autosnap_2016-06-29_19:33:01_hourly ... syncoid_banshee_2016-06-29:19:39:01 (~ 4 KB):
2.74kB 0:00:00 [26.4kB/s] [======================================================================================>                                         ] 68%           
root@banshee:/banshee/tmp2# cd /banshee/tmp ; tar -c . | md5sum ; cd /banshee/tmp2 ; tar -c . | md5sum
e2b2ca03ffa7ba6a254cefc6c1cffb4f  -

Easy, peasy, chicken greasy: replication guarantees absolutely everything matches.

TL;DR

There isn’t one, really! Verification of data and metadata, especially across filesystems, is one of the fundamental challenges of information systems that’s generally abstracted away from you almost entirely, and it makes for one hell of a deep rabbit hole to fall into. Hopefully, if you’ve slogged through all this with me so far, you have a better idea of what tools are at your fingertips to test it when you need to.