A lot of people new to ZFS, and even a lot of people not-so-new to ZFS, like to wax ecstatic about ZVOLs. But they never seem to mention the very real pitfalls ZVOLs present.
What’s a ZVOL?
Well, if you know what LVM is, a ZVOL is like an LV, but for ZFS. If you don’t know what LVM is, you can think of a ZVOL as, basically, a dynamically allocated “raw partition” inside ZFS. Unlike a normal dataset, a ZVOL doesn’t have a filesystem of its own. And you can access it by a raw devicename, like /dev/zvol/poolname/zvolname. This looks ideal for those use-cases where you want to nest a legacy filesystem underneath ZFS – for example, virtual machine images. Once you have the ZVOL, you have a raw block storage device to interact with – think mkfs.ext4 /dev/zvol/poolname/zvolname, for example – but you still get all the normal ZFS features along with it, like data integrity, compression, snapshots, and so forth. Plus you don’t have to mess with a loopback device, so that should be higher performance, right? What’s not to love?
ZVOLs perform better, though, right?
AFAICT, the increased performance is pretty much a lie. I’ve benchmarked ZVOLs pretty extensively against raw disk partitions, raw LVs, raw files, and even .qcow2 files and there really isn’t much of a performance difference to be seen. A partially-allocated ZVOL isn’t going to perform any better than a partially-allocated .qcow2 file, and a fully-allocated ZVOL isn’t going to perform any better than a fully-allocated .qcow2 file. (Raw disk partitions or LVs don’t really get any significant boost, either.)
Let’s talk about snapshots.
If snapshots aren’t one of the biggest reasons you’re using ZFS, they should be, and ZVOLs and snapshots are really, really tricky and weird. If you have a dataset that’s occupying 85% of your pool, you can snapshot that dataset any time you like. If you have a ZVOL that’s occupying 85% of your pool, you cannot snapshot it, period. This is one of those things that both tyros and vets tend to immediately balk at – I must be misunderstanding something, right? Surely it doesn’t work that way? Afraid it does.
Above, we created a dataset on a 20G pool, we dumped 15G of data into it, and we snapshotted the dataset. No surprises here, this is exactly what we expect.
But what happens when we try the same thing with a ZVOL?
root@xenial:~# zfs create target/zvol -V 15G -o compress=off
root@xenial:~# pv < /dev/zero > /dev/zvol/target/zvol
  15GiB 0:03:22 [57.3MiB/s] [========================================>  ] 99% ETA 0:00:00
pv: write failed: No space left on device
NAME          USED  AVAIL  REFER  MOUNTPOINT
target       15.8G  3.46G    19K  /target
target/zvol  15.5G  3.90G  15.0G  -
root@xenial:~# zfs snapshot target/zvol@1
cannot create snapshot 'target/zvol@1': out of space
Despite having 3.9G free on our pool, we can’t snapshot the zvol. If you don’t have at least as much free space in a pool as the REFER of a ZVOL on that pool, you can’t snapshot the ZVOL, period. This means for our little baby demonstration here we’d need 15G free to snapshot our 15G ZVOL. In a real-world situation with VM images, this could easily be a case where you can’t snapshot your 15TB VM image without 15 terabytes of free space available – where if you’d stuck with standard datasets, you’d be able to snapshot that same 15TB VM even with just a few hundred megabytes of AVAIL at your disposal.
TL;DR:
Think long and hard before you implement ZVOLs. Then, you know… don’t.
With the files written, I backed up my virtual filesystem, fully populated, so I can repeat the experiment later.
me@locutus:~$ sudo zpool export test
me@locutus:~$ sudo cp /data/test/copies/0.qcow2 /data/test/copies/0.qcow2.bak
me@locutus:~$ sudo zpool import test
Now, I write corrupt blocks to 10% of the filesystem. (Roughly: it's possible that the same block was overwritten with a garbage block more than once.) Note that I used a specific seed, so that I can recreate the scenario exactly, for more runs later.
me@locutus:~$ cat /tmp/corruptor.pl
#!/usr/bin/perl

# total number of blocks in the test filesystem
$numblocks=131072;

# desired percentage corrupt blocks
$percentcorrupt=.1;

# so we write this many corrupt blocks
$corruptloop=$numblocks*$percentcorrupt;

# consistent results for testing
srand 32767;

# generate 8K of garbage data
for ($x=0; $x<8*1024; $x++) {
	$garbage .= chr(int(rand(256)));
}

open FH, "> /dev/nbd0";

for ($x=0; $x<$corruptloop; $x++) {
	$blocknum = int(rand($numblocks-100));
	print "Writing garbage data to block $blocknum\n";
	seek FH, ($blocknum*8*1024), 0;
	print FH $garbage;
}

close FH;
Okay. When I scrub the filesystem I just wrote those 10,000 or so corrupt blocks to, what happens?
me@locutus:~$ sudo zpool scrub test ; sudo zpool status test
  pool: test
 state: ONLINE
status: One or more devices has experienced an error resulting in data
	corruption.  Applications may be affected.
action: Restore the file in question if possible.  Otherwise restore the
	entire pool from backup.
   see: http://zfsonlinux.org/msg/ZFS-8000-8A
  scan: scrub repaired 133M in 0h1m with 1989 errors on Mon May  9 15:56:11 2016
config:

	NAME        STATE     READ WRITE CKSUM
	test        ONLINE       0     0 1.94K
	  nbd0      ONLINE       0     0 8.94K

errors: 1989 data errors, use '-v' for a list
me@locutus:~$ sudo zpool status -v test | grep /test/ | wc -l
385
OUCH. 385 of my 400 total files were still corrupt after the scrub! Copies=2 didn't do a great job for me here. 🙁
What if I try it again, this time just writing garbage to 1% of the blocks on disk, not 10%? First, let's restore that backup I cleverly made:
root@locutus:/data/test/copies# zpool export test
root@locutus:/data/test/copies# qemu-nbd -d /dev/nbd0
/dev/nbd0 disconnected
root@locutus:/data/test/copies# pv < 0.qcow2.bak > 0.qcow2
 999MB 0:00:00 [1.63GB/s] [==================================>] 100%
root@locutus:/data/test/copies# qemu-nbd -c /dev/nbd0 /data/test/copies/0.qcow2
root@locutus:/data/test/copies# zpool import test
root@locutus:/data/test/copies# zpool status test | tail -n 5
	NAME        STATE     READ WRITE CKSUM
	test        ONLINE       0     0     0
	  nbd0      ONLINE       0     0     0

errors: No known data errors
Alright, now let's change $percentcorrupt from 0.1 to 0.01, and try again. How'd we do after only corrupting 1% of the blocks on disk?
root@locutus:/data/test/copies# zpool status test
  pool: test
 state: ONLINE
status: One or more devices has experienced an error resulting in data
	corruption.  Applications may be affected.
action: Restore the file in question if possible.  Otherwise restore the
	entire pool from backup.
   see: http://zfsonlinux.org/msg/ZFS-8000-8A
  scan: scrub repaired 101M in 0h0m with 72 errors on Mon May  9 16:13:49 2016
config:

	NAME        STATE     READ WRITE CKSUM
	test        ONLINE       0     0    72
	  nbd0      ONLINE       0     0 1.08K

errors: 64 data errors, use '-v' for a list
root@locutus:/data/test/copies# zpool status test -v | grep /test/ | wc -l
64
Still not great. We lost 64 out of our 400 files. Tenth of a percent?
root@locutus:/data/test/copies# zpool status -v test
  pool: test
 state: ONLINE
status: One or more devices has experienced an error resulting in data
	corruption.  Applications may be affected.
action: Restore the file in question if possible.  Otherwise restore the
	entire pool from backup.
   see: http://zfsonlinux.org/msg/ZFS-8000-8A
  scan: scrub repaired 12.1M in 0h0m with 2 errors on Mon May  9 16:22:30 2016
config:

	NAME        STATE     READ WRITE CKSUM
	test        ONLINE       0     0     2
	  nbd0      ONLINE       0     0   105

errors: Permanent errors have been detected in the following files:

        /test/300
        /test/371
Damn. We still lost two files, even with only writing 130 or so corrupt blocks. (The missing 26 corrupt blocks weren't picked up by the scrub because they happened in the 15% or so of unused space on the pool, presumably: a scrub won't check unused blocks.) OK, what if we try a control - how about we corrupt the same tenth of a percent of the filesystem (105 blocks or so), this time without copies=2 set? To make it fair, I wrote 800 1MB files to the same filesystem this time using the default copies=1 - this is more files, but it's the same percentage of the filesystem full. (Interestingly, this went a LOT faster. Perceptibly, more than twice as fast, I think, although I didn't actually time it.)
Now with our still 84% full /test zpool, but this time with copies=1, I corrupted the same 0.1% of the total block count.
root@locutus:/data/test/copies# zpool status test
  pool: test
 state: ONLINE
status: One or more devices has experienced an error resulting in data
	corruption.  Applications may be affected.
action: Restore the file in question if possible.  Otherwise restore the
	entire pool from backup.
   see: http://zfsonlinux.org/msg/ZFS-8000-8A
  scan: scrub repaired 8K in 0h0m with 98 errors on Mon May  9 16:28:26 2016
config:

	NAME                         STATE     READ WRITE CKSUM
	test                         ONLINE       0     0    98
	  /data/test/copies/0.qcow2  ONLINE       0     0   198

errors: 93 data errors, use '-v' for a list
Without copies=2 set, we lost 93 files instead of 2. So copies=n was definitely better than nothing for our test of writing 0.1% of the filesystem as bad blocks... but it wasn't fabulous, either, and it fell flat on its face with 1% or 10% of the filesystem corrupted. By comparison, a truly redundant pool - one with two disks in it, in a mirror vdev - would have survived the same test (corrupting ANY number of blocks on a single disk) with flying colors.
The TL;DR here is that copies=n is better than nothing... but not by a long shot, and you do give up a lot of performance for it. Conclusion: play with it if you like, but limit it only to extremely important data, and don't make the mistake of thinking it's any substitute for device redundancy, much less backups.
I’ve been seeing a lot of misinformation flying around the web lately about the zfs dataset-level feature copies=n. To be clear, dangerous misinformation. So dangerous, I’m going to go ahead and give you the punchline in the title of this post and in its first paragraph: copies=n does not give you device fault tolerance!
Why does copies=n actually exist then? Well, it’s a sort of (extremely) poor cousin that helps give you a better chance of surviving data corruption. Let’s say you have a laptop, you’ve set copies=3 on some extremely critical work-related datasets, and the drive goes absolutely bonkers and starts throwing tens of thousands of checksum errors. Since there’s only one disk in the laptop, ZFS can’t correct the checksum errors, only detect them… except on that critical dataset, maybe and hopefully, because each block has multiple copies. So if a given block has been written three times and any single copy of that block reads so as to match its validation hash, that block will get served up to you intact.
So far, so good. The problem is that I am seeing people advocating scenarios like “oh, I’ll just add five disks as single-disk vdevs to a pool, then make sure to set copies=2, and that way even if I lose a disk I still have all the data.” No, no, and no. But don’t take my word for it: let’s demonstrate.
First, let’s set up a test pool using virtual disks.
root@banshee:/tmp# qemu-img create -f qcow2 0.qcow2 10G ; qemu-img create -f qcow2 1.qcow2 10G
Formatting '0.qcow2', fmt=qcow2 size=10737418240 encryption=off cluster_size=65536 lazy_refcounts=off
Formatting '1.qcow2', fmt=qcow2 size=10737418240 encryption=off cluster_size=65536 lazy_refcounts=off
root@banshee:/tmp# qemu-nbd -c /dev/nbd0 /tmp/0.qcow2 ; qemu-nbd -c /dev/nbd1 /tmp/1.qcow2
root@banshee:/tmp# zpool create test /dev/nbd0 /dev/nbd1
root@banshee:/tmp# zpool status test
  pool: test
 state: ONLINE
  scan: none requested
config:

    NAME        STATE     READ WRITE CKSUM
    test        ONLINE       0     0     0
      nbd0      ONLINE       0     0     0
      nbd1      ONLINE       0     0     0

errors: No known data errors
Now let’s set copies=2, and then create a couple of files in our pool.
root@banshee:/tmp# zfs set copies=2 test
root@banshee:/tmp# dd if=/dev/urandom bs=4M count=1 of=/test/test1
1+0 records in
1+0 records out
4194304 bytes (4.2 MB) copied, 0.310805 s, 13.5 MB/s
root@banshee:/tmp# dd if=/dev/urandom bs=4M count=1 of=/test/test2
1+0 records in
1+0 records out
4194304 bytes (4.2 MB) copied, 0.285544 s, 14.7 MB/s
Let’s confirm that copies=2 is working.
We should see about 8MB of data on each of our virtual disks – one for each copy of each of our 4MB test files.
root@banshee:/tmp# ls -lh *.qcow2
-rw-r--r-- 1 root root 9.7M May  2 13:56 0.qcow2
-rw-r--r-- 1 root root 9.8M May  2 13:56 1.qcow2
Yep, we’re good – we’ve written a copy of each of our two 4MB files to each virtual disk.
Now fail out a disk:
root@banshee:/tmp# zpool export test
root@banshee:/tmp# qemu-nbd -d /dev/nbd1
/dev/nbd1 disconnected
Will a pool with copies=2 and one missing disk import?
root@banshee:/tmp# zpool import
   pool: test
     id: 15144803977964153230
  state: UNAVAIL
 status: One or more devices are missing from the system.
 action: The pool cannot be imported. Attach the missing
    devices and try again.
   see: http://zfsonlinux.org/msg/ZFS-8000-6X
 config:

    test         UNAVAIL  missing device
      nbd0       ONLINE

    Additional devices are known to be part of this pool, though their
    exact configuration cannot be determined.
That’s a resounding “no”.
Can we force an import?
root@banshee:/tmp# zpool import -f test
cannot import 'test': one or more devices is currently unavailable
No – your data is gone.
Please let this be a lesson: no, copies=n is not a substitute for redundancy or parity, and yes, losing any vdev does lose the pool.
With any luck I’ll turn this into a real blog post soon, but for the moment: a cheat sheet for simple usage of fio to benchmark storage. This command will run 16 simultaneous 4k random writers in sync mode. It’s a big enough config to push through the ZIL on most zpools and actually do some testing of the real hardware underneath the cache.
Compression is a hands-down win. LZ4 compression should be on by default for nearly anything you ever set up under ZFS. I typically have LZ4 on even for datasets that will house database binaries… yes, really. Let’s look at two quick test runs, on a Xeon E3 server with 32GB ECC RAM and a pair of Samsung 850 EVO 1TB disks set up as a mirror vdev.
This is an inline compression torture test: we’re reading pseudorandom data (completely incompressible) and writing it to an LZ4 compressed dataset.
root@lab:/data# pv < in.rnd > incompressible/out.rnd
7.81GB 0:00:22 [ 359MB/s] [==================================>] 100%

root@lab:/data# zfs get compressratio data/incompressible
NAME                 PROPERTY       VALUE  SOURCE
data/incompressible  compressratio  1.00x  -
359MB/sec write… yyyyyeah, I’d say LZ4 isn’t hurting us too terribly here – and this is a worst case scenario. What about something a little more realistic? Let’s try again, this time with a raw binary of my Windows Server 2012 R2 “gold” image (the OS is installed and Windows Updates are applied, but nothing else is done to it):
Oh yeah – 515MB/sec this time. Definitely not hurting from using our LZ4 compression. What’d we score for a compression ratio?
root@lab:/data# zfs get compressratio data/realworld
NAME            PROPERTY       VALUE  SOURCE
data/realworld  compressratio  1.48x  -
1.48x sounds pretty good! Can we see some real numbers on that?
root@lab:/data# ls -lh /data/realworld/win2012r2-gold.raw
-rw-rw-r-- 1 root root 8.9G Feb 24 18:01 win2012r2-gold.raw
root@lab:/data# du -hs /data/realworld
6.2G	/data/realworld
8.9G of data in 6.2G of space… with sustained writes of 515MB/sec.
What if we took our original 8G of incompressible data, and wrote it to an uncompressed dataset?
root@lab:/data#  zfs create data/uncompressed
root@lab:/data# zfs set compression=off data/uncompressed
root@lab:/data# cat 8G.in > /dev/null ; # this is to make sure our source data is preloaded in the ARC
root@lab:/data# pv < 8G.in > uncompressed/8G.out
7.81GB 0:00:21 [ 378MB/s] [==================================>] 100%
So, our worst case scenario – completely incompressible data – means a 5% performance hit, and a more real-world-ish scenario – copying a Windows Server installation – means a 27% performance increase. That’s on fast solid state, of course; the performance numbers will look even better on slower storage (read: spinning rust), where even worst-case writes are unlikely to slow down at all.
Even if you have the RAM for it (and we’re talking a good 6GB or so per TB of storage), ZFS deduplication is, unfortunately, almost certainly a lose.
I don’t usually have that much RAM to spare, but one server has 192GB of RAM and only a few terabytes of storage – and it stores a lot of VM images, with obvious serious block-level duplication between images. Dedup shows at 1.35+ on all the datasets, and would be higher if one VM didn’t have a couple of terabytes of almost dup-free data on it.
That server’s been running for a few years now, and nobody using it has complained. But I was doing some maintenance on it today, splitting up VMs into their own datasets, and saw some truly abysmal performance.
7MB/sec? UGH! And that’s not even a sustained average; that’s just where it happened to be when I killed the process. This server should be able to sustain MUCH better performance than that, even though it’s reading and writing from the same pool. So I checked, and saw that dedup was on:
root@virt0:~# zpool list
NAME   SIZE  ALLOC   FREE    CAP  DEDUP  HEALTH  ALTROOT
data  7.06T  2.52T  4.55T    35%  1.35x  ONLINE  -
In theory, you’d think that dedup would help tremendously with exactly this operation: copying a quiesced VM from one dataset to another on the same pool. There’s no need for a single block of data to be rewritten, just more pointers added to the metadata for the existing blocks. However, dedup looked like the obvious culprit for my performance woes here, so I disabled it and tried again:
TL;DR: ZFS dedup sounds like a great idea, but in the real world, it sucks. Even on a machine built to handle it. Even on exactly the kind of storage (a bunch of VMs with similar or identical operating systems) that seems tailor-made for it. I do not recommend its use for pretty much any conceivable workload.
Continuing this week’s “making an article so I don’t have to keep typing it” ZFS series… here’s why you should stop using RAIDZ, and start using mirror vdevs instead.
The basics of pool topology
A pool is a collection of vdevs. Vdevs can be any of the following (and more, but we’re keeping this relatively simple):
single disks (think RAID0)
redundant vdevs (aka mirrors – think RAID1)
parity vdevs (aka stripes – think RAID5/RAID6/RAID7, aka single, dual, and triple parity stripes)
The pool itself will distribute writes among the vdevs inside it on a relatively even basis. However, this is not a “stripe” like you see in RAID10 – it’s just distribution of writes. If you make a RAID10 out of 2 2TB drives and 2 1TB drives, the second TB on the bigger drives is wasted, and your after-redundancy storage is still only 2 TB. If you put the same drives in a zpool as two mirror vdevs, they will be a 2x2TB mirror and a 2x1TB mirror, and your after-redundancy storage will be 3TB. If you keep writing to the pool until you fill it, you may completely fill the two 1TB disks long before the two 2TB disks are full. Exactly how the writes are distributed isn’t guaranteed by the specification, only that they will be distributed.
What if you have twelve disks, and you configure them as two RAIDZ2 (dual parity stripe) vdevs of six disks each? Well, your pool will consist of two RAIDZ2 arrays, and it will distribute writes across them just like it did with the pool of mirrors. What if you made a ten disk RAIDZ2, and a two disk mirror? Again, they go in the pool, the pool distributes writes across them. In general, you should probably expect a pool’s performance to exhibit the worst characteristics of each vdev inside it. In practice, there’s no guarantee where reads will come from inside the pool – they’ll come from “whatever vdev they were written to”, and the pool gets to write to whichever vdevs it wants to for any given block(s).
Storage Efficiency
If it isn’t clear from the name, storage efficiency is the ratio of usable storage capacity (after redundancy or parity) to raw storage capacity (before redundancy or parity).
This is where a lot of people get themselves into trouble. “Well obviously I want the most usable TB possible out of the disks I have, right?” Probably not. That big number might look sexy, but it’s liable to get you into a lot of trouble later. We’ll cover that further in the next section; for now, let’s just look at the storage efficiency of each vdev type.
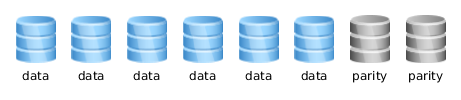
single disk vdev(s) – 100% storage efficiency. Until you lose any single disk, and it becomes 0% storage efficency…
eight single-disk vdevs
RAIDZ1 vdev(s) – (n-1)/n, where n is the number of disks in each vdev. For example, a RAIDZ1 of eight disks has an SE of 7/8 = 87.5%.
an eight disk raidz1 vdev
RAIDZ2 vdev(s) – (n-2)/n. For example, a RAIDZ2 of eight disks has an SE of 6/8 = 75%.
an eight disk raidz2 vdev
RAIDZ3 vdev(s) – (n-3)/n. For example, a RAIDZ3 of eight disks has an SE of 5/8 = 62.5%.
an eight disk raidz3 vdev
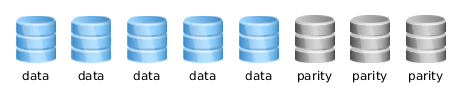
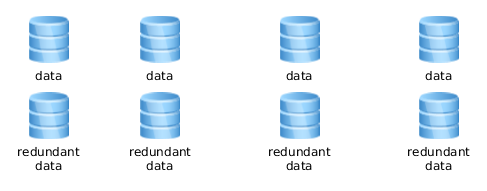
mirror vdev(s) – 1/n, where n is the number of disks in each vdev. Eight disks set up as 4 2-disk mirror vdevs have an SE of 1/2 = 50%.
a pool of four 2-disk mirror vdevs
One final note: striped (RAIDZ) vdevs aren’t supposed to be “as big as you can possibly make them.” Experts are cagey about actually giving concrete recommendations about stripe width (the number of devices in a striped vdev), but they invariably recommend making them “not too wide.” If you consider yourself an expert, make your own expert decision about this. If you don’t consider yourself an expert, and you want more concrete general rule-of-thumb advice: no more than eight disks per vdev.
Fault tolerance / degraded performance
Be careful here. Keep in mind that if any single vdev fails, the entire pool fails with it. There is no fault tolerance at the pool level, only at the individual vdev level! So if you create a pool with single disk vdevs, any failure will bring the whole pool down.
It may be tempting to go for that big storage number and use RAIDZ1… but it’s just not enough. If a disk fails, the performance of your pool will be drastically degraded while you’re replacing it. And you have no fault tolerance at all until the disk has been replaced and completely resilvered… which could take days or even weeks, depending on the performance of your disks, the load your actual use places on the disks, etc. And if one of your disks failed, and age was a factor… you’re going to be sweating bullets wondering if another will fail before your resilver completes. And then you’ll have to go through the whole thing again every time you replace a disk. This sucks. Don’t do it. Conventional RAID5 is strongly deprecated for exactly the same reasons. According to Dell, “Raid 5 for all business critical data on any drive type [is] no longer best practice.”
RAIDZ2 and RAIDZ3 try to address this nightmare scenario by expanding to dual and triple parity, respectively. This means that a RAIDZ2 vdev can survive two drive failures, and a RAIDZ3 vdev can survive three. Problem solved, right? Well, problem mitigated – but the degraded performance and resilver time is even worse than a RAIDZ1, because the parity calculations are considerably gnarlier. And it gets worse the wider your stripe (number of disks in the vdev).
Saving the best for last: mirror vdevs. When a disk fails in a mirror vdev, your pool is minimally impacted – nothing needs to be rebuilt from parity, you just have one less device to distribute reads from. When you replace and resilver a disk in a mirror vdev, your pool is again minimally impacted – you’re doing simple reads from the remaining member of the vdev, and simple writes to the new member of the vdev. In no case are you re-writing entire stripes, all other vdevs in the pool are completely unaffected, etc. Mirror vdev resilvering goes really quickly, with very little impact on the performance of the pool. Resilience to multiple failure is very strong, though requires some calculation – your chance of surviving a disk failure is 1-(f/(n-f)), where f is the number of disks already failed, and n is the number of disks in the full pool. In an eight disk pool, this means 100% survival of the first disk failure, 85.7% survival of a second disk failure, 66.7% survival of a third disk failure. This assumes two disk vdevs, of course – three disk mirrors are even more resilient.
But wait, why would I want to trade guaranteed two disk failure in RAIDZ2 with only 85.7% survival of two disk failure in a pool of mirrors? Because of the drastically shorter time to resilver, and drastically lower load placed on the pool while doing so. The only disk more heavily loaded than usual during a mirror vdev resilvering is the other disk in the vdev – which might sound bad, but remember that it’s no more heavily loaded than it would’ve been as a RAIDZ member. Each block resilvered on a RAIDZ vdev requires a block to be read from each surviving RAIDZ member; each block written to a resilvering mirror only requires one block to be read from a surviving vdev member. For a six-disk RAIDZ1 vs a six disk pool of mirrors, that’s five times the extra I/O demands required of the surviving disks.
Resilvering a mirror is much less stressful than resilvering a RAIDZ.
One last note on fault tolerance
No matter what your ZFS pool topology looks like, you still need regular backup.
Say it again with me: I must back up my pool!
ZFS is awesome. Combining checksumming and parity/redundancy is awesome. But there are still lots of potential ways for your data to die, and you still need to back up your pool. Period. PERIOD!
Please read that last bit extra hard: For even better performance, consider using mirroring. He’s not kidding. Just like RAID10 has long been acknowledged the best performing conventional RAID topology, a pool of mirror vdevs is by far the best performing ZFS topology.
Future expansion
This is one that should strike near and dear to your heart if you’re a SOHO admin or a hobbyist. One of the things about ZFS that everybody knows to complain about is that you can’t expand RAIDZ. Once you create it, it’s created, and you’re stuck with it.
Well, sorta.
Let’s say you had a server with 12 slots to put drives in, and you put six drives in it as a RAIDZ2. When you bought it, 1TB drives were a great bang for the buck, so that’s what you used. You’ve got 6TB raw / 4TB usable. Two years later, 2TB drives are cheap, and you’re feeling cramped. So you fill the rest of the six available bays in your server, and now you’ve added an 12TB raw / 8TB usable vdev, for a total pool size of 18TB/12TB. Two years after that, 4TB drives are out, and you’re feeling cramped again… but you’ve got no place left to put drives. Now what?
Well, you actually can upgrade that original RAIDZ2 of 1TB drives – what you have to do is fail one disk out of the vdev and remove it, then replace it with one of your 4TB drives. Wait for the resilvering to complete, then fail a second one, and replace it. Lather, rinse, repeat until you’ve replaced all six drives, and resilvered the vdev six separate times – and after the sixth and last resilvering finishes, you have a 24TB raw / 16TB usable vdev in place of the original 6TB/4TB one. Question is, how long did it take to do all that resilvering? Well, if that 6TB raw vdev was nearly full, it’s not unreasonable to expect each resilvering to take twelve to sixteen hours… even if you’re doing absolutely nothing else with the system. The more you’re trying to actually do in the meantime, the slower the resilvering goes. You might manage to get six resilvers done in six full days, replacing one disk per day. But it might take twice that long or worse, depending on how willing to hover over the system you are, and how heavily loaded it is in the meantime.
What if you’d used mirror vdevs? Well, to start with, your original six drives would have given you 6TB raw / 3TB usable. So you did give up a terabyte there. But maybe you didn’t do such a big upgrade the first time you expanded. Maybe since you only needed to put in two more disks to get more storage, you only bought two 2TB drives, and by the time you were feeling cramped again the 4TB disks were available – and you still had four bays free. Eventually, though, you crammed the box full, and now you’re in that same position of wanting to upgrade those old tiny 1TB disks. You do it the same way – you replace, resilver, replace, resilver – but this time, you see the new space after only two resilvers. And each resilvering happens tremendously faster – it’s not unreasonable to expect nearly-full 1TB mirror vdevs to resilver in three or four hours. So you can probably upgrade an entire vdev in a single day, even without having to hover over the machine too crazily. The performance on the machine is hardly impacted during the resilver. And you see the new capacity after every two disks replaced, not every six.
TL;DR
Too many words, mister sysadmin. What’s all this boil down to?
don’t be greedy. 50% storage efficiency is plenty.
for a given number of disks, a pool of mirrors will significantly outperform a RAIDZ stripe.
a degraded pool of mirrors will severely outperform a degraded RAIDZ stripe.
a degraded pool of mirrors will rebuild tremendously faster than a degraded RAIDZ stripe.
a pool of mirrors is easier to manage, maintain, live with, and upgrade than a RAIDZ stripe.
BACK. UP. YOUR POOL. REGULARLY. TAKE THIS SERIOUSLY.
TL;DR to the TL;DR – unless you are really freaking sure you know what you’re doing… use mirrors. (And if you are really, really sure what you’re doing, you’ll probably change your mind after a few years and wish you’d done it this way to begin with.)
This comes up far too often, so rather than continuing to explain it over and over again, I’m going to try to do a really good job of it once and link to it here.
What’s ECC RAM? Is it a good idea?
The ECC stands for Error Correcting Checksum. In a nutshell, ECC RAM is a special kind of server-grade memory that can detect and repair some of the most common kinds of in-memory corruption. For more detail on how ECC RAM does this, and which types of errors it can and cannot correct, the rabbit hole’s over here.
Now that we know what ECC RAM is, is it a good idea? Absolutely. In-memory errors, whether due to faults in the hardware or to the impact of cosmic radiation (yes, really) are a thing. They do happen. And if it happens in a particularly strategic place, you will lose data to it. Period. There’s no arguing this.
What’s ZFS? Is it a good idea?
ZFS is, among other things, a checksumming filesystem. This means that for every block committed to storage, a strong hash (somewhat misleadingly AKA checksum) for the contents of that block is also written. (The validation hash is written in the pointer to the block itself, which is also checksummed in the pointer leading to itself, and so on and so forth. It’s turtles all the way down. Rabbit hole begins over here for this one.)
Is this a good idea? Absolutely. Combine ZFS checksumming with redundancy or parity, and now you have a self-healing array. If a block is corrupt on disk, the next time it’s read, ZFS will see that it doesn’t match its checksum and will load a redundant copy (in the case of mirror vdevs or multiple copy storage) or rebuild a parity copy (in the case of RAIDZ vdevs), and assuming that copy of the block matches its checksum, will silently feed you the correct copy instead, and log a checksum error against the first block that didn’t pass.
ZFS also supports scrubs, which will become important in the next section. When you tell ZFS to scrub storage, it reads every block that it knows about – including redundant copies – and checks them versus their checksums. Any failing blocks are automatically overwritten with good blocks, assuming that a good (passing) copy exists, either redundant or as reconstructed from parity. Regular scrubs are a significant part of maintaining a ZFS storage pool against long term corruption.
Is ZFS and non-ECC worse than not-ZFS and non-ECC? What about the Scrub of Death?
OK, it’s pretty easy to demonstrate that a flipped bit in RAM means data corruption: if you write that flipped bit back out to disk, congrats, you just wrote bad data. There’s no arguing that. The real issue here isn’t whether ECC is good to have, it’s whether non-ECC is particularly problematic with ZFS. The scenario usually thrown out is the the much-dreaded Scrub Of Death.
TL;DR version of the scenario: ZFS is on a system with non-ECC RAM that has a stuck bit, its user initiates a scrub, and as a result of in-memory corruption good blocks fail checksum tests and are overwritten with corrupt data, thus instantly murdering an entire pool. As far as I can tell, this idea originates with a very prolific user on the FreeNAS forums named Cyberjock, and he lays it out in this thread here. It’s a scary idea – what if the very thing that’s supposed to keep your system safe kills it? A scrub gone mad! Nooooooo!
The problem is, the scenario as written doesn’t actually make sense. For one thing, even if you have a particular address in RAM with a stuck bit, you aren’t going to have your entire filesystem run through that address. That’s not how memory management works, and if it were how memory management works, you wouldn’t even have managed to boot the system: it would have crashed and burned horribly when it failed to load the operating system in the first place. So no, you might corrupt a block here and there, but you’re not going to wring the entire filesystem through a shredder block by precious block.
But we’re being cheap here. Say you only corrupt one block in 5,000 this way. That would still be hellacious. So let’s examine the more reasonable idea of corrupting some data due to bad RAM during a scrub. And let’s assume that we have RAM that not only isn’t working 100% properly, but is actively goddamn evil and trying its naive but enthusiastic best to specifically kill your data during a scrub:
First, you read a block. This block is good. It is perfectly good data written to a perfectly good disk with a perfectly matching checksum. But that block is read into evil RAM, and the evil RAM flips some bits. Perhaps those bits are in the data itself, or perhaps those bits are in the checksum. Either way, your perfectly good block now does not appear to match its checksum, and since we’re scrubbing, ZFS will attempt to actually repair the “bad” block on disk. Uh-oh! What now?
Next, you read a copy of the same block – this copy might be a redundant copy, or it might be reconstructed from parity, depending on your topology. The redundant copy is easy to visualize – you literally stored another copy of the block on another disk. Now, if your evil RAM leaves this block alone, ZFS will see that the second copy matches its checksum, and so it will overwrite the first block with the same data it had originally – no data was lost here, just a few wasted disk cycles. OK. But what if your evil RAM flips a bit in the second copy? Since it doesn’t match the checksum either, ZFS doesn’t overwrite anything. It logs an unrecoverable data error for that block, and leaves both copies untouched on disk. No data has been corrupted. A later scrub will attempt to read all copies of that block and validate them just as though the error had never happened, and if this time either copy passes, the error will be cleared and the block will be marked valid again (with any copies that don’t pass validation being overwritten from the one that did).
Well, huh. That doesn’t sound so bad. So what does your evil RAM need to do in order to actually overwrite your good data with corrupt data during a scrub? Well, first it needs to flip some bits during the initial read of every block that it wants to corrupt. Then, on the second read of a copy of the block from parity or redundancy, it needs to not only flip bits, it needs to flip them in such a way that you get a hash collision. In other words, random bit-flipping won’t do – you need some bit flipping in the data (with or without some more bit-flipping in the checksum) that adds up to the corrupt data correctly hashing to the value in the checksum. By default, ZFS uses 256-bit SHA validation hashes, which means that a single bit-flip has a 1 in 2^256 chance of giving you a corrupt block which now matches its checksum. To be fair, we’re using evil RAM here, so it’s probably going to do lots of experimenting, and it will try flipping bits in both the data and the checksum itself, and it will do so multiple times for any single block. However, that’s multiple 1 in 2^256 (aka roughly 1 in 10^77) chances, which still makes it vanishingly unlikely to actually happen… and if your RAM is that damn evil, it’s going to kill your data whether you’re using ZFS or not.
But what if I’m not scrubbing?
Well, if you aren’t scrubbing, then your evil RAM will have to wait for you to actually write to the blocks in question before it can corrupt them. Fortunately for it, though, you write to storage pretty much all day long… including to the metadata that organizes the whole kit and kaboodle. First time you update the directory that your files are contained in, BAM! It’s gotcha! If you stop and think about it, in this evil RAM scenario ZFS is incredibly helpful, because your RAM now needs to not only be evil but be bright enough to consistently pull off collision attacks. So if you’re running non-ECC RAM that turns out to be appallingly, Lovecraftianishly evil, ZFS will mitigate the damage, not amplify it.
If you are using ZFS and you aren’t scrubbing, by the way, you’re setting yourself up for long term failure. If you have on-disk corruption, a scrub can fix it only as long as you really do have a redundant or parity copy of the corrupted block which is good. Once you corrupt all copies of a given block, it’s too late to repair it – it’s gone. Don’t be afraid of scrubbing. (Well, maybe be a little wary of the performance impact of scrubbing during high demand times. But don’t be worried about scrubbing killing your data.)
I’ve constructed a doomsday scenario featuring RAM evil enough to kill my data after all! Mwahahaha!
OK. But would using any other filesystem that isn’t ZFS have protected that data? ‘Cause remember, nobody’s arguing that you can lose data to evil RAM – the argument is about whether evil RAM is more dangerous with ZFS than it would be without it.
I really, really want to use the Scrub Of Death in a movie or TV show. How can I make it happen?
What you need here isn’t evil RAM, but an evil disk controller. Have it flip one bit per block read or written from disk B, but leave the data from disk A alone. Now scrub – every block on disk B will be overwritten with a copy from disk A, but the evil controller will flip bits on write, so now, all of disk B is written with garbage blocks. Now start flipping bits on write to disk A, and it will be an unrecoverable wreck pretty quickly, since there’s no parity or redundancy left for any block. Your choice here is whether to ignore the metadata for as long as possible, giving you the chance to overwrite as many actual data blocks as you can before the jig is up as they are written to by the system, or whether to pounce straight on the metadata and render the entire vdev unusable in seconds – but leave the actual data blocks intact for possible forensic recovery.
Alternately you could just skip straight to step B and start flipping bits as data is written on any or all individual devices, and you’ll produce real data loss quickly enough. But you specifically wanted a scrub of death, not just bad hardware, right?
I don’t care about your logic! I wish to appeal to authority!
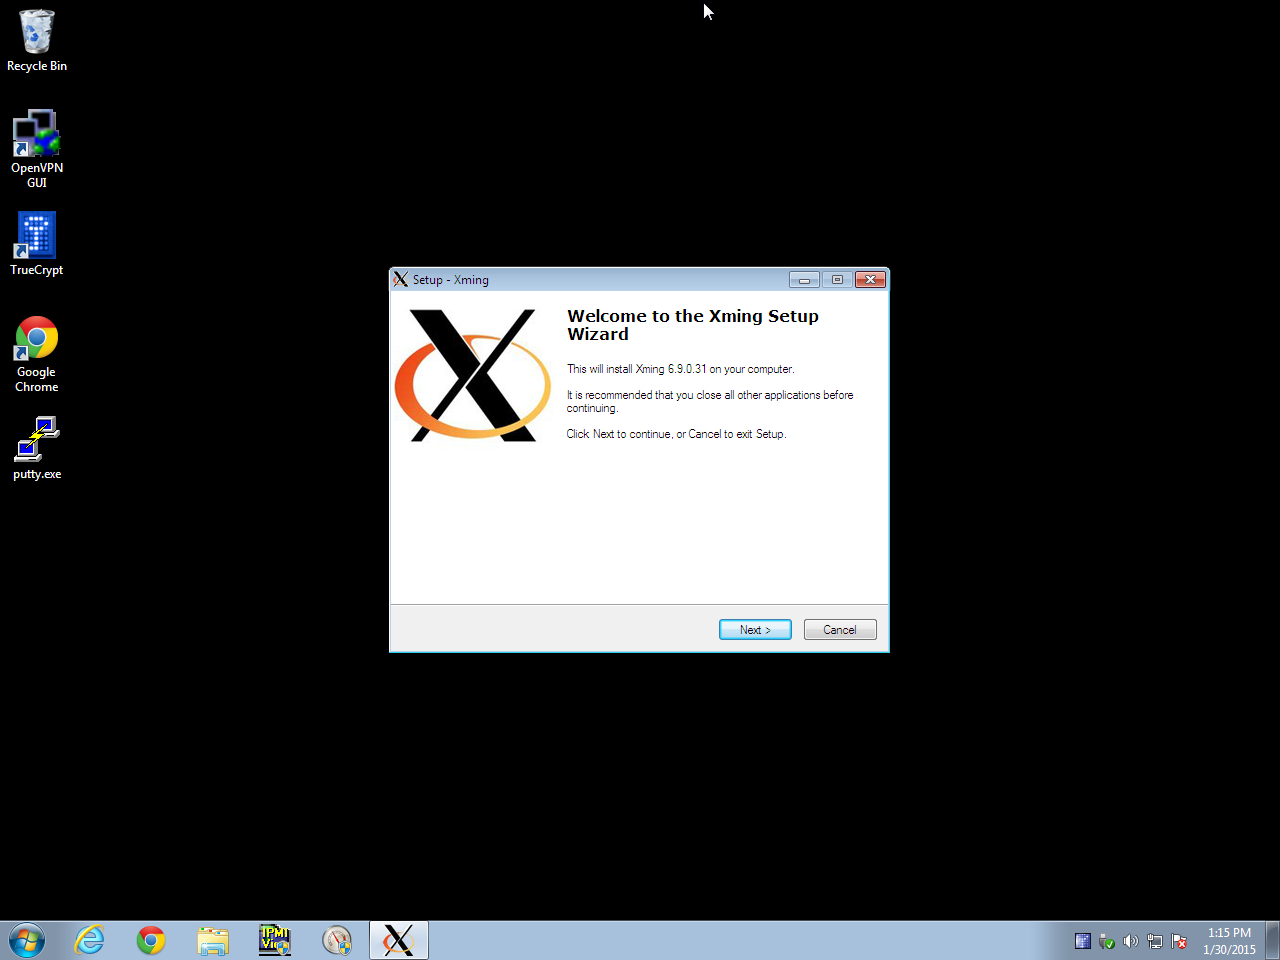
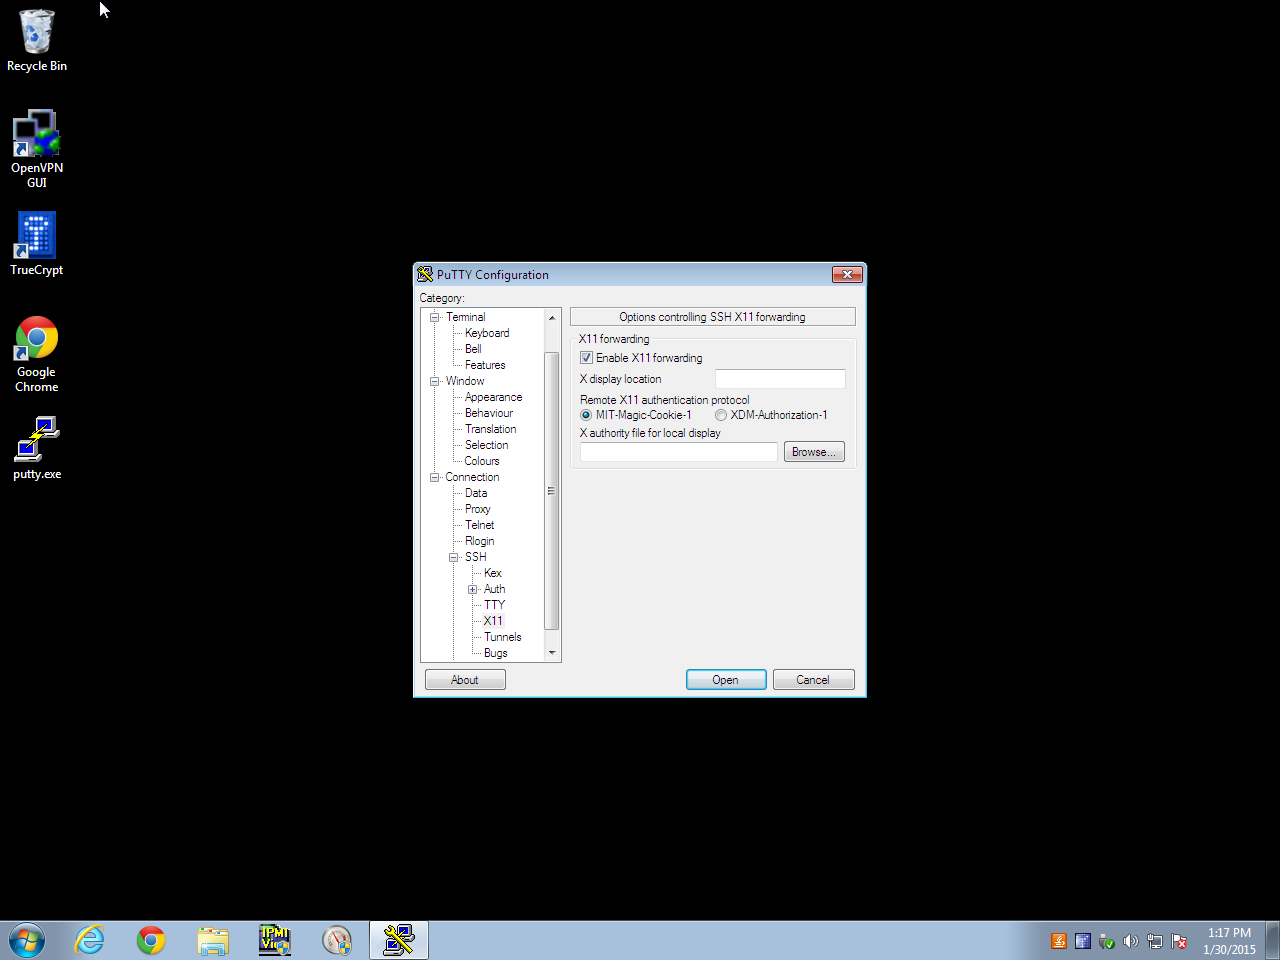
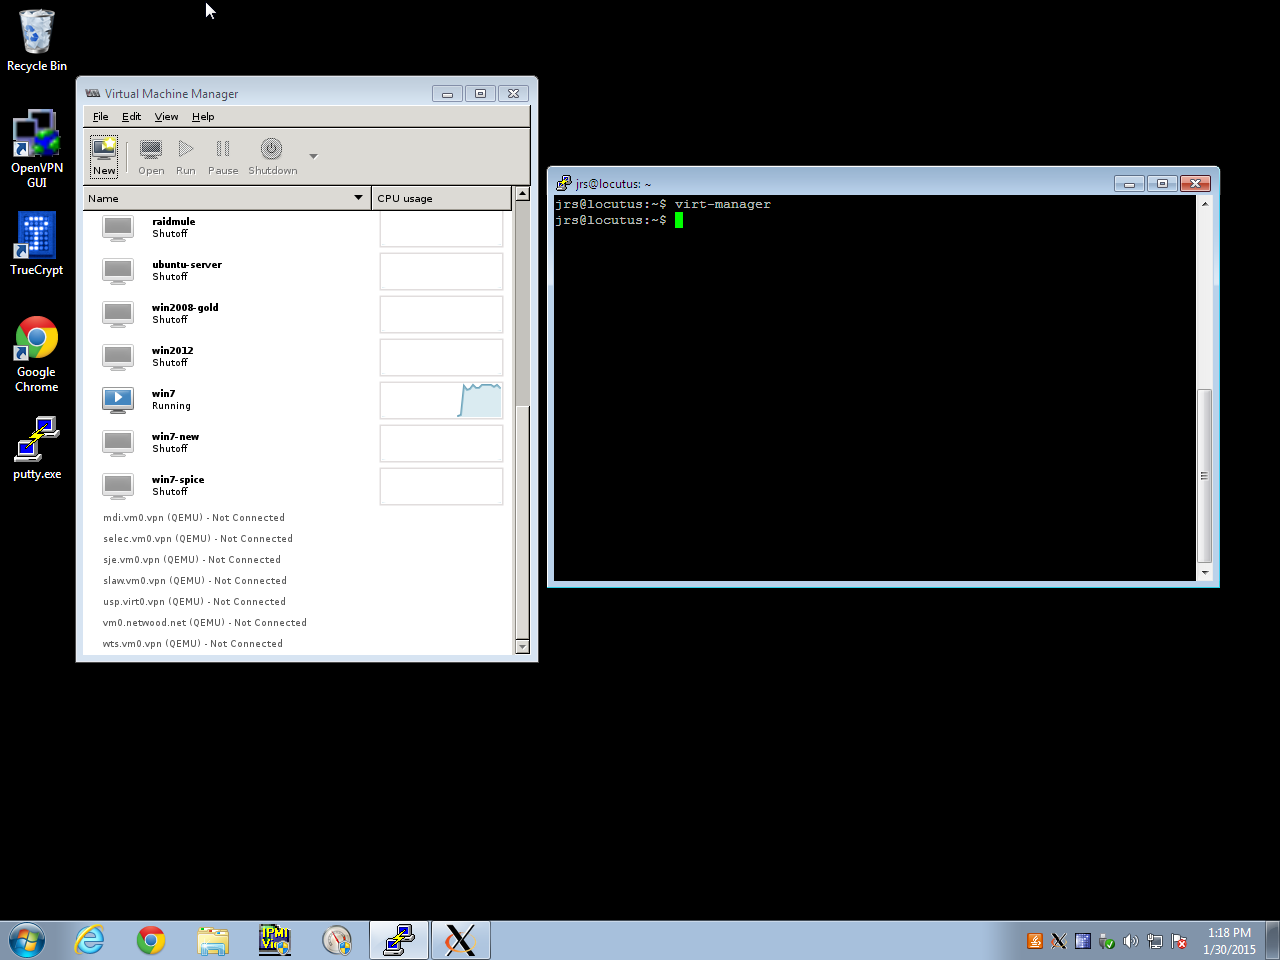
Got a graphical application you want to run on a Linux box, but display on a Windows box? It’s stupidly easy. I can’t believe how long it took me to learn how to do this, even though I knew it was possible to. Hopefully, this will save some other sysadmin from not having this trick in the toolbox. (It’s particularly useful for running virt-manager when you don’t have a Linux machine to sit in front of.)
Install XmingStep 1: download and install Xming (probably from Softpedia, since Sourceforge is full of malware and BS misleading downloads now)
Enable X11 ForwardingStep 2: in PuTTY’s configs on your Windows box, Connection –> SSH –> X11 –> check the “Enable X11 Forwarding” box.
Run from SSHStep 3: SSH into a Linux box, and run a GUI application from the command line. Poof, the app shows up on your Windows desktop!
Last night (2014 Apr 7) a massive security vulnerability was publicly disclosed in OpenSSL, the library that encrypts most of the world’s sensitive traffic. The bug in question is approximately two years old – systems older than 2012 are not vulnerable – and affects the TLS “heartbeat” function, which is why the vulnerability has been nicknamed HeartBleed.
The bug allows a malicious remote user to scan arbitrary 64K chunks of the affected server’s memory. This can disclose any and ALL information in that affected server’s memory, including SSL private keys, usernames and passwords of ANY running service accepting logins, and more. Nobody knows if the vulnerability was known or exploited in the wild prior to its public disclosure last night.
If you are an end user:
You will need to change any passwords you use online unless you are absolutely sure that the servers you used them on were not vulnerable. If you are not a HIGHLY experienced admin or developer, you absolutely should NOT assume that sites and servers you use were not vulnerable. They almost certainly were. If you are a highly experienced ops or dev person… you still absolutely should not assume that, but hey, it’s your rope, do what you want with it.
Note that most sites and servers are not yet patched, meaning that changing your password right now will only expose that password as well. If you have not received any notification directly from the site or server in question, you may try a scanner like the one at http://filippo.io/Heartbleed/ to see if your site/server has been patched. Note that this script is not bulletproof, and in fact it’s less than 24 hours old as of the time of this writing, up on a free site, and under massive load.
The most important thing for end users to understand: You must not, must not, MUST NOT reuse passwords between sites. If you have been using one or two passwords for every site and service you access – your email, forums you post on, Facebook, Twitter, chat, YouTube, whatever – you are now compromised everywhere and will continue to be compromised everywhere until ALL sites are patched. Further, this will by no means be the last time a site is compromised. Criminals can and absolutely DO test compromised credentials from one site on other sites and reuse them elsewhere when they work! You absolutely MUST use different passwords – and I don’t just mean tacking a “2” on the end instead of a “1”, or similar cheats – on different sites if you care at all about your online presence, the money and accounts attached to your online presence, etc.
If you are a sysadmin, ops person, dev, etc:
Any systems, sites, services, or code that you are responsible for needs to be checked for links against OpenSSL versions 1.0.1 through 1.0.1f. Note, that’s the OpenSSL vendor versioning system – your individual distribution, if you are using repo versions like a sane person, may have different numbering schemes. (For example, Ubuntu is vulnerable from 1.0.1-0 through 1.0.1-4ubuntu5.11.)
Examples of affected services: HTTPS, IMAPS, POP3S, SMTPS, OpenVPN. Fabulously enough, for once OpenSSH is not affected, even in versions linking to the affected OpenSSL library, since OpenSSH did not use the Heartbeat function. If you are a developer and are concerned about code that you wrote, the key here is whether your code exposed access to the Heartbeat function of OpenSSL. If it was possible for an attacker to access the TLS heartbeat functionality, your code was vulnerable. If it was absolutely not possible to check an SSL heartbeat through your application, then your application was not vulnerable even if it linked to the vulnerable OpenSSL library.
In contrast, please realize that just because your service passed an automated scanner like the one linked above doesn’t mean it was safe. Most of those scanners do not test services that use STARTTLS instead of being TLS-encrypted from the get-go, but services using STARTTLS are absolutely still affected. Similarly, none of the scanners I’ve seen will test UDP services – but UDP services are affected. In short, if you as a developer don’t absolutely know that you weren’t exposing access to the TLS heartbeat function, then you should assume that your OpenSSL-using application or service was/is exploitable until your libraries are brought up to date.
You need to update all copies of the OpenSSL library to 1.0.1g or later (or your distribution’s equivalent), both dynamically AND statically linked (PS: stop using static links, for exactly things like this!), and restart any affected services. You should also, unfortunately, consider any and all credentials, passwords, certificates, keys, etc. that were used on any vulnerable servers, whether directly related to SSL or not, as compromised and regenerate them. The Heartbleed bug allowed scanning ALL memory on any affected server and thus could be used by a sufficiently skilled user to extract ANY sensitive data held in server RAM. As a trivial example, as of today (2014-Apr-08) users at the Ars Technica forums are logging on as other users using password credentials held in server RAM, as exposed by standard exploit test scripts publicly disclosed.
Completely eradicating all potential vulnerability is a STAGGERING amount of work and will involve a lot of user disruption. When estimating your paranoia level, please do remember that the bug itself has been in the wild since 2012 – the public disclosure was not until 2014-Apr-07, but we have no way of knowing how long private, possibly criminal entities have been aware of and/or exploiting the bug in the wild.