Today’s Apache 101 presentation at IT-Ology went well – 20-something attendees, and plenty of questions asked and answered. If you couldn’t make the presentation today – or if you did, but you want to refer to the slides later – you can find my slide deck at https://jrs-s.net/apache101/.
Author: Jim Salter
Understanding ctime
ctimes have got to be one of the most widely misunderstood features of POSIX filesystems. It’s very intuitive – and very wrong – to believe that just as mtime is the time the file was last modified and atime is the time the file was last accessed, ctime must be the time the file was created. Nope!
ctime is not the file creation time, it’s the inode creation time. Any time the inode for a file changes, the ctime changes. Which isn’t very intuitive, and happens much more frequent than you might think. In fact, I can’t think of a time that the mtime changes that the ctime won’t change with it… and in a lot of cases, the ctime will update when the mtime doesn’t! There’s a LOT of bad information floating around about this… so let’s examine it directly:
me@box:/tmp$ touch test
SHOWTIMES="%P \t ctime: %Cb %Cd %CT \t mtime: %Tb %Td %TT \t atime: %Ab %Ad %AT \n" ; export SHOWTIMES
me@box:/tmp$ find . -maxdepth 1 -name test -printf "$SHOWTIMES"
test ctime: Jul 29 15:53:51.4814403150 mtime: Jul 29 15:53:51.4814403150 atime: Jul 29 15:53:51.4814403150
me@box:/tmp$ cat test > /dev/null
me@box:/tmp$ find . -maxdepth 1 -name test -printf "$SHOWTIMES"
test ctime: Jul 29 15:53:51.4814403150 mtime: Jul 29 15:53:51.4814403150 atime: Jul 29 15:54:18.1014495830
me@box:/tmp$ touch test
me@box:/tmp$ find . -maxdepth 1 -name test -printf "$SHOWTIMES"
test ctime: Jul 29 15:54:25.6522832920 mtime: Jul 29 15:54:25.6522832920 atime: Jul 29 15:54:25.6522832920
me@box:/tmp$ chmod 777 test
me@box:/tmp$ find . -maxdepth 1 -name test -printf "$SHOWTIMES"
test ctime: Jul 29 15:54:32.7214485080 mtime: Jul 29 15:54:25.6522832920 atime: Jul 29 15:54:25.6522832920
me@box:/tmp$ mv test test2 ; mv test2 test
me@box:/tmp$ find . -maxdepth 1 -name test -printf "$SHOWTIMES"
test ctime: Jul 29 15:54:54.6322825980 mtime: Jul 29 15:54:25.6522832920 atime: Jul 29 15:54:25.6522832920
OK, from top to bottom:
1. we create a file, and we check its ctime, mtime, and atime. No surprises.
2. we access the file, by cat’ing it to /dev/null. atime updates, ctime and mtime remain the same. No surprises.
3. we modify the file, by touching it. atime, mtime, and ctime update… not what you expected, amirite?
4. we change permissions on the file. ctime updates, but mtime and atime do not. Again… not what you expected, right right?
5. we mv the file a couple times. ctime updates again – mtime and atime still don’t.
This is usually the first answer that should be given to “how do I modify the ctime on a file?” (The second answer is: don’t. [i]By design[/b], there is no feature within a POSIX filesystem to set a ctime to anything other than the current system time, so the only way to do it is either to reset the system time, then mv the file, or to unmount the filesystem entirely and hexedit the metadata with a debugging tool. Neither is a good idea, and wanting to do so in the first place usually stems from a misunderstanding of what ctime is and does.)
SouthEast Linux Fest (SELF) 2012
I had a great time at SELF in Charlotte, NC this weekend. One of the highlights, for me, was for the first time meeting some fellow BSD types in the flesh – Kris Moore (founder of the PC-BSD distribution) and Dru Lavigne (Director of the FreeBSD Foundation), no less. While discussing the pain of doing FreeBSD installs onto RAIDZ, Kris told me about the new graphical installer in PC-BSD that lets you create new RAIDZ arrays of all types and install directly to them, all without ever having to leave the installer, which I found pretty exciting. I found it even more exciting when he told me that the procedures taken by the installer were based partly on my own work at freebsdwiki.net!
I set up a new VM with three virtual disks pretty much the minute I got home, and started a new PC-BSD 9.0 install. Sure enough, although the option is a little hard to discover, I managed to figure it out without having to go in search of any documentation – and without ever leaving the installer, and with a bare minimum of blood and chicken feathers, I got a brand new RAIDZ1 across my three virtual disks set up, and PC-BSD cheerfully installed onto it. (This is testing only, of course – in production, you should only do RAIDZ onto bare metal, not onto an abstraction like linux logical volumes or raw files accessed through a hypervisor.) Pretty heady stuff!
To the right – Tux dropped by the table while Dru and Kris and I were chatting, and posed for me with BSD’s horns. How great is that?
Storing PHP sessions in memcached instead of in files
in php.ini:
session.save_handler = memcache
session.save_path = "tcp://serv01:11211,tcp://serv02:11211,tcp://serv03:11211"
Obviously, you need php5-memcache installed, replace “serv1” “serv2” and “serv3” with valid server address(es), and you’ll need to restart your Apache server after making the change.
Why would you need to do this? Well, this week I had to deal with a web application server pool that kept slowly increasing its number of children all the way up to MaxCli, no matter what. It was unpredictable, other than being a slow creep. Eventually, stracing the pids showed that they were getting stuck in FLOCK on files in /var/lib/php5/php_sess*. This turns out to be an endemic problem with PHP that the devs don’t seem inclined to fix: php’s garbage collector will delete session files dirtily if a php process (which in the case of mod_php, means an Apache process) violates any of the php limits, such as max_execution_time (among many, many others). So you end up with your php script trying to lock a session file (file descriptor 3) that php’s garbage collector already deleted, and therefore an infinitely hung process that will never go away on its own.
Changing over to using memcache to store php sessions eliminated this file lock issue and resulted in a much more stable situation – a server pool that had been creeping up to 800 children per server over the course of a couple hours has been running stable and sweet on less than 150 children per server for days now.
Enabling core dumps on Apache2.2 on Debian
It was quite an adventure today, figuring out how to get a segfaulting Apache to give me core dumps to analyze on Debian Squeeze. What SHOULD have been easy… wasn’t. Here’s what all you must do:
First of all, you’ll need to set ulimit -c unlimited in your /etc/init.d/apache2 script’s start section.
case $1 in
start)
log_daemon_msg "Starting web server" "apache2"
# set ulimit for debugging
# ulimit -c unlimited
Now make a directory for core dumps – mkdir /tmp/apache2-dumps ; chmod 777 /tmp/apache2-dumps – then you’ll need to apt-get install apache2-dbg libapr1-dbg libaprutil1-dbg …
And, the current (Debian Squeeze, in May 2012) version of Debian does not have PIE support in the default gdb, so you’ll need to install gdb from backports. So, add deb http://backports.debian.org/debian-backports squeeze-backports main to /etc/apt/sources.list, then apt-get update && apt-get install -t squeeze-backports gdb …
Now add “CoreDumpDirectory /tmp/apache2-dumps” to /etc/apache2/apache2.conf (or its own file in conf.d, whatever), then /etc/init.d/apache2 stop ; /etc/init.d/apache2 start …
And once you start getting segfaults, you’ll get a core in /tmp/apache2-dumps/core.
Finally, now that you have your core, you can gdb apache2 /tmp/apache2-dumps/core, bt full, and debug to your heart’s content. WHEW.
Opening up SQL server in the Windows Server 2008 firewall
@echo ========= SQL Server Ports ===================
@echo Enabling SQLServer default instance port 1433
netsh firewall set portopening TCP 1433 “SQLServer”
@echo Enabling Dedicated Admin Connection port 1434
netsh firewall set portopening TCP 1434 “SQL Admin Connection”
@echo Enabling conventional SQL Server Service Broker port 4022
netsh firewall set portopening TCP 4022 “SQL Service Broker”
@echo Enabling Transact-SQL Debugger/RPC port 135
netsh firewall set portopening TCP 135 “SQL Debugger/RPC”
@echo ========= Analysis Services Ports ==============
@echo Enabling SSAS Default Instance port 2383
netsh firewall set portopening TCP 2383 “Analysis Services”
@echo Enabling SQL Server Browser Service port 2382
netsh firewall set portopening TCP 2382 “SQL Browser”
@echo ========= Misc Applications ==============
@echo Enabling HTTP port 80
netsh firewall set portopening TCP 80 “HTTP”
@echo Enabling SSL port 443
netsh firewall set portopening TCP 443 “SSL”
@echo Enabling port for SQL Server Browser Service’s ‘Browse’ Button
netsh firewall set portopening UDP 1434 “SQL Browser”
@echo Allowing multicast broadcast response on UDP (Browser Service Enumerations OK)
netsh firewall set multicastbroadcastresponse ENABLE
Testing Ubuntu Precise (12.04 LTS beta)
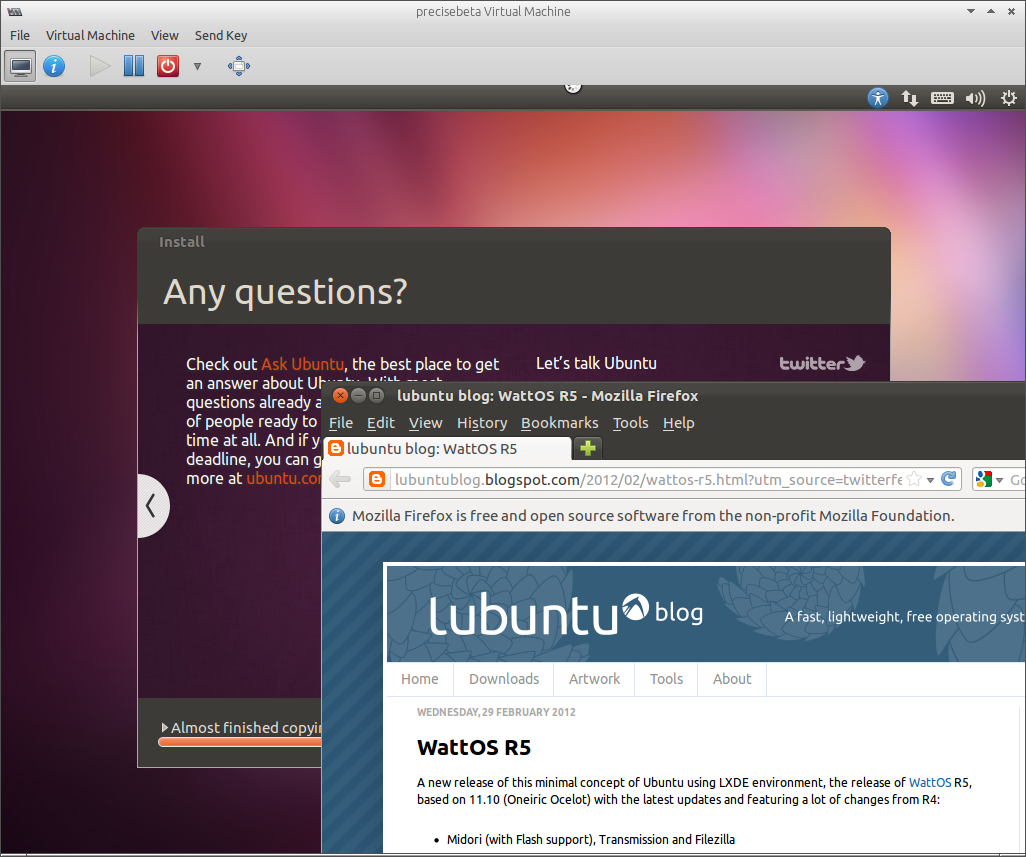
OK, this is the coolest thing ever – I decided to download the beta for the upcoming Ubuntu Precise Pangolin (12.04 LTS) release and do some testing. And I start installing it in a VM, and *while* it’s installing, I see it populate a dialog with Ubuntu-relevant links, and curiously, I click one… and BAM, instant fully-functional, working Firefox!
So, while you’re installing your operating system, you can goof around on the internet. Seriously, how cool is that?!
Linux Sysadmin 101
I just finished the LibreOffice Impress presentation I’ll be using when I give my first Linux Sysadmin 101 talk at IT-ology this weekend. The hardest part is always making graphics!

It’s licensed Creative Commons non-commercial share-alike; if you’d like a copy, you can grab one here: https://jrs-s.net/linux_sysadmin_101/linux_sysadmin_101.odp (ODP, 2.4MB)
Hash collision DoS vulnerability and PHP 5.x
There’s a lot of fear floating around right now about the hash collision DoS vulnerability which pretty much every web application platform out there (except for Perl, which fixed the vulnerability way back in 2003!) is open to. http://thehackernews.com/2011/12/web-is-vulnerable-to-hashing-denial-of.html
And yeah, it’s a pretty big deal – if you’re vulnerable, any PHP script that so much as touches $_POST or $_GET will be vulnerable. What none of these pages seem very inclined to tell you is exactly HOW to test for vulnerability – and, what may have already made this problem a non-issue for you. Spoiler: if you’re running a current LTS version of Debian or Ubuntu and you installed the LAMP stack during boot or by using tasksel install lamp-server, you’re probably fine. The Suhosin patch gets in the vulnerability’s way in the default configuration it uses on Squeeze and Lucid, and the Debian-style LAMP installation gives you Suhosin, so you’re good to go.
But what if you DIDN’T get your LAMP stack that way, or you just aren’t sure if you’re running Suhosin – or the right configuration of Suhosin – and you want to check? First, dump this little PHP script somewhere that you can access it – for most people, /var/www/hashtest.php will work fine:
<!--?php $test = $_POST['test']; echo "test passed!\n"; ?-->
Note: it’s that useless line accessing $_POST that makes this script potentially vulnerable – without that line, this script wouldn’t actually be vulnerable to the attack, because PHP builds the super-array for $_POST and $_GET lazily. You don’t access it… PHP doesn’t create it. Anyway, now make sure that you can actually access that script using wget, like this: wget -O – http://127.0.0.1/hashtest.php
You should get a quick HTML output that says “test passed!” – which isn’t true, because we didn’t actually test it – but now you know the script will actually execute. Now, wget -qO /tmp/hashcollide.txt https://jrs-s.net/hashcollide.txt – this gives you a “payload” file with a nice set of really nasty hash collisions that will confuse a PHP application badly. Finally, you’re ready to test it out – wget -O – –-post-file /tmp/hashcollide.txt http://127.0.0.1/hashtest.php[/b] and you’re off to the races. If you’re lucky, you’ll get this:
test passed!
If you’re not lucky, you get a nice long wait (max_execution_time in php.ini, 30 seconds by default) followed by this:
me@locutus:/var/www$ wget -O - --post-file /tmp/hashcollide.txt http://127.0.0.1/hashtest.php Connecting to 127.0.0.1:80... connected. HTTP request sent, awaiting response... 500 Internal Server Error 2011-12-29 16:10:14 ERROR 500: Internal Server Error.
In my testing so far, FreeBSD (all versions), Ubuntu Hardy, Ubuntu Oneiric, and Debian Lenny are vulnerable. Ubuntu Lucid and Debian Squeeze were not. Again, this assumes you’ve installed the LAMP stack in the default manner; “cowboy installs” may or may not be vulnerable. Suhosin appears to be the key factor determining whether a particular machine will or will not fall prey to this vulnerability. The fix, if you are vulnerable – upgrade your OS to a current LTS version, upgrade all packages, and make sure you’re running Suhosin – then make sure you actually set the Suhosin variable suhosin.post.max_vars to 1000 or less.
In the following example, we discover that a stock Oneiric workstation is vulnerable, and then we fix it:
me@locutus:/var/www$ wget --post-file /tmp/hashcollide.txt -O - http://127.0.0.1/hashtest.php --2011-12-30 10:27:43-- http://127.0.0.1/hashtest.php Connecting to 127.0.0.1:80... connected. HTTP request sent, awaiting response... 500 Internal Server Error 2011-12-30 10:28:43 ERROR 500: Internal Server Error.
Yup, it’s broken – so let’s fix it.
me@locutus:~$ sudo apt-get install php5-suhosin me@locutus:~$ grep suhosin.post.max_vars /etc/php5/apache2/conf.d/suhosin.ini ;suhosin.post.max_vars = 1000 me@locutus:~$ sudo sed -i s/;suhosin\.post\.max_vars/suhosin\.post\.max_vars/ /etc/php5/apache2/conf.d/suhosin.ini me@locutus:~$ grep suhosin.post.max_vars /etc/php5/apache2/conf.d/suhosin.ini suhosin.post.max_vars = 1000 me@locutus:~$ wget -qO - --post-file /tmp/hashcollide.txt http://127.0.0.1/hashtest.php test passed!
For some damn reason, even though Oneiric indicates that suhosin.post.max_vars should be set to 1000 by default, and even though the Suhosin project says they have it default to 200… in actuality, on Oneiric, it defaults to unset. If you uncomment the statement already in suhosin.ini as I did above, though, then restart Apache – you’re set.
Note: the “payload file” referenced above was lifted from https://github.com/koto/blog-kotowicz-net-examples/tree/master/hashcollision .
PSA: AMD Socket C-32 CPU Coolers
I’ve started to build what I’ve dubbed “medium iron” virtualization servers: 12-24 cores, up to 128GB RAM, etc etc. For this particular task, AMD is the bang-for-the-buck king; they can’t touch Intel right now on per-core performance, but if what you want are tons and tons of cores and lots of memory address capability for cheap, they can’t be beat.

One problem: the new Socket C32 CPUs, such as the Opteron 4180/4184/418x, don’t come with a cooler… and there are only two coolers AT ALL on the market that specifically state they support Socket C32 – the Noctua NH-12DO, which is a fine, quiet, lotsa-air-flow cooler but very pricey at typically $80 or so (and rather hard to find), and some Dynatron that everybody and their brother warns sounds like a drill press even at idle (and isn’t cheap either). Making matters worse, the Noctua is an unusually large, super-tall design that just plain won’t work in a lot of cases.
If you dig further, you’ll find some hardware enthusiasts mentioning that the Socket C32 “should accept most Socket F coolers”, going further to mention that they’ll need to be a certain “pitch” – which usually isn’t specified on the cooler’s details page.
Well, as a public service announcement, here’s your specific inexpensive alternative for Socket C32 cooling: the Thermaltake A4022 (sometimes aka the “TR2-R1”). At under $20 retail, it’s somewhere south of 1/4 the price of the Noctua cooler; it’s also much easier to find, and it’s a standard low-profile design that fits in a lot more places.
With two of the A4022 coolers installed, my dual Opteron 4180 system idles at about 40C and runs about 65C when running 12 instances of K7Burn to maximize thermal output. Better yet, this was a deliberately low precision installation: I put a small dab of generic thermal grease on top of each CPU, and did not remove the thermal tape stripe from the bottom of each cooler (which generally will give you lower temps, if you properly grease the CPU/cooler interface). So, no “overclocker tricks” required – these coolers, in my testing, “just work” perfectly well.