I’ve been using KVM in production to host Windows Server guests for close to 4 years now. I’ve always been thoroughly impressed at what a great job KVM did with accelerating disk I/O for the guests – making Windows guests perform markedly faster virtualized than they used to on the bare metal. So when I got really, REALLY bad performance recently on a few Windows Server Standard 2012 guests – bad enough to make the entire guest seem “locked up tight” for minutes at a time – I did some delving to figure out what was going on.
Linux and KVM offer a wealth of options for handling caching and underlying subsystems of host storage… an almost embarassing wealth, which nobody seems to have really benchmarked. I have seen quite a few people tossing out offhanded comments about this cache mode or that cache mode being “safer”or “faster”or “better”, but no hard numbers. So to both fix my own immediate problem and do some much-needed documentation, I spent more hours this week than I really want to think about doing some real, no-kidding, here-are-the-numbers benchmarking.
Methodology
Test system: AMD FX-8320 8-core CPU, 32GB DDR3 SDRAM, 1x WD 2TB Black (WD2002FAEX) drive, 1x Samsung 840 PRO Series 512GB SSD, Ubuntu 12.04.2-LTS fully updated, Windows Server 2008 R2 guest OS, HD Tune Pro 5.50 Windows disk benchmark suite.
The host and guest OS are both installed on the WD 2TB Black conventional disk; the Samsung 840 PRO Series SSD is attached to the guest in various configurations for benchmarking. The guest OS is given approximately 30 seconds to “settle” after each boot and login before running any benchmarks. No other operations are occurring on either guest or host while benchmarks are run.
Exploratory Testing
Before diving straight into “which combination works the fastest”, I really wanted to explore the individual characteristics of all the various overlapping options available.
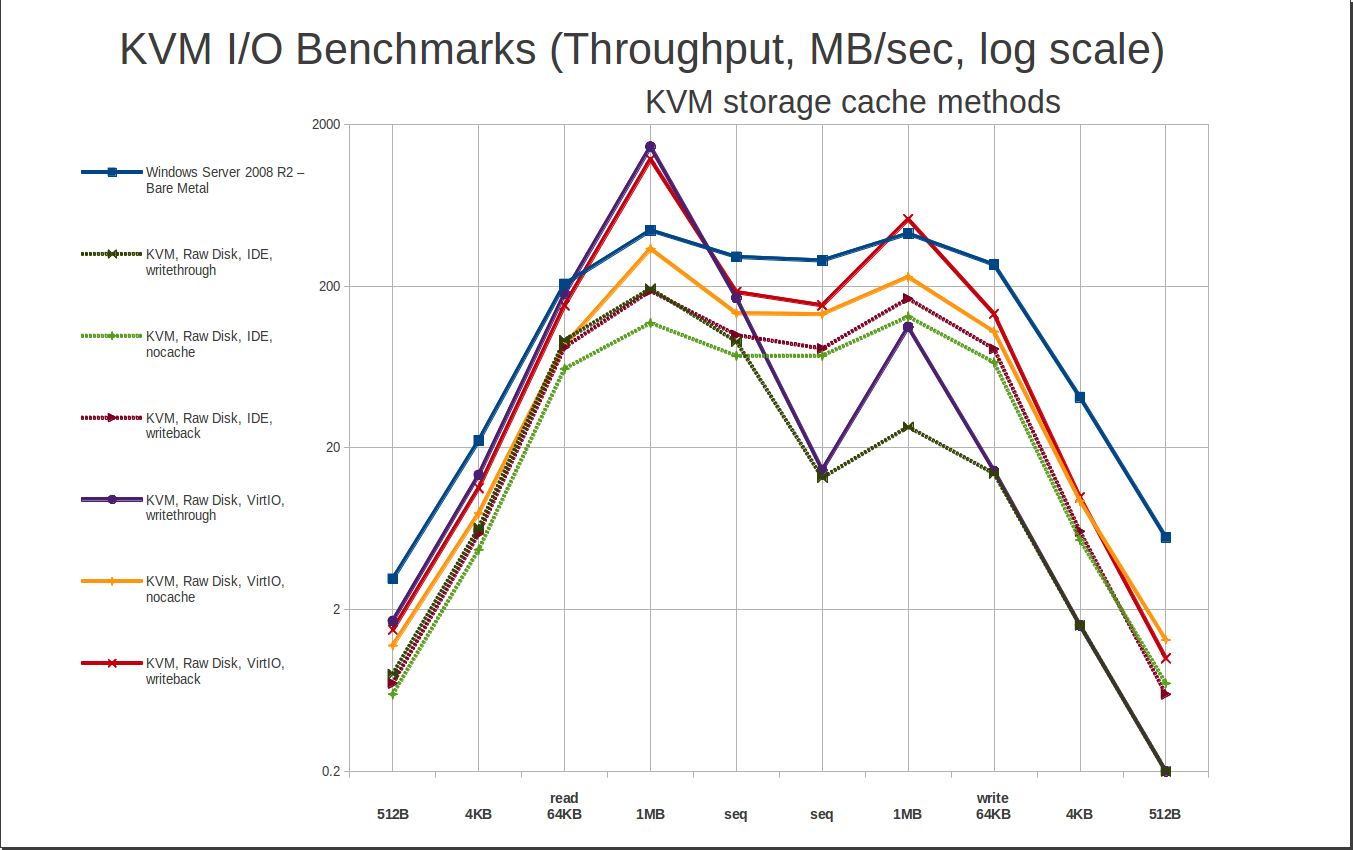
The first thing I wanted to find out: how much of a penalty, if any, do you pay for operating a raw disk virtualized under KVM, as opposed to under Windows on the bare metal? And how much of a boost do the VirtIO guest drivers offer over basic IDE drivers?
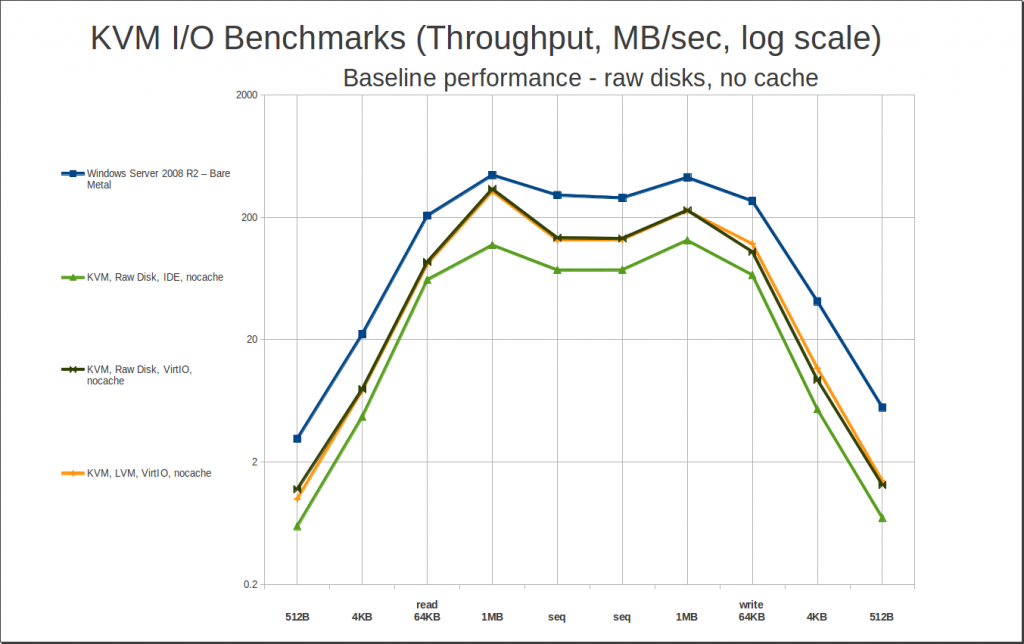
As you can see, we do pay a penalty – particularly without the VirtIO drivers, which offer a substantial increase in performance over the default IDE, even without caching. We can also see that LVM logical volumes perform effectively identically to actual raw disks. Nice to know!
Now that we know that “raw is raw”, and “VirtIO is significantly better than IDE”, the next burning question is: how much of a performance hit do we take if we use .qcow2 files on an actual filesystem, instead of feeding KVM a raw block device? Actually, let’s pause that question – before that, why would we want to use a .qcow2 file instead of a raw disk or LV? Two big answers: rsync, and state saves. Unless you compile rsync from source with an experimental patch, you can’t use it to synchronize copies of a guest that are stored on a block device – whereas you can, with a qcow2 or raw file on a filesystem. And you can’t save state (basically, like hibernation – only much faster, and handled by the host instead of the guest) with raw storage either – you need qcow2 for that. As a really, really nice aside, if you’re using qcow2 and your host runs out of space… your guest pauses instead of crashing, and as soon as you’ve made more space available on your host, you can resume the guest as though nothing ever happened. Which is nice.
So, if we can afford to, we really would like to have qcow2. Can we afford to?
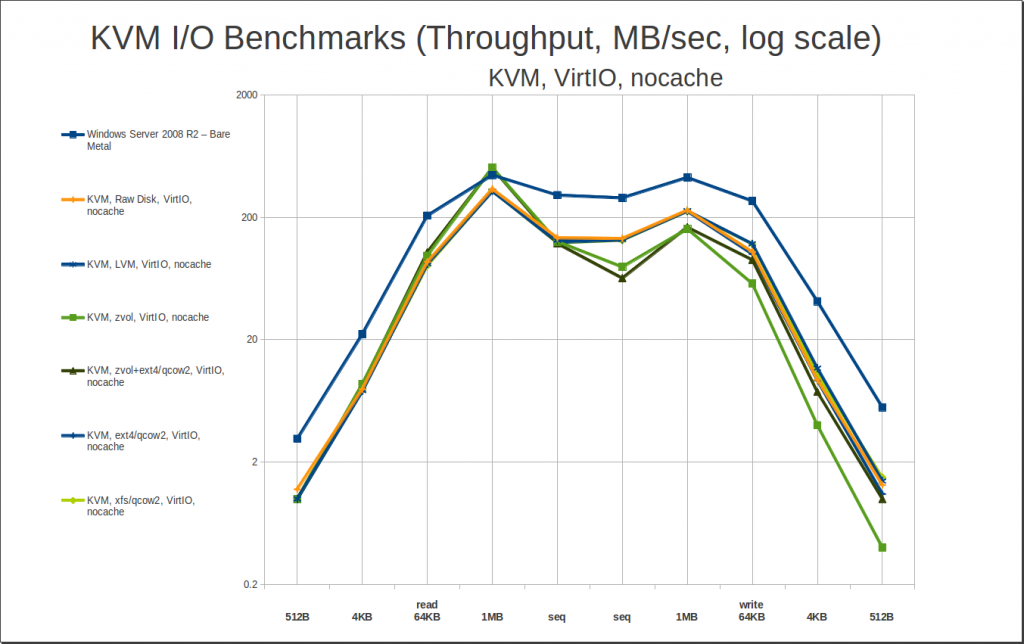
Yes… yes we can. There’s nothing too exciting to see here – basically, the takeaway is “there is little to no performance penalty for using qcow2 files on a filesystem instead of raw disks.” So, performance is determined by cache settings and by the presence of VirtIO drivers in our guest… not so much by whether we’re using raw disks, or LV, or ZVOL, or qcow2 files.
One caveat: I tested using fully-allocated qcow2 files. I did a little bit of casual testing with sparsely allocated (aka “thin provisioned”) qcow2 files, and basically, they follow the same performance curves, but with roughly half the performance on some writes. This isn’t that big a deal, in my opinion – you only have to do a “slow” write to any given block once. After that, it’s a rewrite, not a new write, and you’re back to the same performance level you’d have had if you’d fully allocated your qcow2 file to start with. So, basically, it’s a self-correcting problem, with a tolerable temporary performance penalty. I’m more than willing to deal with that in return for not having to potentially synchronize gigabytes of slack space when I do backups and migrations.
So… since performance is determined largely by cache settings, let’s take a look at how those play out in the guest:

In plain English, “writethrough” – the default – is read caching with no write cache, and “writeback” is both read and write caching. “None” is a little deceptive – it’s not just “no caching”, it actually requires Direct I/O access to the storage medium, which not all filesystems provide.
The first thing we see here is that the default cache method, writethrough, is very very fast at reading, but painfully slow on writes – cripplingly so. On very small writes, writethrough is capable of less than 0.2 MB/sec in some cases! This is on a brand-new 840 Pro Series SSD... and it’s going to get even worse than this later, when we look at qcow2 storage. Avoid, avoid, avoid.
KVM caching really is pretty phenomenal when it hits, though. Take a look at the writeback cache method – it jumps well above bare metal performance for large reads and writes… and it’s not a small jump, either; 1MB random reads of well over 1GB / sec are completely normal. It’s potentially a little risky, though – you could potentially lose guest data if you have a power failure or host system crash during a write. This shouldn’t be an issue on a stable host with a UPS and apcupsd.
Finally, there’s cache=none. It works. It doesn’t impress. It isn’t risky in terms of data safety. And it generally performs somewhat better with extremely, extremely small random I/O… but without getting the truly mind-boggling wins that caching can offer. In my personal opinion, cache=none is mostly useful when you’re limited to IDE drivers in your guest. Also worth noting: “cache=none” isn’t available on ZFS or FUSE filesystems.
Moving on, we get to the stuff I really care about when I started this project – ZFS! Storing guests on ZFS is really exciting, because it offers you the ability to take block-level host-managed snapshots of your guests; set and modify quotas; set and configure compression; do asynchronous replication; do block-level deduplication – the list goes on and on and on. This is a really big deal. But… how’s the performance?
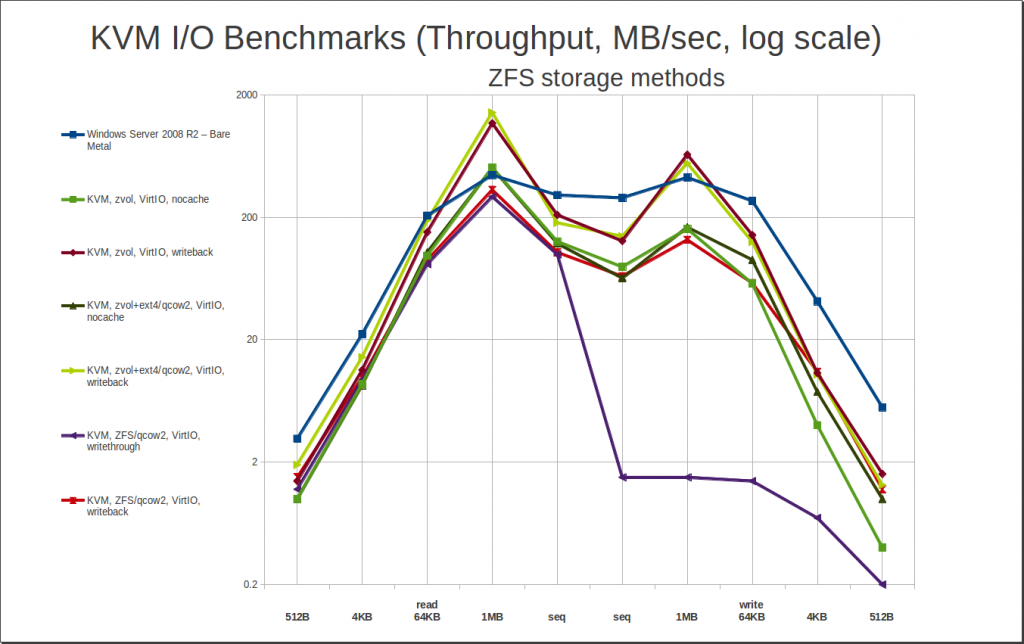
The performance is very, very solid… as long as you don’t use writethrough. If you use writethrough cache and ZFS, you’re going to have a bad time. Also worth noting: Direct I/O is not available on the ZFS filesystem – although it is available with ZFS zvols! – so there are no results here for “cache=none” and ZFS qcow2.
The big, big, big thing you need to take away from this is that abysmal write performance line for ZFS/qcow2/writethrough – well under 2MB/sec for any and all writes. If you set a server up this way, it will look blazing quick and you’ll love it… until the first time you or a user tries to write a few hundred MB of data to it across the network, at which point the whole thing will lock up tighter than a drum for half an hour plus. Which will make you, and your users, very unhappy.
What else can we learn here? Well, although we’ve got the option of using a zvol – which is basically ZFS’s answer to an LVM LV – we really would like to avoid it, for the same reasons we talked about when we compared qcow to raw. So, let’s look at the performance of that raw zvol – is it worth the hassle? In the end, no.
But here’s the big surprise – if we set up a ZVOL, then format it with ext4 and put a .qcow2 on top of that… it performs as well, and in some cases better than, the raw zvol itself did! As odd as it sounds, this leaves qcow2-on-ext4-on-zvol as one of our best performing overall storage methods, with the most convenient options for management. It sounds like it’d be a horrible Rube Goldberg, but it performs like best-in-breed. Who’d’a thunk it?
There’s one more scenario worth exploring – so far, since discovering how much faster it was, we’ve almost exclusively looked at VirtIO performance. But you can’t always get VirtIO – for example, I have a couple of particularly crotchety old P2V’ed Small Business Server images that absolutely refuse to boot under VirtIO without blue-screening. It happens. What are your best options if you’re stuck with IDE?
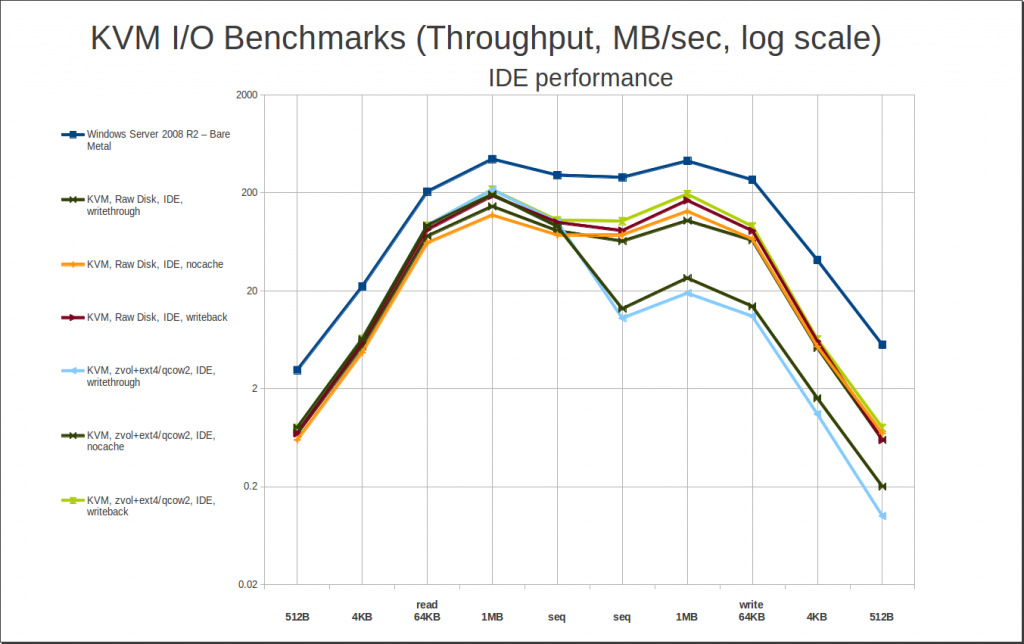
Without VirtIO drivers, caching does very, very little for you at best, and kills your performance at worst. (Hello again, horrible writethrough write performance.) So you really want to use “cache=none” if you’re stuck on IDE. If you can’t do that for some reason (like using ZFS as a filesystem, not a zvol), writeback will perform quite acceptably… but it will also expose you to whatever added data integrity risk that the write caching presents, without giving you any performance benefits in return. Caveat emptor.
Final Tests / Top Performers
At this point, we’ve pretty thoroughly explored how individual options affect performance, and the general ways in which they interact. So it’s time to cut to the chase: what are our top performers?
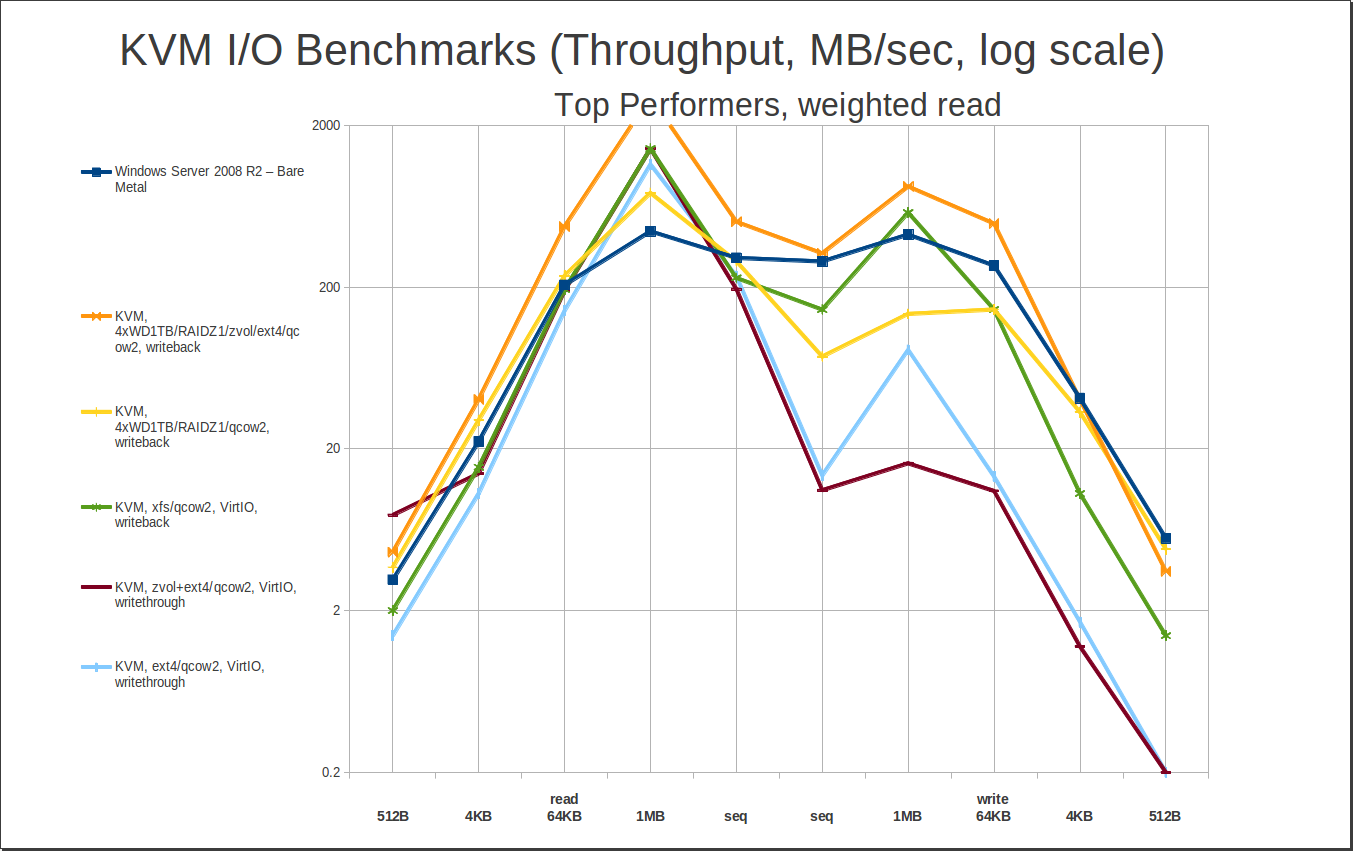
First, let’s look at our top read performers. My method for determining “best” read performance was to take the 4KB random read and the sequential read, then multiply the 4KB random by a factor which, when applied to the bare metal Windows performance, would leave a roughly identical value to the sequential read. Once you’ve done this, taking the average of the two gives you a mean weighted value that makes 4KB read performance roughly as “important” as sequential read performance. Sorting the data by these values gives us…

Woah, hey, what’s that joker in the deck? RAIDZ1…?
My primary workstation is also an FX-8320 with 32GB of DDR3, but instead of an SSD, it has a 4 drive RAIDZ1 array of Western Digital 1TB Black (WD1001FAEX) drives. I thought it would be interesting to see how the RAIDZ1 on spinning rust compared to the 840 Pro SSD… and was pretty surprised to see it completely stomping it, across the board. At least, that’s how it looks in these benchmarks. The benchmarks don’t tell the whole story, though, which we’ll cover in more detail later. For now, we just want to notice that yes, a relatively small and inexpensive RAIDZ1 array does surprisingly well compared to a top-of-the-line SSD – and that makes for some very interesting and affordable options, if you need to combine large amounts of data with high performance access.
Joker aside, the winner here is pretty obvious – qcow2 on xfs, writeback. Wait, xfs? Yep, xfs. I didn’t benchmark xfs as thoroughly as I did ext4 – never tried it layered on top of a zvol, in particular – but I did do an otherwise full set of xfs benchmarks. In general, xfs slightly outperforms ext4 across an identically shaped curve – enough of a difference notice on a graph, but not enough to write home about. The difference is just enough to punt ext4/writeback out of the top 5 – and even though we aren’t actually testing write performance here, it’s worth noting how much better xfs/writeback writes than the two bottom-of-the-barrel “top performers” do.
I keep harping on this, but seriously, look close at those two writethrough entries – it’s not as bad as writethrough-on-ZFS-qcow2, but it’s still way worse than any of the other contenders, with 4KB writes under 2MB/sec. That’s single-raw-spinning-disk territory, at best. Writethrough does give you great read performance, and it’s “safe” as in data integrity, but it’s dangerous as hell in terms of suddenly underperforming under really badly under heavy load. That’s not just “I see a valley on the graph” levels of bad, it’s very potentially “hey IT guy, why did the server lock up?” levels of bad. I do not recommend writethrough caching, “default” option or not.
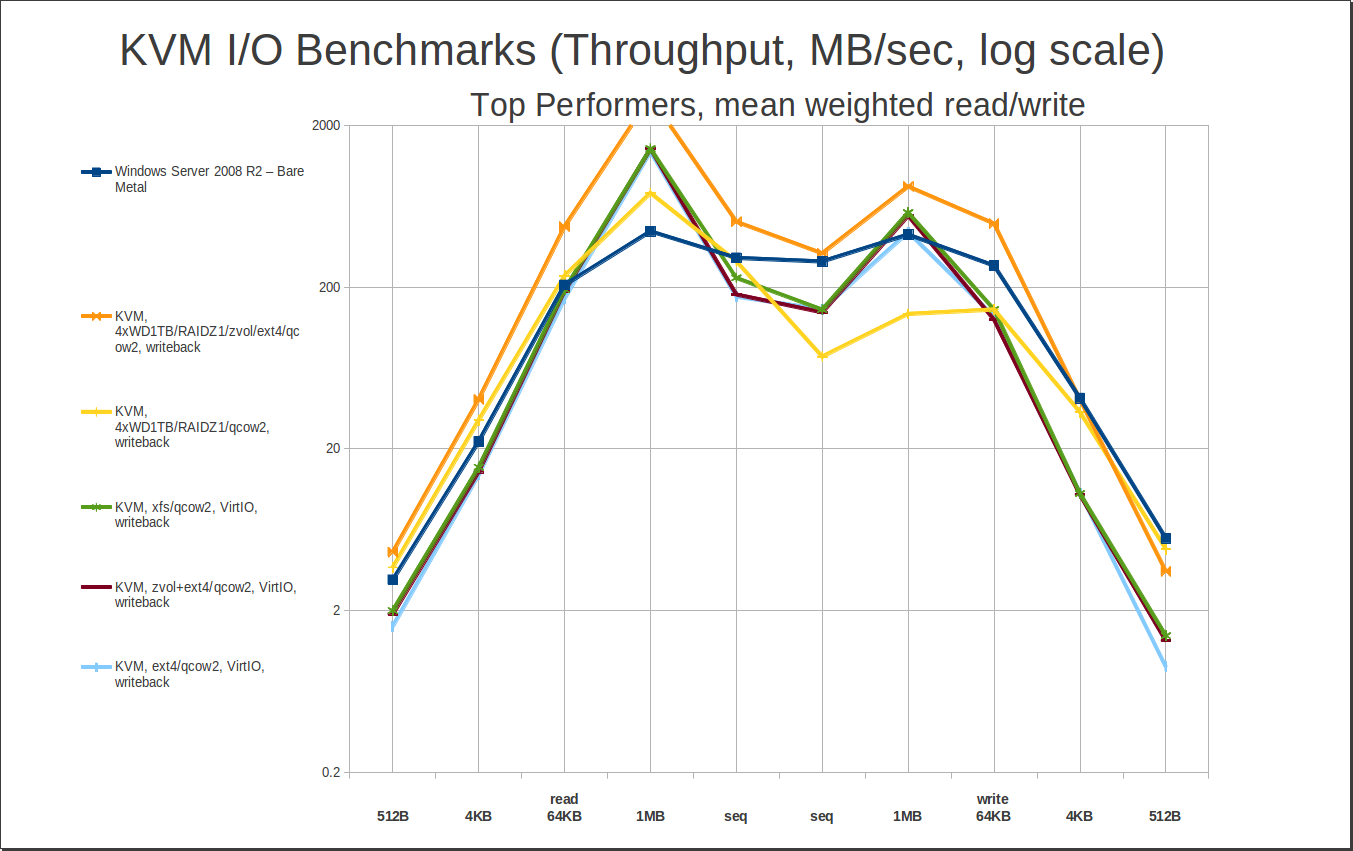
How ’bout write performance? I calculated “weighted write” just like “weighted read” – divide the bare metal sequential write speed by the bare metal 4KB write speed, then apply the resulting factor to all the 4KB random writes, and average them with the sequential writes. Here are the top 5 weighted write performers:
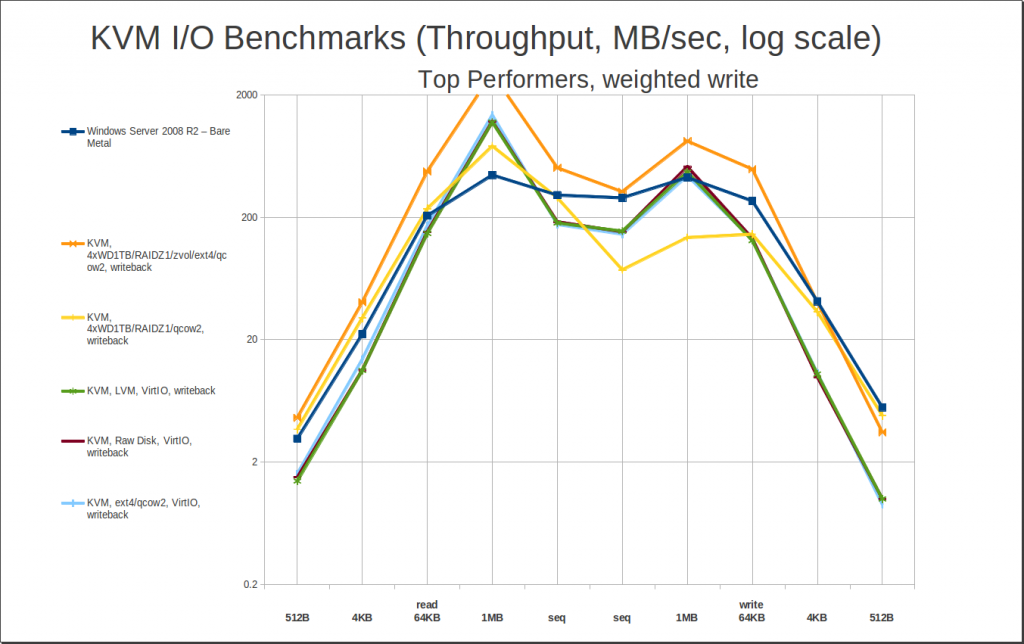
The first thing to notice here is that while the top 5 slots have changed, the peak read numbers really haven’t. All we’ve really done here is kick the writethrough entries to the curb – we haven’t paid any significant penalty in read performance to do so. Realizing that, let’s not waste too much time talking about this one… instead, let’s cut straight to the “money graph” – our top performers in average mean weighted read and write performance. The following are, plain and simple, the best performers for any general purpose (and most fairly specialized) use cases:
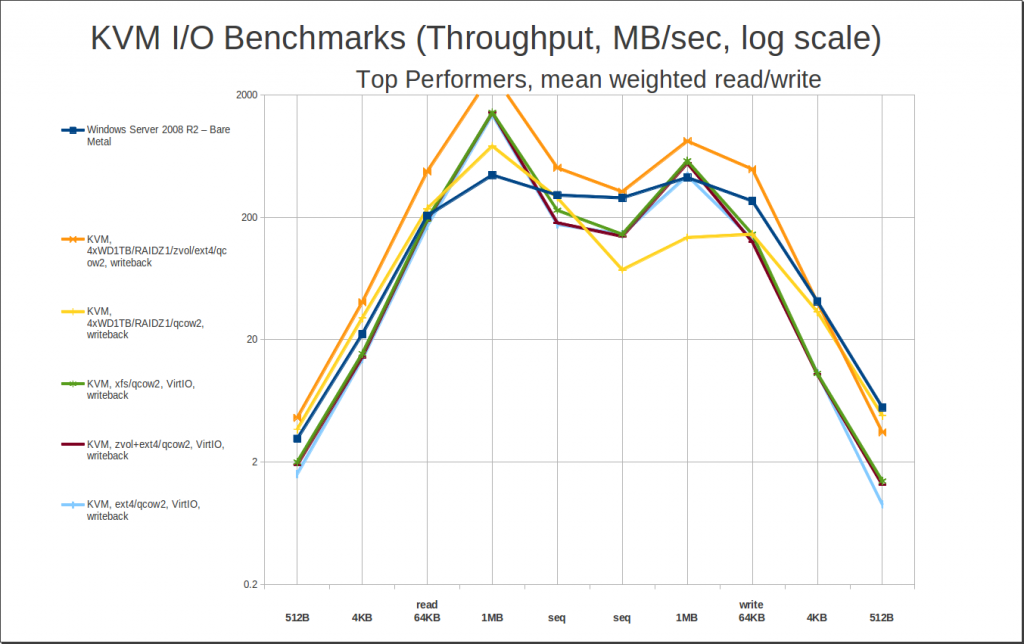
Interestingly, our “jokers” – zvol/ext4/qcow2/writeback and zfs/qcow2/writeback on my workstation’s relatively humble 4-drive RAIDZ1 – are still dominating the pack, at #1 and #2 respectively. This is because they read as well as any of the heavy lifters do, and are showing significantly better write performance – with caveats, which we’ll cover in the conclusions.
Jokers aside, xfs/qcow2/writeback is next, followed by zvol/ext4/qcow2/writeback. You aren’t seeing any cache=none at all here – the gains some cache=none contenders make in very tiny writes just don’t offset the penalties paid in reads and in larger writes from foregoing the cache. If you have a very heavily teeny-tiny-write-loaded workload – like a super-heavy-traffic database – cache=none may still perform better… but you probably don’t want virtualization for a really heavy database workload in the first place, KVM or otherwise. If you hammer your disks, rust or solid state, to within an inch of their lives… you’re really going to feel that raw performance penalty.
Conclusions
In the end, the recommendation is pretty clear – a ZFS zvol with ext4, qcow2 files, and writeback caching offers you the absolute best performance. (Using xfs on a zvol would almost certainly perform as well, or even better, but I didn’t test that exact combination here.) Best read performance, best write performance, qcow2 management features, ZFS snapshots / replication / data integrity / optional compression / optional deduplication / etc – there really aren’t any drawbacks here… other than the complexity of the setup itself. In the real world, I use simple .qcow2 on ZFS, no zvols required. The difference in performance between the two was measurable on graphs, but it’s not significant enough to make me want to actually maintain the added complexity.
If you can’t or won’t use ZFS for whatever reason (like licensing concerns), xfs is probably your next best bet – but if that scares you, just use ext4 – the difference won’t be enough to matter much in the long run.
There’s really no reason to mess around with raw disks or raw files – they add significant extra hassle, remove significant features, and don’t offer tangible performance benefits.
If you’re going to use writeback caching, you should be extra certain of power integrity – UPS on the server with apcupsd. If you’re at all uncertain of your power integrity… take the read performance hit and go with nocache. (On the other hand, if you’re using ZFS and taking rolling hourly snapshots… maybe it’s worth taking more risks for the extra performance. Ultimately, you’re the admin, you get to call the shots.)
Caveats
It’s very important to note that these benchmarks do not tell the whole story about disk performance under KVM. In particular, both the random and sequential reads used here bypass the cache considerably more heavily than most general purpose workloads would… minimizing the impact that the cache has. And yes, it is significant. See those > 1GB/sec peaks in the random read performance? That kind of thing happens a lot more in a normal workload than it does in a random walk – particularly with ZFS storage, which uses the ARC (Adaptive Replacement Cache) rather than the simple FIFO cache used by other systems. The ARC makes decisions about cache eviction based not only on the time since an object was last seen, but the frequency at which it’s seen, among other things – with the result that it kicks serious butt, especially after a good amount of time to warm up and learn the behavior patterns of the system.
So, please take these numbers with a grain of salt. They’re quite accurate for what they are, but they’re synthetic benchmarks, not a real-world experience. Windows on KVM is actually a much (much) better experience than the raw numbers here would have you believe – the importance of better-managed cache, and persistent cache, really can’t be over-emphasized.
The actual guest OS installation for these tests was on a single spinning disk, but it used ZFS/qcow2/writeback for the underlying storage. I needed to reboot the guest after every single row of data – and in many cases, several times more, because I screwed something or another up. In the end, I rebooted that Windows Server 2008 R2 guest upwards of 50 times. And on a single spinning disk, shutdowns took about 4 seconds and boot times (from BIOS to desktop) took about 3 seconds. You don’t get that kind of performance out of the bare metal, and you can’t see it in these graphs, either. For most general-purpose workloads, these graphs are closer to being a “worst-place scenario” than are a direct model.
That sword cuts both ways, though – the “jokers in the deck”, my RAIDZ1 of spinning rust, isn’t really quite as impressive as it looks above. I’m spitballing here, but I think a lot of the difference is that ZFS is willing to more aggressively cache writes with a RAIDZ array than it is with a single member, probably because it expects that more spindles == faster writes, and it only wants to keep so many writes in cache before it flushes them. That’s a guess, and only a guess, but the reality is that after those jaw-dropping 1.9GB/sec 1MB random write runs, I could hear the spindles chattering for a significant chunk of time, getting all those writes committed to the rust. That also means that if I’d had the patience for bigger write runs than 5GB, I’d have seen performance dropping significantly. So you really shouldn’t think “hey, forget SSDs completely, spinning rust is fine for everybody!” It’s not. It is, however, a surprisingly good competitor on the cheap if you buy enough of it, and if your write runs come in bursts – even “bursts” ranging in the gigabytes.