Please STOP trusting email.

It is now Anno Domini 2025, and for some reason, people keep trusting email. That needs to stop. Let’s talk about why–but first, let’s talk about why I’m telling you this now.

All things happen in cycles, including grifting. And folks, we are at an absolute peak of griftitude right now, similar to the days of snake oil peddlers traveling town to town and selling bottled garbage from the back of a wagon.

One type of fraud that’s peaking right now is payroll/escrow fraud, and it depends very much on people trusting email for things they shouldn’t. It’s an easy grift with a decent success rate and potentially massive payoffs.

Anatomy of an email-based grift

First, you discover an existing payer/payee relationship. This is usually public information and not all that hard to figure out. For example, you might discover that Architect A won a public bid for a construction project. That project will usually have publicly disclosed target dates for completion of various stages as well as the project as a whole–if a stage is nearing completion, this is a potential target, so you do a little more research.

Next, you discover that Architect A is using electrical vendor B to handle the lighting. Typically, the architectural firm gets paid first, and subs out the rest of the contractors. So now, you want to figure out who the accounts payable and receivable folks are at both A and B–again, usually publicly accessible information, not hard to figure out.

Now, you’d like to actually compromise somebody at either A or B, and both if possible. If you can manage it, your odds get a lot better, and you might be able to figure out a way to score bigger and possibly multiple payoffs. But it’s not strictly necessary. Let’s say you were not able to get into the actual email of anybody at either firm–you’re still in the ball game, no worries.

Next step, you know that the lighting for the project is done, and you know who accounts receivable at electrical engineer B is, and who the accounts payable at architect A is. So, you spoof some email from B to A. First, you say that B’s banking information has changed–and you “correct” it to a short-lived account you’re using for the grift.

If you timed it right–and if the accounts payable person at A is a useful idiot–the payment for engineering firm B winds up in your own account, and you immediately move the funds out of that account to someplace offshore and crime-friendly. If it takes more than 48 hours for A and/or B to figure out the money went to the wrong place, you’re home free–they can’t get the funds back, once they’ve moved offshore.

This doesn’t need to be an architect and an engineering sub–another common example is real estate firms and closing attorneys. Real estate sales are also publicly posted data, and you can impersonate a real estate firm and ask the closing attorney to wire the escrow (money put down prior to a purchase completing) to a different bank account. It’s the same grift, with the same potentially enormous one-time payout.

The same technique works for payroll

For construction projects, this can be a single score worth potentially millions of dollars. But what if you got some intel on a business that isn’t a construction, architectural, or real estate related business?

No problem–you’ll need to downshift and look for a smaller payout, but payroll fraud works the same way and requires even less research.

All you need for this one is to know who handles the payroll for a business, and who grants bonuses in a business. Now you impersonate the person authorized to grant bonuses, email the payroll person, and authorize a bonus–usually between $3,000 and $10,000–to one or more employees.

Since you already impersonated those employees and changed their ACH target the day before, those several-thousand dollar “bonuses” go to you, not the employees… who weren’t expecting a bonus, and therefore don’t get alerted by it not showing up.

Generally speaking, you target this one in between paydays, because an individual employee who doesn’t get a paycheck they’re expecting will ring the alarm fast.

Impersonation is incredibly easy

It’s tempting to think this is super high tech information security stuff, but it’s anything but–because email was never designed as a secure protocol in the first place.

Let’s look at physical, postal mail first. What happens if you write “President of the United States of America, 1600 Pennsylvania Ave, Washington DC 20500” in the upper left corner of the envelope?

Your letter gets delivered, is what happens. The postal office does not attempt to verify the “return address” in any way whatsoever–it’s not a form of authentication. It’s on you to realize that this dinky little envelope with a kitten stamp and a postmark from Slapout, AL did not actually originate in the Oval Office.

Email works the same way! Anybody can write anything they like in the FROM: section of an email. It is not validated, in any way, period. If you blindly trust an email based on the FROM: you are making the same mistake as somebody who blindly trusts a postal letter based on what’s scrawled in the upper left corner of the envelope.

Infiltration isn’t that much harder

So far, we’ve talked about how grifters can separate fools from thousands or millions of dollars with nothing but publicly available information–and that is, by far, the most common form of grift in my experience as a very senior IT person.

An advanced attacker might aim a little further north, though, and try to genuinely compromise a target’s email account. If the attacker can gain control of a target’s email account, the attacker can now gain access to private information which makes that crucial attack scheduling far more accurate.

In our first example, we were banking that electrical firm B will have completed the lighting phase of the project on the stated date when the building plans were first announced. If that date slipped badly–or, wonder of wonders, the firm finished early–the critical email to change the ACH target might arrive too early (and be discovered) or too late (and the payment was already made).

But if the attacker can actually compromise the accounts receivable person–or a C-level–at electrical firm B, the attacker can just monitor that email and wait to act until the exact right time. The attempt is also more likely to succeed because even a paranoid IT expert can verify that the email came from the legitimate account of the target–but the improvement in timing the attack is frankly far more important than the improvement in “legitimacy” of the attack itself.

How can I verify that an email is legitimate?

If you’re expecting a bunch of highly technical stuff about email headers, I’m going to disappoint you–because the correct answer is “you can’t.”

Yes, a sufficiently cautious and well-informed person can first force their mail client to display the normally-hidden message headers, then verify each step the message has taken across the internet. (This is the electronic version of reading all the postmarks on a physical envelope.)

However, the vast majority of targets are neither sufficiently cautious nor sufficiently well-informed, nor will they ever be. And more importantly, while this sort of sleuthery might be accurate enough to tell you whether a message came from a particular server, it can’t tell you anything about whether the message originated with the human it should have.

So the real answer here is, when money is on the line, don’t trust email. If you get an email asking you to move a significant amount of money, or to give someone access to an account (banking, telephone, online gaming, email, or anything else) you’d be upset at losing control over, don’t do it–instead, call that person, ask to speak to an actual human, and verify the legitimacy of the request.

And, this is important… don’t use the contents of the email to contact that person or organization. If you don’t already know their phone number, website address, etc–close the email, look the contact information up from scratch, then contact them that way to inquire about the validity of the message you received.

How do I protect myself from being scammed?

We’ve already covered “you shouldn’t trust email,” so we won’t belabor that point… but we will now point out that you need to make sure that the other people you associate with aren’t trusting “your” emails either.

If you’re responsible for the movement of significant amounts of money on a regular basis, check the policies of the people and the firms who you expect to pay or to be paid. Make sure they know–preferably, in writing–that you will not act on unverified email instructions, and that you will not issue unverified email instructions either.

This is important, because an entity that screws up and sends your money somewhere else based on an email “from” you will frequently try to make it your problem. As far as they’re concerned, they sent that $10,000 somewhere, so they “paid” and if you didn’t get it, well “that’s on you.”

You might be thinking “well, that’s obviously stupid.” Sure, sometimes it’s obviously stupid. Other times, it’s obviously dishonest. Either way, if you don’t have a written policy statement on file that you will not be held responsible for actions taken on unverified email, you might be left on the hook–and court actions will typically cost more than the amount of money in play, so you don’t want to rely on litigation as a solution here.


Rustdesk Server on Ubuntu 22.04

As usual, I’m self-documenting a project while I work on it. Rustdesk is an open source remote control utility that caught my eye about a year ago; it’s cross platform and allows you to self-host your own “relay server” so that you can connect securely from one machine on a private network to a machine on a different private network without needing to faff about with port forwarding or similar nonsense.

Most of the docs seem focused around running it as a Docker instance, which I didn’t particularly want to do. They also weren’t clear AT ALL about where important files live, how they’re run, etc.

First up: you’ll need to install THREE separate .deb files. Go to the rustdesk-server releases page here and download the rustdesk-server-hbbr, rustdesk-server-hbbs, and rustdeskserver-utils packages for your architecture, then dpkg -i each of the three.

This should be sufficient to get the services up and running–you can check with systemctl status rustdesk-hbbr and systemctl status rustdesk-hbbs. Once each service is running, the next step is finding your new Rustdesk server’s public key–which isn’t created until after the first time hbbs runs.

If you just installed everything normally from the .deb, you’ll find that key at /var/lib/rustdesk-server/id_ed25519.pub. Now, download and install the Rustdesk client onto another machine. Fire up the client, and get to configuring.

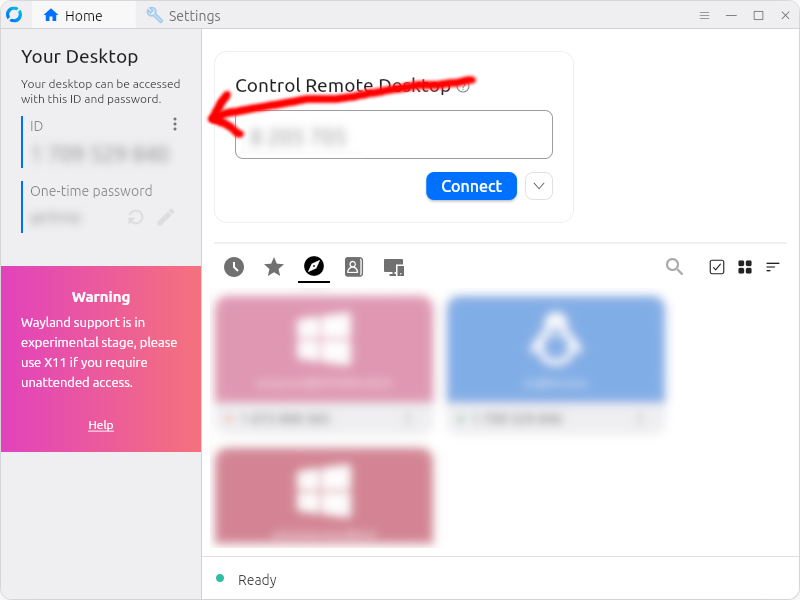
rustdesk client home screen
First, click the three-dot menu next to your ID, in the upper left corner of the client.


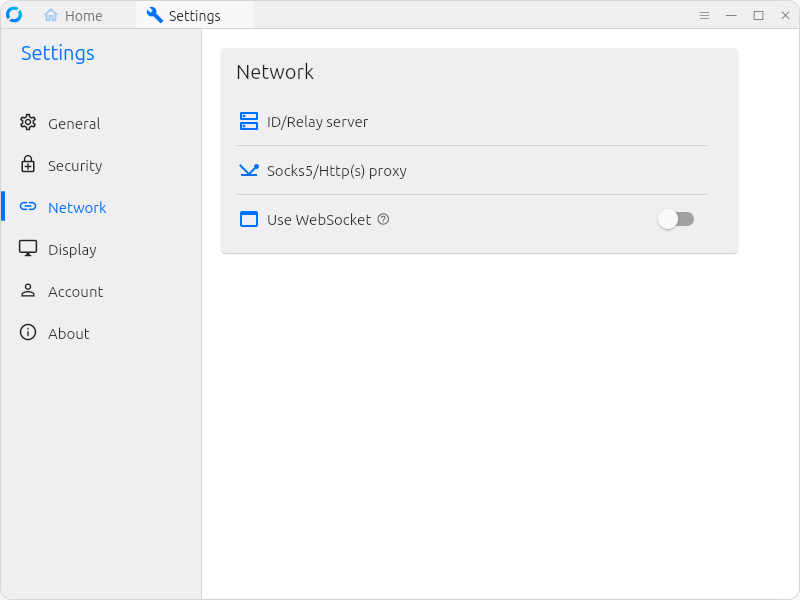
Rustdesk client network settings
Next, from the general Rustdesk client Settings page, click Network.


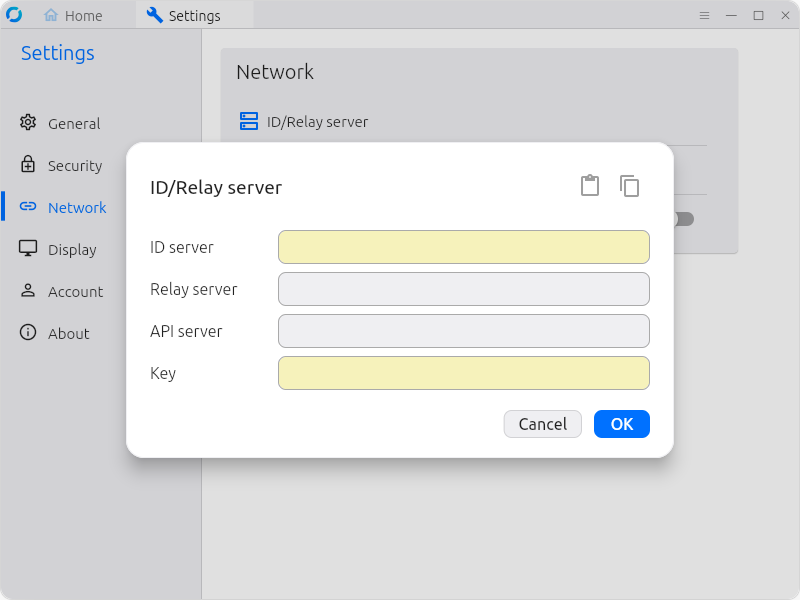
Rustdesk client ID/Relay server config
You should only need to fill in the highlighted two fields here: ID server and Key. Unless you’ve got a very non-standard config, Rustdesk figures Relay and API servers out for itself.

Once you’ve configured your first client to use your new relay server, you’ll want to click the copy icon on the upper right hand corner–this copies a string of apparent garbage to your clipboard; this garbage can later be imported into other Rustdesk clients.

To import your new configuration on other client systems later, just get that string of apparent garbage text into the system clipboard on the remote machine, then click the clipboard Paste icon just next to the Copy icon on the upper right. This will actually populate all fields of the ID/Relay server dialog on the new client just as they were configured on the old client. Tip: this probably isn’t particularly sensitive information, so you might consider saving it as a text file on an easy-to-access webserver somewhere. 

At this point, you’re ready to rock. Once you’ve got the client software installed on any two machines and configured them to use your new relay server, you may connect to any of the machines thus configured, using the Rustdesk password you individually configure on each of those clients.

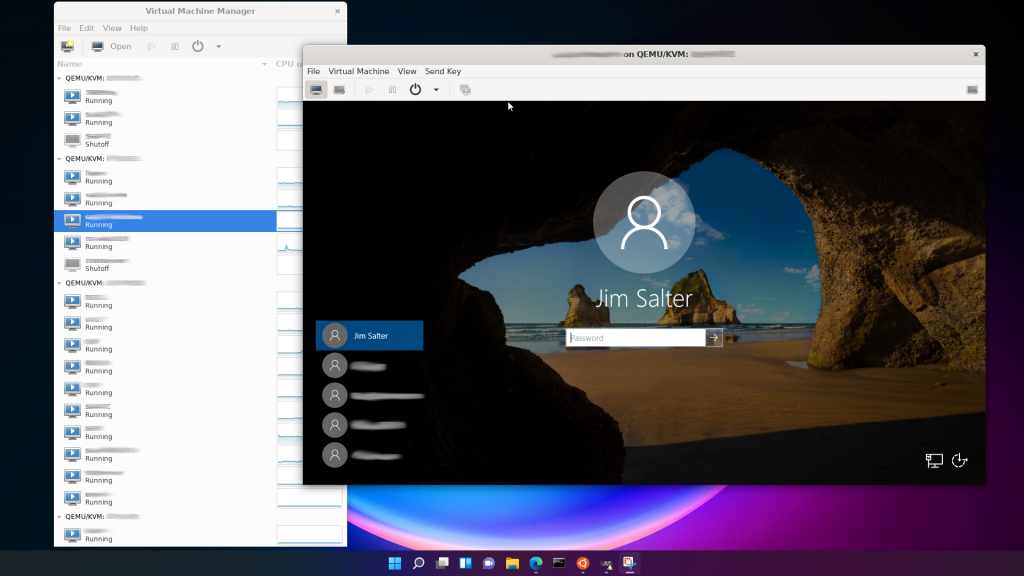
This is extremely early days for me–I literally just finished setting this up as a proof-of-concept earlier this morning–but so far, it looks pretty slick; I’m experiencing considerably lower latency with Rustdesk piped through a relay server in Atlanta, GA than I am with direct Spice connection to the same system via virt-manager and KVM!


Salter’s Screwdriver Theory of Latency

We’ve all noticed that software never seems to get any faster no matter how much faster the hardware gets. This easily-observable fact is usually explained in one of two ways:

  • Software devs are lazy, and refuse to optimize more than they absolutely must
  • Software devs are ambitious, and use all available CPU cycles / IOPS to do as much as possible–so more cycles/IOPS available == more detailed work delivered

These things are both true, but they aren’t the root cause of the issue–they’re simply how the issue tends to be addressed and/or to expose itself.

The real reason software never gets (visibly) faster unless you install much older operating systems and applications on much newer hardware is because typically, humans aren’t comfortable with “machine-speed” interfaces.

For as long as I’ve been alive, a typical discrete human-visible task performed by a computer–opening an application, saving a file, loading a web page–has tended to take roughly 1,500ms on a typical to slow PC, or 500ms on a fast PC.

1,500ms is about the length of time it takes to say “hey, pass me that screwdriver, would you?” and have a reasonably attentive buddy pass you the screwdriver. 500ms is about the length of time it takes to say “Scalpel,” and have a reasonably attentive, professional surgical assistant slap the scalpel in your hand.

If you’re still on the fence about this, consider “transitions.” When a simple, discrete task like opening an application gets much faster than 500ms despite some devs being lazy and other devs being ambitious… that’s when the visual transitions start to appear.

On macOS, when you open applications or switch focus to them, they “stream” from the lower right-hand corner of the screen up to the upper-left corner of where the window will actually be, and expand out from there into the lower-right until the app is full sized. Windows expands windows upward from the taskbar. Even Linux distributions intended for end-users employ graphical transitions which slow things down. Why?

Because “instantaneous” response is unsettling for most humans, whether they directly understand and can articulate that fact or not.

To be fair, I have seen this general idea–that humans aren’t comfortable with low task latency–occasionally floated around over the decades. But the part I haven’t seen is the direct comparison with the typical task latency a human assistant would provide, and I think that’s a pretty illustrative and convincing point.

If you like this theory and find it useful, feel free to just refer to it as “Screwdriver Theory”–but I wouldn’t be upset if you linked to this page to explain it. =)

Windows, KVM, and time zones

If you’re running Windows VMs beneath a Linux KVM host, you’ve very likely been plagued by an annoying issue: they start up with the wrong time by several hours, every time they’re rebooted, no matter what you do.

The issue is that Windows syncs its time with the local hardware clock, and in KVM’s case, it generally provides VMs with a “hardware” clock set to UTC regardless of what the real hardware clock’s time zone is set to.

Here’s the fix: on your Windows VM, create a new text file called UTCtime.reg, and populate it with the following:

Windows Registry Editor Version 5.00

[HKEY_LOCAL_MACHINE\SYSTEM\CurrentControlSet\Control\TimeZoneInformation]
"RealTimeIsUniversal"=dword:00000001

Now you can just double-click the patch file to import it into the VM’s registry, then reboot the VM. When it comes back up, it’ll come back up with the correct time (assuming your hardware clock is set to the correct time, of course).

IDK about y’all, but this one had been pissing me off for years; it’s nice to finally have a fix for it!

Adventures in network repair

Recently, I acquired a new client with a massive load of technical debt (in other words: a new client). The facility internet connection appeared to go down for an hour or two every day, typically in the mid-afternoon.

Complicating things tremendously, this new client had no insight into its own infrastructure: the former IT person had left them with no credentials or documentation for anything. So I was limited to completely unprivileged tools while troubleshooting.

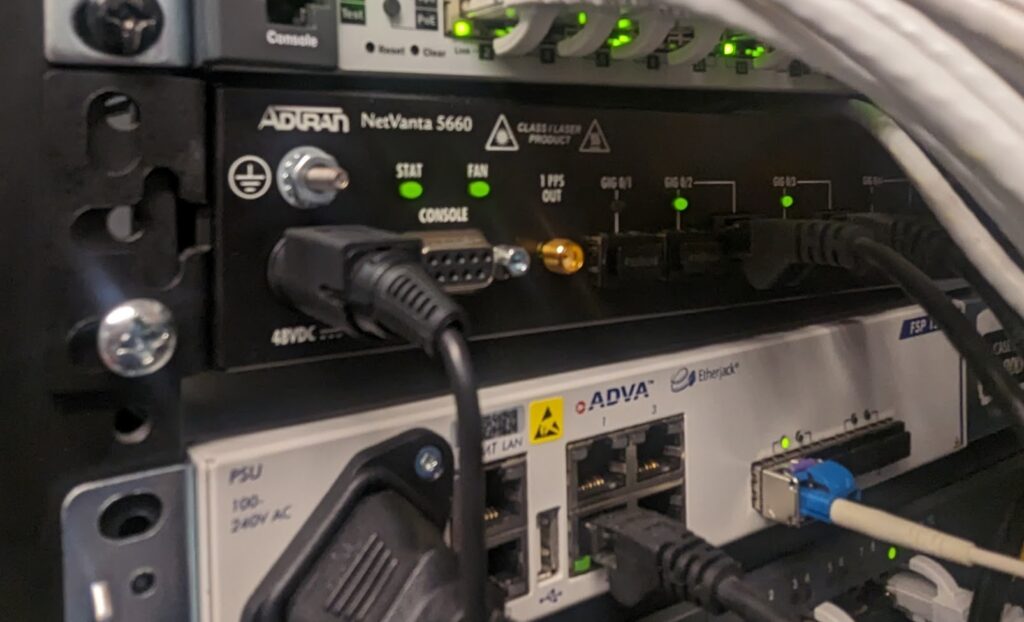
The first major thing I discovered was a somewhat deranged Adtran Netvanta router, as installed by the ISP. When I got a Linux laptop onto the network and issued a dhclient -v, I could see both that the Netvanta was acting as DHCP server, and that it was struggling badly.

My laptop DHCPDISCOVERed about twelve times before getting a DHCPOFFER from the Netvanta, to which it eagerly replied with a DHCPREQ for the offered address… which the Netvanta failed to respond to. My laptop DHCPREQ’d twice more, before giving up and moving back to DHCPDISCOVER. Eventually, the Netvanta DHCPOFFERed again, my laptop DHCPREQ’d, and this time on the third try, the punch-drunk Netvanta DHCPACK’d it, and it was on the network… after a solid two minutes of trying to get an IP address.

Alright, now I knew both that DHCP was coming from the ISP router, and that it was deranged. Why? And could I do anything about it?

The Netvanta was bolted into a wall-mounted half-cab directly touching its sibling Adva, so tightly together you couldn’t slide a playing card between the two. Both devices had functional active cooling, so this wasn’t necessarily a problem… but when I ran a bare finger along the rear face of the chassis, it was a lot warmer than I liked. So, I unbolted one side of it, and re-bolted it caddycorner with one side higher than the other, which gave some external airflow across the chassis.

Although now it looks like I’m an idiot who can’t line up boltholes, the triangles of airspace on the bottom left and top right of the Netvanta give it some convection space to shed heat from its metal chassis.

And to my great delight, when I got back to my commandeered office (the former IT guy’s personal dungeon), dhclient -v now completed in under 10ms, every time: DHCPDISCOVER–>DHCPOFFER–>DHCPREQ–>DHCPACK with no stumbles at all. As an added bonus, my exploratory internet speedtests went from 65Mbps to 400Mbps!

This made an enormous improvement in the facility’s network health, but there were still problems: the next day, my direct report got frustrated enough with the facility network to turn on a cell phone hotspot. Luckily, I’d already spotted another problem in the same rack:

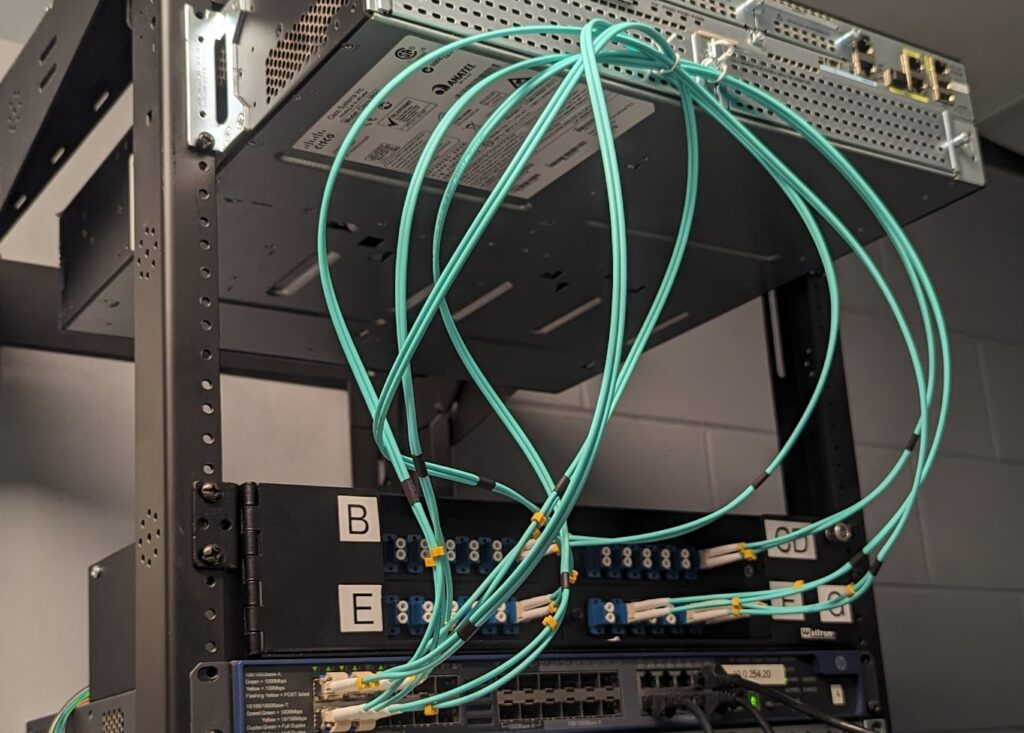
Whoever installed all this gear apparently didn’t realize there’s a minimum bend radius for fiberoptics: and for multi-mode fiber like you see above, that minimum bend radius is 30x the diameter of the jacketed pair. I didn’t try to break out a ruler, but that looked a lot more like 10x the jacket diameter than 30x to me, so off I went to grab a five-pack of LC to LC multi-mode patch cables.

Keeping to our theme of me looking like a drunken redneck while actually improving things technically, I used some mounting points on the face of an abandoned Cisco switch mounted several units higher in the cabinet as a centerpoint anchor for my new patch cables. Does it look stupid? Yes. Does it keep things out of the way without fracturing the glass on the inside of my optic cables? Also yes.

The performance difference here was harder to spot–especially since I needed to perform it on a weekend with the facility empty except for myself–but if you know what you’re looking for, it’s there. Prior to replacing the patch cables, an iperf3 run to one of my internet-based servers had a TCP congestion window of 3.00MiB:

me@swift:~$ iperf3 -c [redacted]
Connecting to host [redacted], port 5201
[ 5] local [redacted] port 39874 connected to [redacted] port 5201
[ ID] Interval Transfer Bitrate Retr Cwnd
[ 5] 0.00-1.00 sec 30.3 MBytes 254 Mbits/sec 0 3.00 MBytes
[ 5] 1.00-2.00 sec 48.8 MBytes 409 Mbits/sec 0 3.00 MBytes
[ 5] 2.00-3.00 sec 52.5 MBytes 440 Mbits/sec 0 3.00 MBytes
[ 5] 3.00-4.00 sec 52.5 MBytes 440 Mbits/sec 0 3.00 MBytes
[ 5] 4.00-5.00 sec 36.2 MBytes 304 Mbits/sec 0 3.00 MBytes
[ 5] 5.00-6.00 sec 38.8 MBytes 325 Mbits/sec 0 3.00 MBytes
[ 5] 6.00-7.00 sec 40.0 MBytes 335 Mbits/sec 0 3.00 MBytes
[ 5] 7.00-8.00 sec 47.5 MBytes 399 Mbits/sec 0 3.00 MBytes
[ 5] 8.00-9.00 sec 52.5 MBytes 440 Mbits/sec 0 3.00 MBytes
[ 5] 9.00-10.00 sec 53.8 MBytes 451 Mbits/sec 0 3.00 MBytes
– – – – – – – – – – – – – – – – – – – – – – – – –
[ ID] Interval Transfer Bitrate Retr
[ 5] 0.00-10.00 sec 453 MBytes 380 Mbits/sec 0 sender
[ 5] 0.00-10.05 sec 452 MBytes 377 Mbits/sec receiver

iperf Done.

After replacing the too-tightly-bent fiber patch cables, the raw speed didn’t increase much–but the TCP congestion window doubled to 6.00MiB. This is an excellent sign which–if you understand TCP congestion windowing algorithms–strongly implies a significant decrease in experienced latency.

jim@swift:~$ iperf3 -c [redacted]
Connecting to host [redacted], port 5201
[ 5] local [redacted] port 39882 connected to [redacted] port 5201
[ ID] Interval Transfer Bitrate Retr Cwnd
[ 5] 0.00-1.00 sec 29.1 MBytes 244 Mbits/sec 0 6.00 MBytes
[ 5] 1.00-2.00 sec 52.5 MBytes 440 Mbits/sec 0 6.00 MBytes
[ 5] 2.00-3.00 sec 52.5 MBytes 441 Mbits/sec 0 6.00 MBytes
[ 5] 3.00-4.00 sec 47.5 MBytes 398 Mbits/sec 0 6.00 MBytes
[ 5] 4.00-5.00 sec 52.5 MBytes 440 Mbits/sec 0 6.00 MBytes
[ 5] 5.00-6.00 sec 52.5 MBytes 441 Mbits/sec 0 6.00 MBytes
[ 5] 6.00-7.00 sec 52.5 MBytes 440 Mbits/sec 0 6.00 MBytes
[ 5] 7.00-8.00 sec 52.5 MBytes 440 Mbits/sec 0 6.00 MBytes
[ 5] 8.00-9.00 sec 53.8 MBytes 451 Mbits/sec 0 6.00 MBytes
[ 5] 9.00-10.00 sec 52.5 MBytes 440 Mbits/sec 0 6.00 MBytes
– – – – – – – – – – – – – – – – – – – – – – – – –
[ ID] Interval Transfer Bitrate Retr
[ 5] 0.00-10.00 sec 498 MBytes 418 Mbits/sec 0 sender
[ 5] 0.00-10.05 sec 498 MBytes 415 Mbits/sec receiver

iperf Done.

This apparent improvement in latency is confirmed with simpler web-based speedtests to fast.com, which showed an unloaded latency of 3ms and a loaded latency of 48-85ms prior to replacing the cables. After replacing them, fast.com consistently showed unloaded latency of 2ms… and loaded latency of <10ms.

Again, pay attention to the latency. In the “before” shot above, we see a maxed-out download throughput of 500Mbps, which is nice… and in fact, at first glance, you might mistakenly think this is a better result than the “after” we see below:

Oh no, you might think–download speed decreased from 500Mbps to 380Mbps! What did we do wrong? That’s the tricky part; we didn’t do anything wrong–something else on the network just siphoned off some of the available throughput while the test was running.

The important things to notice are, as mentioned, latency: it’s easy to dismiss the unloaded latency (meaning, how quickly pings return when the main bulk of the test isn’t running) decreasing from 3ms to 2ms. It’s only 1ms, after all… but it’s also a 33% improvement, and it held precisely consistent across many runs.

More conclusively, the loaded latency (time to return a ping when there’s lots of data moving) decreased by several hundred percent, and that result was also consistent across several runs.

There are almost certainly more gremlins to find and eliminate in this long-untended network, but we’re already in a much better position than we started from.

520 byte sectors and Ubuntu

I recently bought a server which came with Samsung PM1643 SSDs. Trying to install Ubuntu on them didn’t work at first try, because the drives had 520 byte sectors instead of 512 byte.

Luckily, there’s a fix–get the drive(s) to a WORKING Ubuntu system, plug them in, and use the sg_format utility to convert the sector size!

root@ubuntu:~# sg_format -v --format --size=512 /dev/sdwhatever

Yep, it’s really that easy. Be warned, this is a destructive, touch-every-sector operation–so it will take a while, and your drives might get a bit warm. The 3.84TB drives I needed to convert took around 10 minutes apiece.

On the plus side, this also fixes any drive slowdowns due to a lack of TRIM, since it’s a destructive sector-level format.

I’ve heard stories of drives that refused to sg_format initially; if you encounter stubborn drives, you might be able to unlock them by dding a gigabyte or so to them–or you might need to first sg_format them with --size=520, then immediately and I mean immediately again with --size=512.

WSL2, keychain, /etc/hosts and you

There unfortunately are still a few stumbling blocks toward getting a properly, fully-working virt-manager setup running under WSL2 on Windows 11.

apt install virt-manager just works, of course–but getting WSL2 to properly handle hostnames and SSH key passphrases takes a bit of tweaking.

First up, install a couple of additional packages:

apt install keychain ssh-askpass

The keychain package allows WSL2 to cache the passphrases for your SSH keys, and ssh-askpass allows virt-manager to bump requests up to you when necessary.

If you haven’t already done so, first generate yourself an SSH key and give it a passphrase:

me@my-win11:~# ssh-keygen
Generating public/private rsa key pair.
Enter file in which to save the key (~/.ssh/id_rsa):
Enter passphrase (empty for no passphrase):
Enter same passphrase again:
Your identification has been saved in ~/.ssh/id_rsa
Your public key has been saved in ~/.ssh/id_rsa.pub

You will also need to configure keychain itself, by adding the following to the end of your .bashrc:

# For Loading the SSH key
/usr/bin/keychain -q --nogui $HOME/.ssh/id_rsa
source $HOME/.keychain/$HOSTNAME-sh

Now, you’ll enter in your SSH key passphrase each time you open a WSL2 terminal, and it will remember it for SSH sessions opened via that terminal (or via apps opened from that terminal, eg if you type in virt-manager).

If you like to set hostnames in /etc/hosts to make your virt-manager connections look more reasonable, there’s one more step necessary. By default, for some reason WSL2 clobbers /etc/hosts each time it’s started.

You can defang this by creating /etc/wsl.conf and inserting this stanza:

[network]
generateHosts = false

Presto, you can now have a nice, secure, and well-working virt-manager under your Windows 11 WSL2 instance!

screenshot of virt-manager under WSLg
I also edited this screenshot with Ubuntu GiMP installed under WSL2 with apt install gimp. Because of course I did.

One final caveat: I do not recommend trying to create a shortcut in Windows to open virt-manager directly.

You can do that… but if you do, you’re liable to break things badly enough to require a Windows reboot. Windows 11 really doesn’t like launching WSL2 apps directly from a batch file, rather than from within a fully-launched WSL2 terminal!

When NOTHING else will remove a half-installed .deb package

WARNING: ALL WARRANTIES NULL AND VOID

With that important disclaimer out of the way… when you’re stuck in the world’s worst apt -f install loop and can’t figure out any other way to get the damn thing unwedged when there’s a half-installed package (eg if you’ve removed an /etc directory for a package you installed before, and this breaks an installer script—or the installer script “knows you already have it” and refuses to replace a removed config directory), this is the nuclear option:

sudo nano /var/lib/dpkg/status

Remove the offending package (and any packages that depend on it) entirely from this file, then apt install the offending package again.

If you’re still broken after that… did I mention all warranties null and void? This is an extremely nuclear option, and I really wouldn’t recommend it outside a throwaway test environment; you’re probably better off just nuking the whole server and reinstalling.

With that said, the next thing I had to do to clean out the remnants of the mysql/mariadb coinstall debacle that inspired this post was:

find / -iname “*mysql*” | grep -v php | grep -v snap | xargs rm -r

This got me out of a half-broken state on a machine that somebody had installed both mariadb-server and mysql-server on, leaving neither working properly.

When static routes on pfSense are ignored

I have this problem pretty frequently, and it always pisses me off: a pfSense router has a static route or two configured, and it works to ping through them in the router’s own Diagnostics … but they’re ignored entirely when requests come from machines on the LAN.

Here’s the fix.

First, as normal, you need to set up a Gateway pointing to the static route relay on the LAN. Then set up a static route through that new Gateway, if you haven’t already.

Now, you need to go to System–>Advanced–>Firewall & NAT. Look about halfway down the page, for a checkbox “Static route filtering” with flavor text “Bypass firewall rules for traffic on the same interface”. Check that. Scroll to the bottom, and click Save.

Once that’s done, if traceroutes from the LAN to the target network still go out through the WAN instead of through your local gateway… add a firewall rule to fix it.

Firewall –> Rules –> Floating

New rule at the TOP.

Action–> Pass
Quick–> CHECK THIS.
Interface–> LAN
Protocol–> Any
Source–> LAN net
Destination–>Network–> [ target subnet ]

Save your firewall rule, and apply it: within a few seconds, traceroutes from the LAN should start showing the new route.

Rebalancing data on ZFS mirrors

One of the questions that comes up time and time again about ZFS is “how can I migrate my data to a pool on a few of my disks, then add the rest of the disks afterward?”

If you just want to get the data moved and don’t care about balance, you can just copy the data over, then add the new disks and be done with it. But, it won’t be distributed evenly over the vdevs in your pool.

Don’t fret, though, it’s actually pretty easy to rebalance mirrors. In the following example, we’ll assume you’ve got four disks in a RAID array on an old machine, and two disks available to copy the data to in the short term.

Step one: create the new pool, copy data to it

First up, we create a simple temporary zpool with the two available disks.

zpool create temp -oashift=12 mirror /dev/disk/by-id/wwn-disk0 /dev/disk/by-id/disk1

Simple. Now you’ve got a ZFS mirror named temp, and you can start copying your data to it.

Step two: scrub the pool

Do not skip this step!

zpool scrub temp

Once this is done, do a zpool status temp to make sure you don’t have any errors. Assuming you don’t, you’re ready to proceed.

Step three: break the mirror, create a new pool

zpool detach temp /dev/disk/by-id/disk1

Now, your temp pool is down to one single disk vdev, and you’ve freed up one of its original disks. You’ve also got a known good copy of all your data on disk0, and you’ve verified it’s all good by using a zpool scrub command in step two. So, destroy the old machine’s storage, freeing up its four disks for use. 

zpool create tank /dev/disk/by-id/disk1 mirror /dev/disk/by-id/disk2 /dev/disk/by-id/disk3 mirror /dev/disk/by-id/disk4 /dev/disk/by-id/disk5

Now you’ve got your original temporary pool named temp, and a new permanent pool named tank. Pool “temp” is down to one single-disk vdev, and pool “tank” has one single-disk vdev, and two mirror vdevs.

Step four: copy your data from temp to tank

Copy all your data one more time, from the single-disk pool “temp” to the new pool “tank.” You can use zfs replication for this, or just plain old cp or rsync. Your choice.

Step five: scrub tank, destroy temp

Do not skip this step.

zpool scrub tank

Once this is done, do a zpool status tank to make sure you don’t have any errors. Assuming you don’t, now it’s time to destroy your temporary pool to free up its disk.

zpool destroy temp

Almost done!

Step six: attach the final disk from temp to the single-disk vdev in tank

zpool attach tank /dev/disk/by-id/disk0 /dev/disk/by-id/disk1

That’s it—you now have all of your data imported to a six-disk pool of mirrors, and all of the data is evenly distributed (according to disk size, at least) across all vdevs, not all clumped up on the first one to be added.

You can obviously adjust this formula for larger (or smaller!) pools, and it doesn’t necessarily require importing from an older machine—you can use this basic technique to redistribute data across an existing pool of mirrors, too, if you add a new mirror vdev. 

The important concept here is the idea of breaking mirror vdevs using zpool detach, and creating mirror vdevs from single-disk vdevs using zpool attach.